
Running a grocery store is hard enough with juggling inventory, managing deliveries, and keeping customers happy. Now, more and more customers are searching for better alternatives online, so you must have a user-friendly website to keep up with demand.
But where do you start? Should you build it yourself or hire a developer? What features do you really need? And how do you keep costs under control without damaging quality?
Fortunately for you, we’ve answered all of these and more in this blog. So, read on to learn how to design online grocery store website and bring in sales effortlessly.
What to Consider When Designing an Online Grocery Store
Designing an online grocery store means you need to have a clear idea of what your customers need to have a satisfying shopping experience.
While the right platform can speed this along, there are a few key things you need to handle before you invest in a platform.
CMS vs Custom-built/Hardcoded Websites
The first decision you’ll face when building an online grocery store is whether to use a CMS like WordPress or a hardcoded (custom-built) website.
While hardcoded sites give you total control, a CMS is almost always the better choice for growing businesses because of its pre-built themes/plugins, flexibility, and low upfront costs.
On the other hand, custom-built websites require extensive coding knowledge, or you have to hire a developer. It can also take months to build a custom website that fits your unique vision.
Hosting and Infrastructure
For online grocery websites, hosting is crucial to how well your store works. This is because grocery stores have to deal with real-time inventory updates, high traffic during peak hours, and time-sensitive deliveries.
For CMS platforms, you will need a managed hosting service. This type of hosting handles security, backups, and performance for you (it also has a one-click WordPress install). Examples include HostArmada, Kinsta, and Hostinger.
Necessary Costs
If you’re working with open-source platforms like WordPress, budgeting is essential to avoid any last-minute surprises.
| Expense | Low-cost | Mid-range | High-range |
| Hosting | $5-20/month | $50-200/month | $300+/month |
| Platform | Free (EasyCommerce) | $29–299/month (Shopify) | Custom ($10k+) |
| Payment Gateways Fees | 2.9% + $0.30/transaction (Stripe) | Volume discounts available | |
| Delivery Tools | $50-100/month (plugins) | Built-in (dedicated platforms) |
Necessary expenses aside, hidden costs include:
- Plugins/themes: One-time or subscription fees.
- Developer fees: If customizing beyond templates.
Grocery Store Design Checklist
A well-designed grocery store is all about making the shopping experience quick, intuitive, and frustration-free. Below, we will explain what to prioritize when you design online grocery store website.
Clear and Easy Navigation
Start by organizing your products into logical categories like dairy, produce, and pantry staples, and include a prominent search bar so shoppers can easily find specific items.
Make sure your homepage highlights popular products and current promotions to guide customers towards purchases.
High-quality Product Information
Your products must be presented using high-quality, consistent product images that show items from multiple angles when possible. You also need to add detailed descriptions with essential information like weight, ingredients, expiration dates, and recommendations for storage.
This information is especially important for groceries since customers can’t physically inspect the items.
Easy Checkout Experience
The checkout process should be as frictionless as possible. Add features like saved payment methods and address auto-fill to speed up orders for repeat customers.
Make sure to display all delivery and pickup options with minimum order requirements and associated costs (e.g., delivery charges) before customers reach the final checkout step.
Trust-building Features
If you’ve just launched your online grocery store, you need to make sure your customers have confidence in your business.
You can do this by displaying secure payment badges (SSL, PCI compliance), real-time stock indicators (Only 3 left in stock), and product reviews (especially for perishable items).
Delivery and Support
You can also build trust by making sure customers can easily find your contact information and policies about returns and delivery times.
Remember to include a live chat or visible contact page for urgent issues. Fortunately, you can use EasyCommerce Addons to include any of these features that aren’t already built-in.
Learn more about how to start an online grocery store from here.
Why EasyCommerce?

As a beginner in online grocery website design, WordPress can be your holy grail. It’s surprisingly easy to set up, highly customizable, cheap, and reliable. While the CMS itself is one of the most popular of its kind (with a market share of 62.7%), the ecommerce plugin you use with it makes all the difference.
EasyCommerce is a simple yet intuitive plugin to help you build an ecommerce store with your existing WordPress website. It has a fast and easy-to-manage interface with all the necessary features built in.
You can also offer multiple popular payment gateways (PayPal, Stripe, Square, etc.) at checkout, include grocery-specific features to your store, and automate marketing efforts with their dedicated addons.
Below, we’ll show you how to design an online grocery website effortlessly with EasyCommerce.
Design Online Grocery Store Website with EasyCommerce – A Step-by-Step Guide
WordPress has made website creation accessible to nearly everyone, thanks to its user-friendly interface and customizability. This explains why WordPress powers over 36% of the world’s top million websites.
To build your website with EasyCommerce, you will first need a WordPress website. Here’s a brief checklist to build your site –
- Get a reliable hosting provider. Preferably, one that has SSL certificates, 24/7 support, and a one-click WordPress install.
- Register for a domain name that’s unique to your grocery store and easy to remember. Use websites like Hostinger, NameCheap, or GoDaddy to register for cheap.
Now, simply log in to your Hosting account, locate the WordPress Installer, enter your domain, and click Install WordPress.
How to Set Up EasyCommerce
Once installed, log in to your WordPress Dashboard (yourdomain.com/wp-admin). Follow to steps below to make an online grocery store website design on EasyCommerce.
Step 1: Install and Activate EasyCommerce
- Log in to your WordPress website.
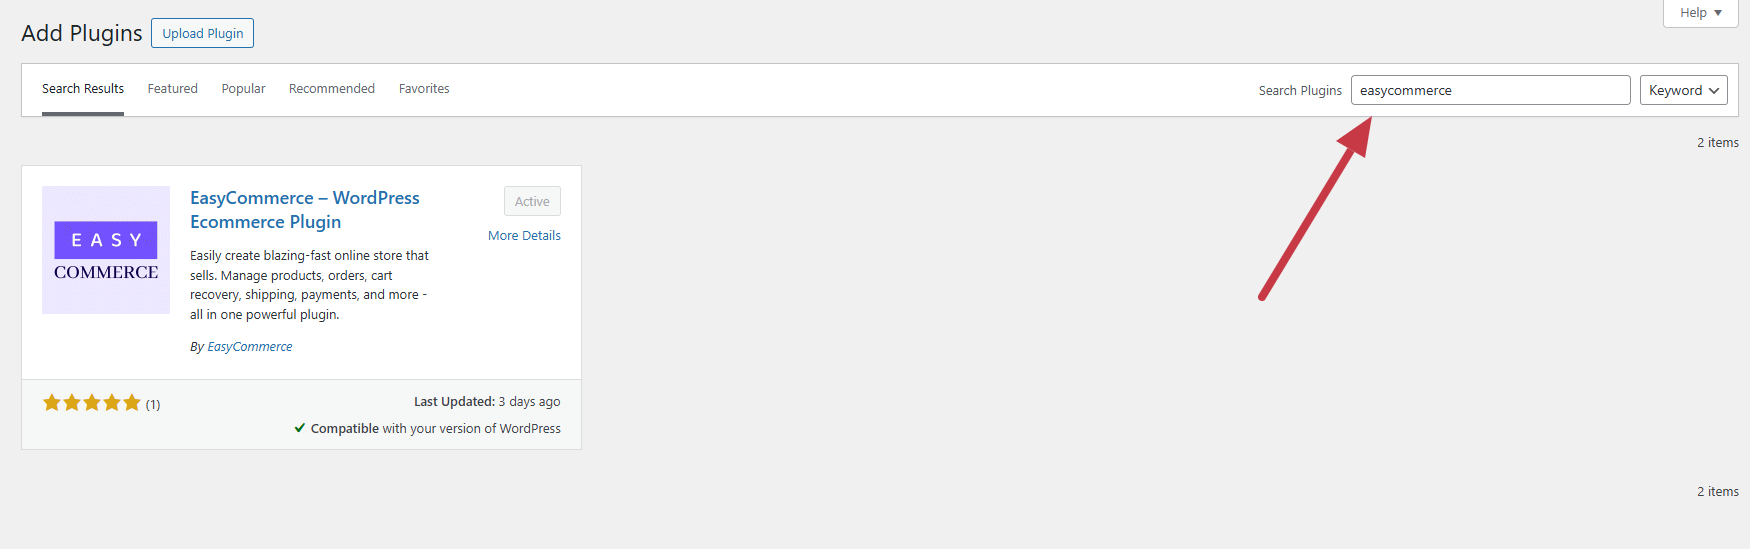
- Navigate to Plugins > Add New Plugin.

- Search for EasyCommerce in the plugin directory.
- Click Install Now and then Activate.
Step 2: Run EasyCommerce Setup Wizard
Go to Plugins > Installed Plugins and click the Setup Wizard button under EasyCommerce.
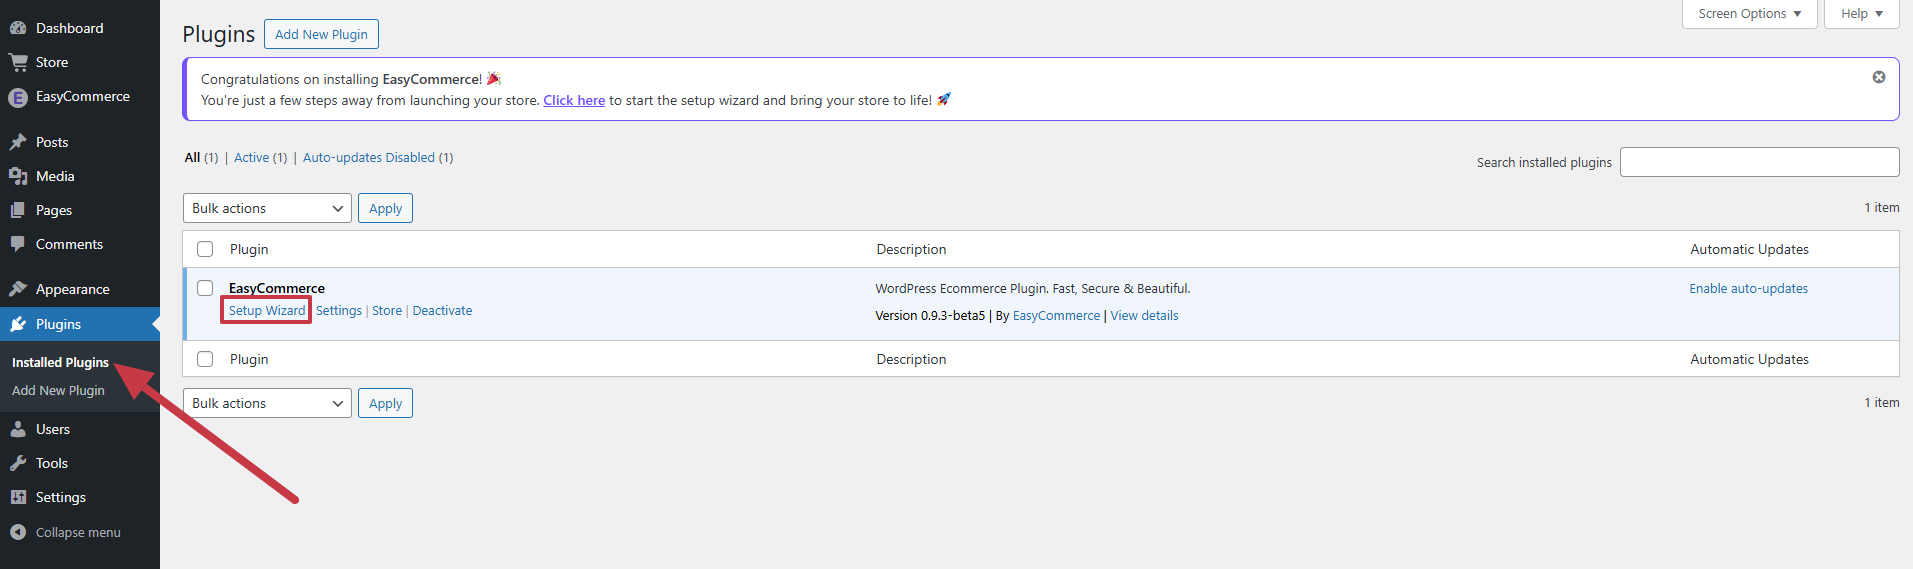
There are three pages of the setup wizard: Brand, Store, and Account.
- Brand: You can set up your store’s name, logo, and product type from here.
- Store: Determine currency, payment methods, and essential pages from this page. If you select Create New Page, EasyCommerce will make a new page with its specific shortcodes.
- Account: Enter your name, email, and provide the API key you received in your email to connect your store to the EasyCommerce system.
Note: We recommend using Astra for your store theme as it is highly lightweight, customizable, and perfect for an ecommerce store.
How to Add Products to Your Store with EasyCommerce
Now that the essentials of your store are set up. Here’s how to add items quickly using EasyCommerce:
Step 1: Access the Products Section
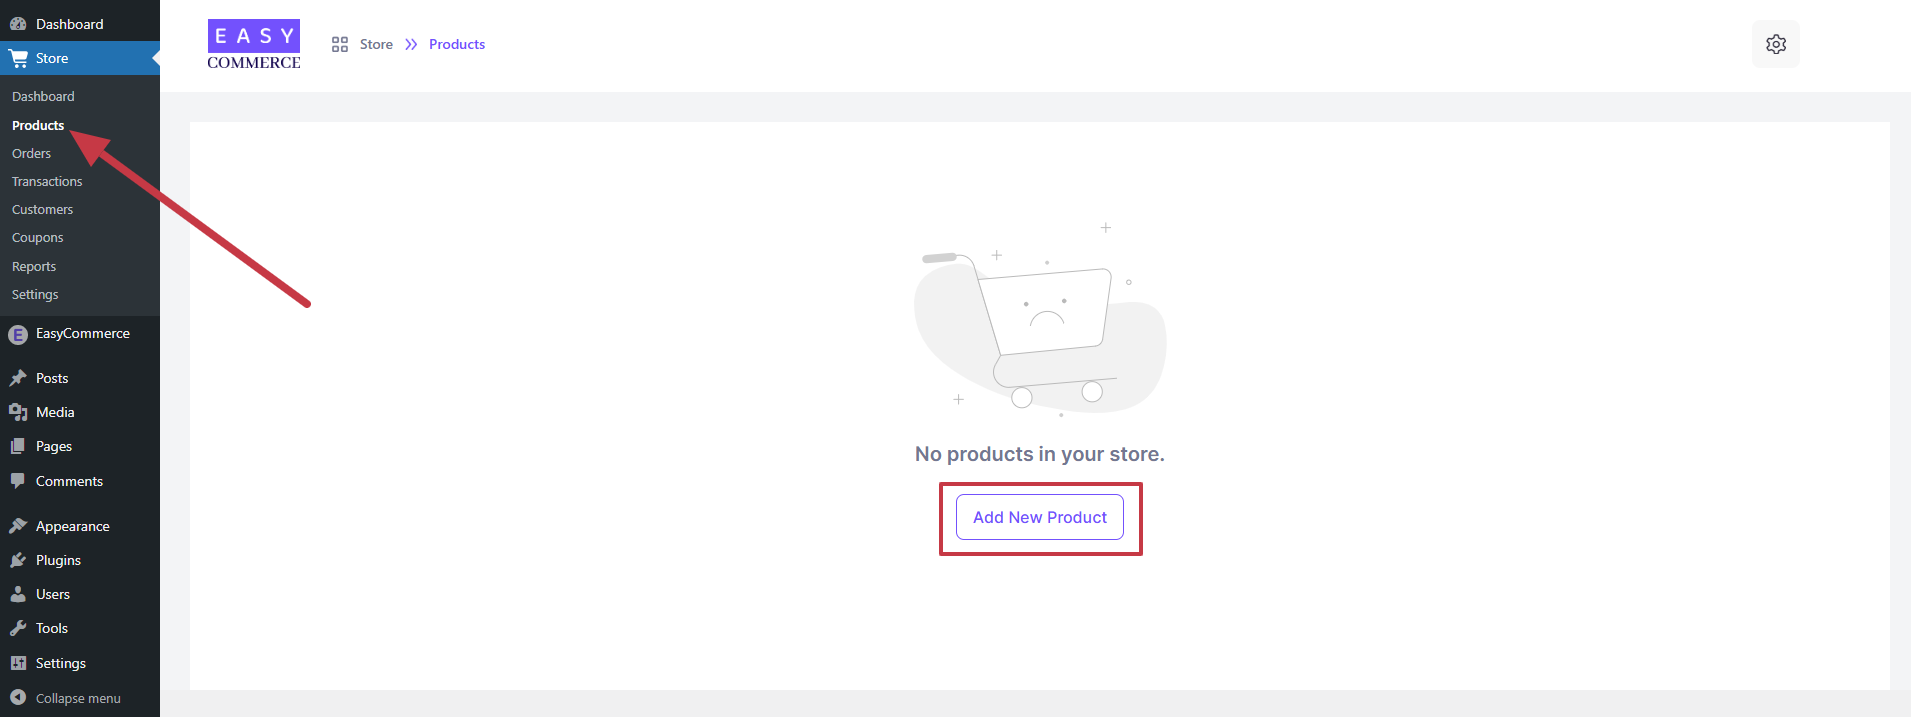
- From your WordPress dashboard, go to EasyCommerce Store > Products.
- Click Add New Product to begin.
Step 2: Fill in Product Information
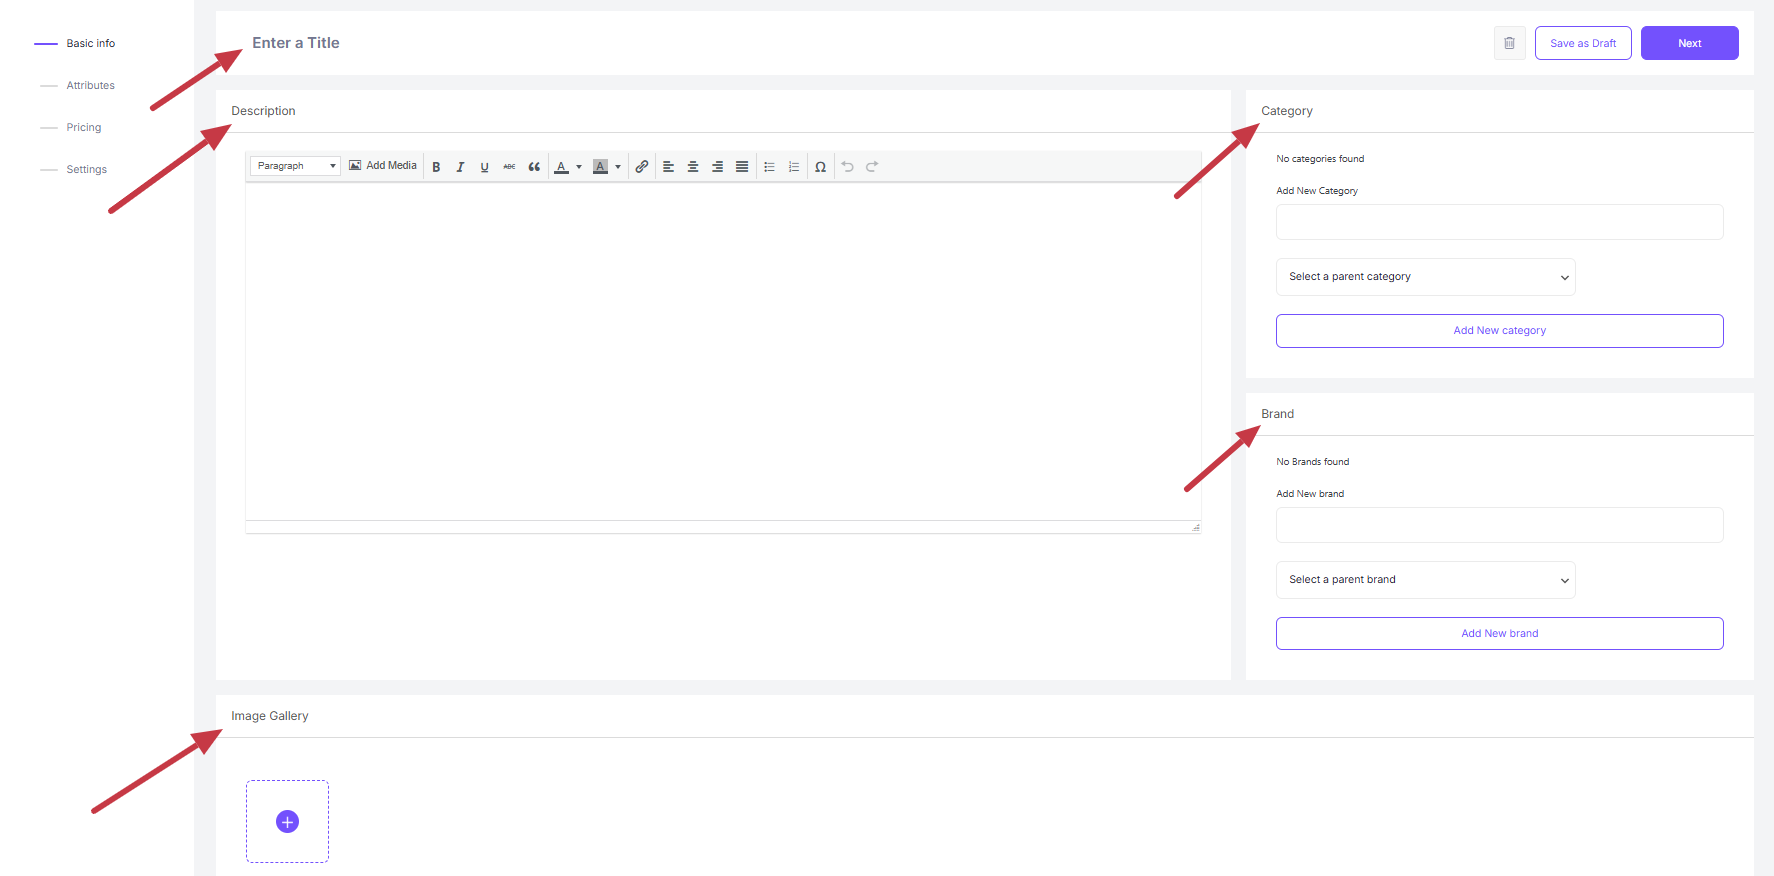
- Product Title: Use a clear, descriptive name (e.g., “Organic Almond Butter – 16oz”).
- Description: Highlight key features, benefits, and usage tips.
- Images: Upload high-quality photos (from multiple angles). Set one as the thumbnail.
- Category and Brand: Enter and set to organize for easy browsing.
Step 3: Add Attributes
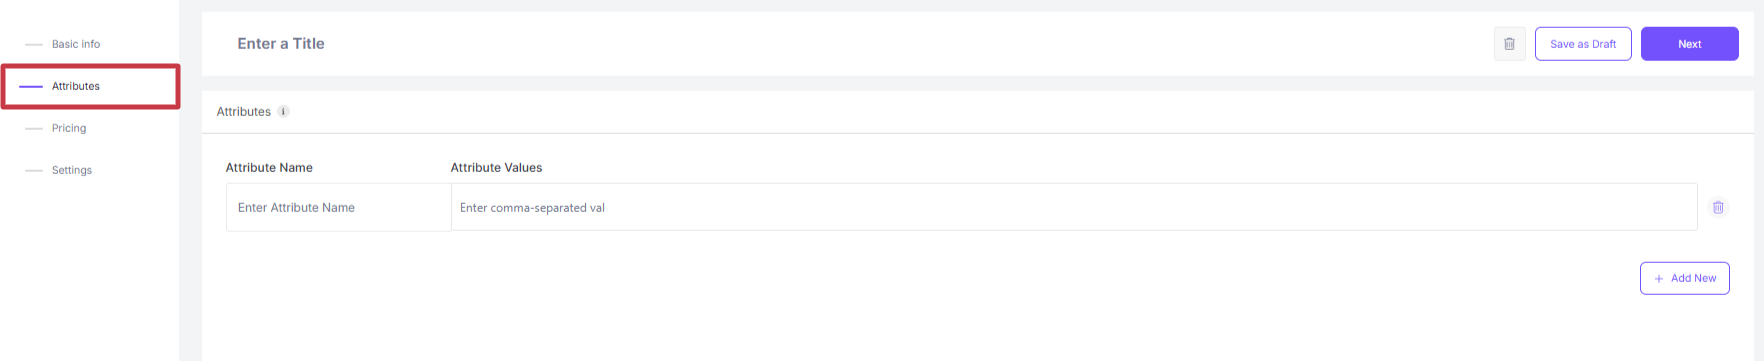
Add attribute names and values in the attributes section to define organic, imported, private label, etc. Each attribute is separated by commas, so enter a variant by putting a comma at the end of the value.
Step 4: Set Pricing and Inventory

Under Pricing, click + Add New Price to:
- Enter the price and SKU.
- Toggle Manage Stock to track inventory.
- Set a low stock alert to restock on time.
- Add weight/dimensions for accurate shipping costs.
- Click Autogenerate Variants to create separate SKUs/pricing for each variant.
Note: Once a product stock hits the low stock number given, it will show up in the Low Stock Product Variants section of the EasyCommerce dashboard.
Step 4: Adjust Visibility and SEO
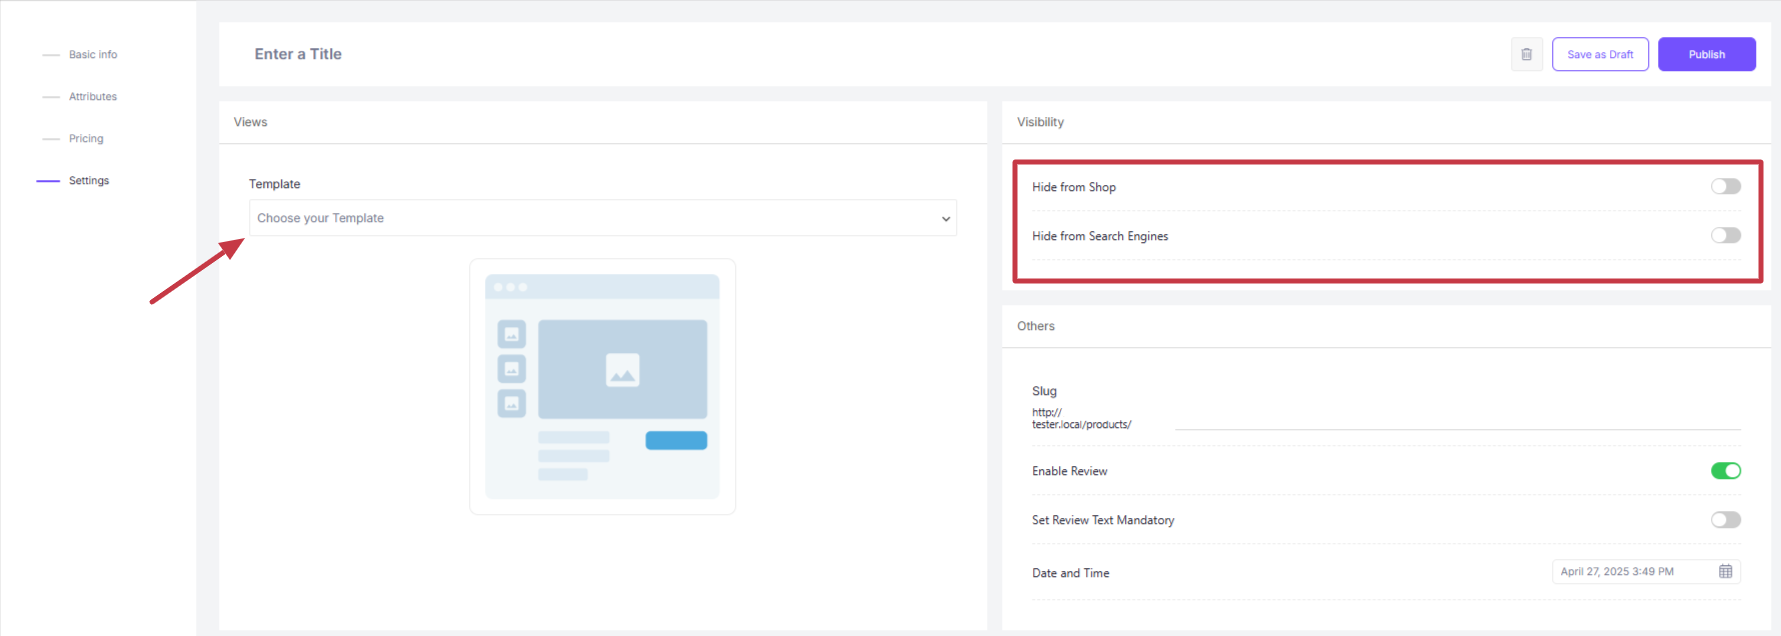
- Choose a product page layout.
- Toggle visibility (hide/show in your store or search results).
- Customize the URL slug (keep it short and keyword-friendly).
- Enable customer reviews to build trust.
- Set a publish date for Google to crawl this page.
Hit Publish, and your product goes live instantly.
Pro tip: You can click the Builder option next to each order from the Products page, and it will open the page in the WordPress editor. You can customize the online grocery website design with EasyCommerce blocks and patterns.
Learn how to build a product page from here.
Setting Up Payments in EasyCommerce
Now that your products are ready, let’s configure payment methods to start accepting orders. EasyCommerce supports major gateways like Stripe, PayPal, and Braintree. Here’s how to set them up:
Step 1: Enable Payment Addons
- From your WordPress dashboard, go to EasyCommerce > Addons
- Browse available payment integrations (Stripe, PayPal, Square, etc.)
- Click Activate on your preferred gateways.
Step 2: Configure Payment Settings
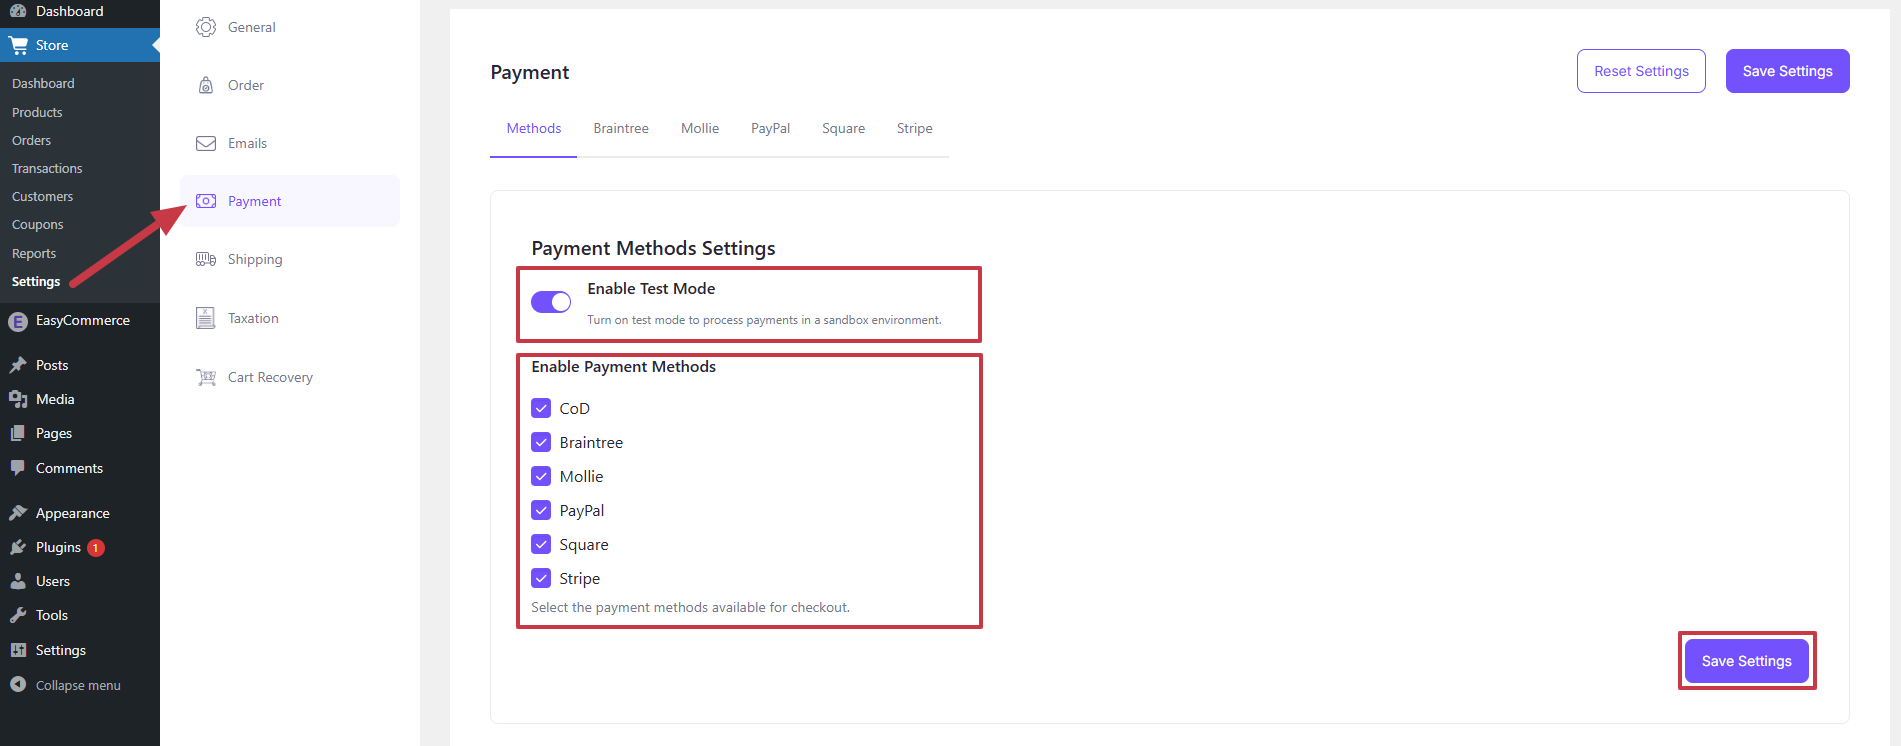
- Navigate to Store > Settings > Payment
- You’ll see all activated payment methods listed
- Optional: Enable Test Mode to trial transactions
- Toggle your preferred live payment options
- Click Save Settings once done.
Step 3: Enter Gateway Credentials
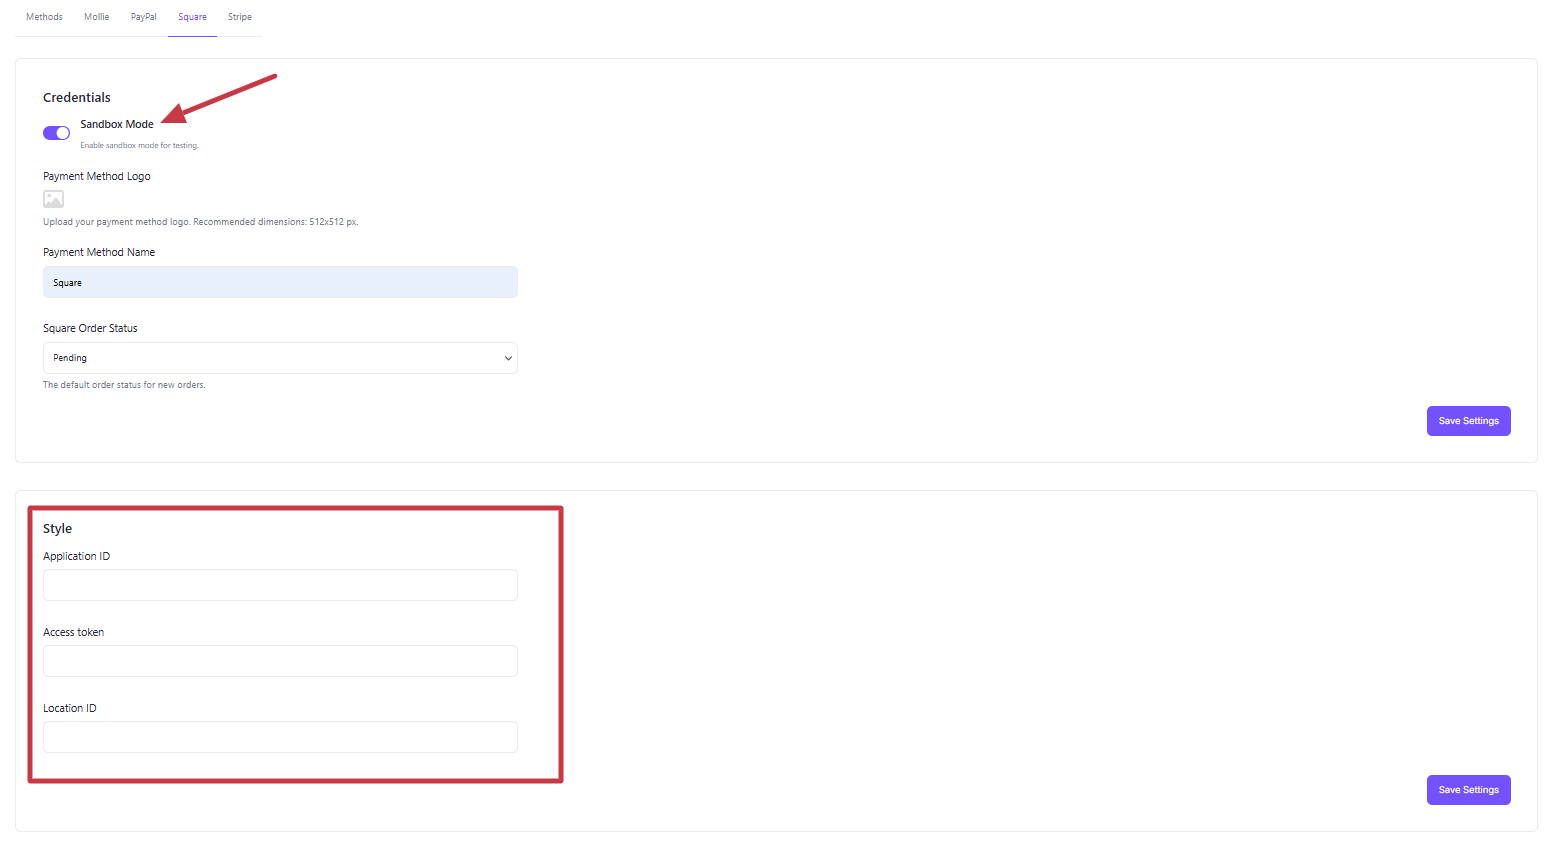
Using Square as an example:
- Click the Square settings tab, next to Methods.
- Enter required credentials
- Click Save Settings to complete the setup.
Step 4: Test Before Going Live
- Process test transactions in Sandbox Mode
- Verify that payments appear correctly in your dashboard
- Once confirmed, switch to Live Mode.
Check out how to set up other payment gateways from here.
Configuring Shipping in EasyCommerce
Shipping needs to work perfectly, especially for online grocery stores. Here’s how to configure shipping rates and methods in EasyCommerce:
Step 1: Access Shipping Settings
- Go to EasyCommerce > Settings > Shipping
- Select Shipping Countries from the dropdown menu
- Choose all countries where you want to offer shipping
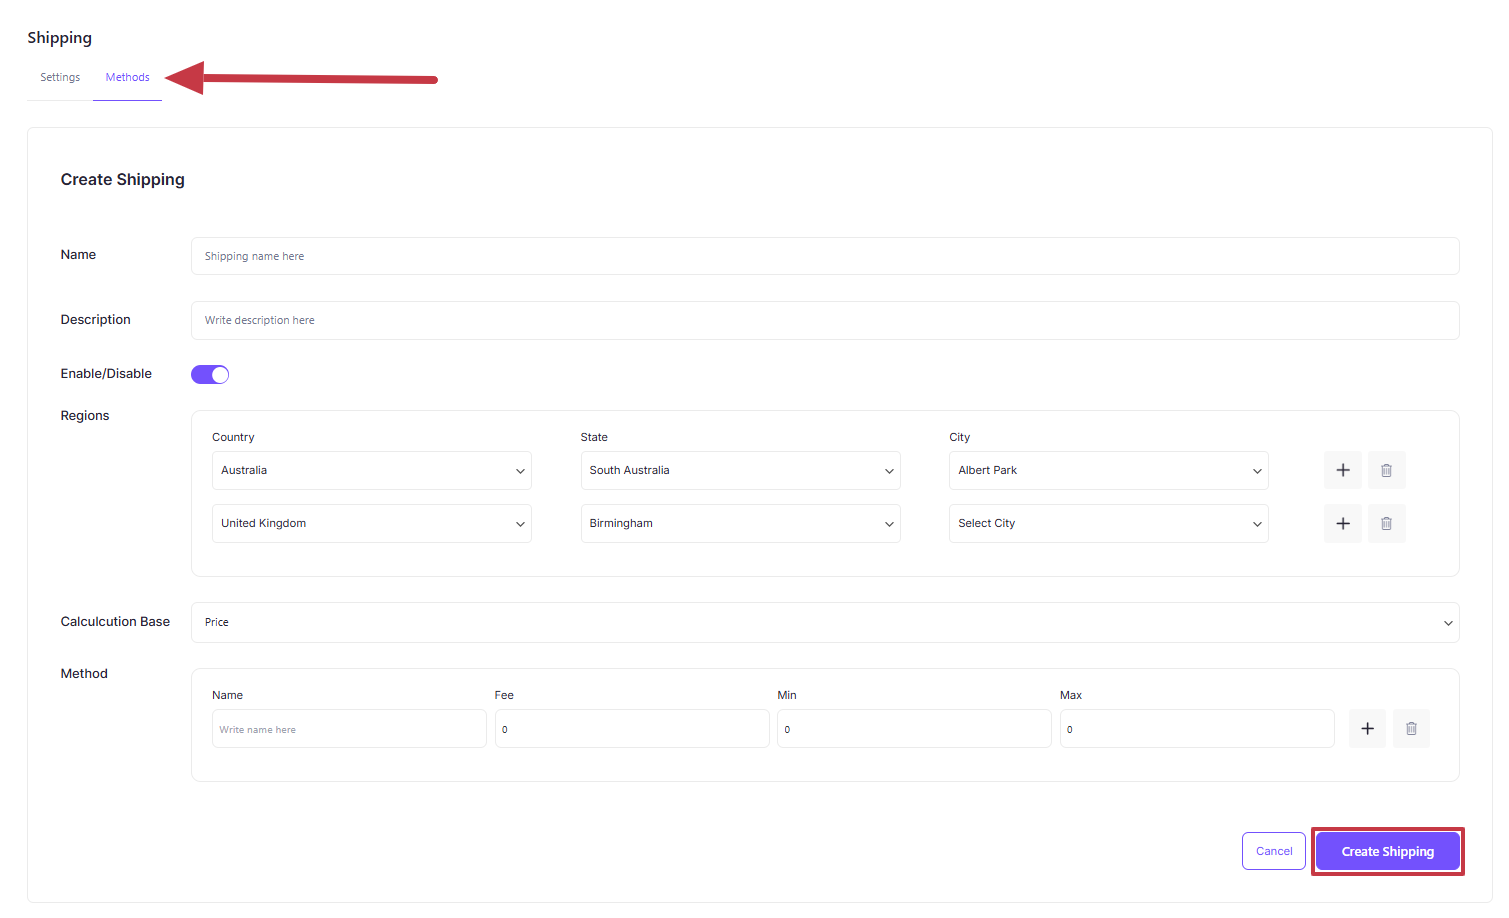
Step 2: Create Shipping Methods
Navigate to the Methods tab and click Add Shipping. Provide the following information.
Enter basic information:
- Name your method (e.g., “Standard Delivery”)
- Add a brief description for customers
- Toggle to enable/disable the method
Set shipping regions:
- Select applicable countries
- Optionally specify states or cities for local delivery
Rate Calculation based on:
- Flat rate (fixed fee)
- Weight-based pricing
- Quantity-based pricing
Set minimum/maximum limits (e.g., free shipping over $50)
Step 3: Save Method
Click Create Shipping to activate the method.
Setting Up Coupons in EasyCommerce
Coupons are a great way to promote your business and retain loyal customers. Follow the steps below to set up coupons on your online grocery store website.
Step 1: Go to the Coupons Page
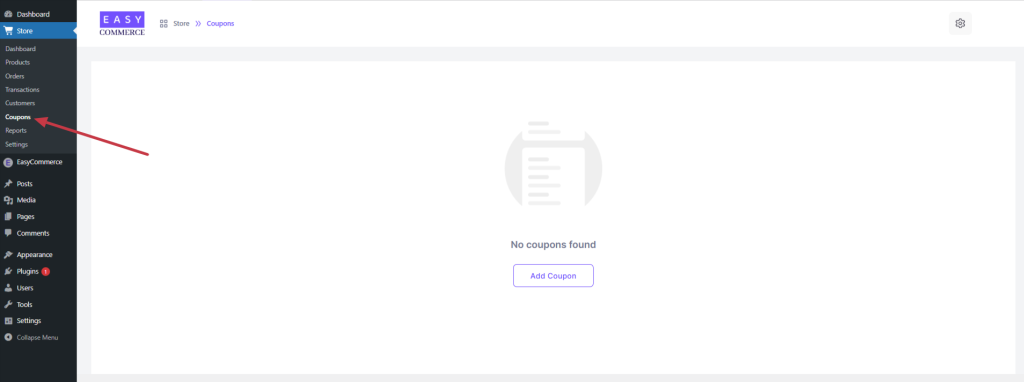
Log in to your WordPress website and navigate to EasyCommerce Store > Coupons.
Step 2: Add and Enter Coupon Details
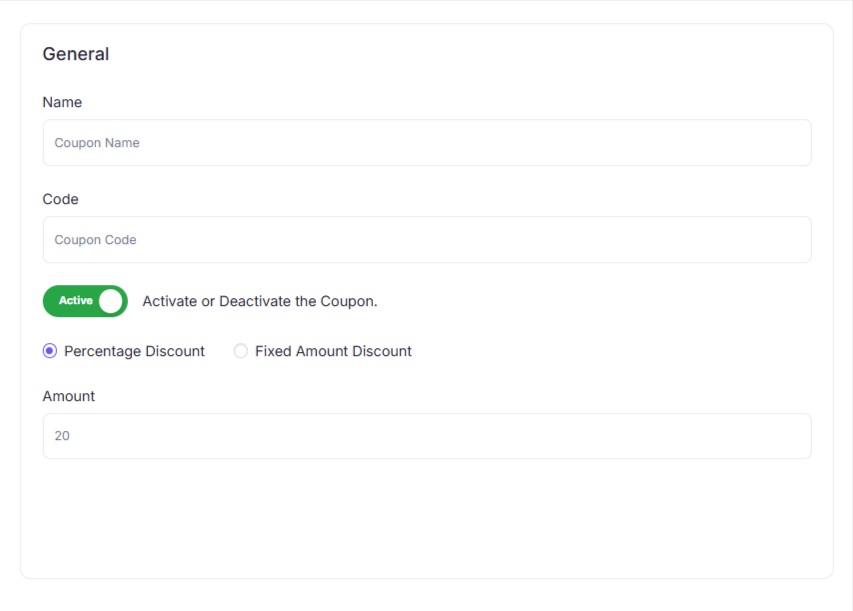
You will find a blank page with an Add Coupon button. Click it and you will be redirected to the coupon creation page. Here, you will have to add –
- Coupon Name (not the code, just the campaign name)
- Code: A code to be used as the discount coupon.
- Active Status: Typically in Active mode.
- Discount Type: Percentage or Fixed amount
- Amount: The discount that customers get with the coupon.
Step 3: Configure Coupon Settings
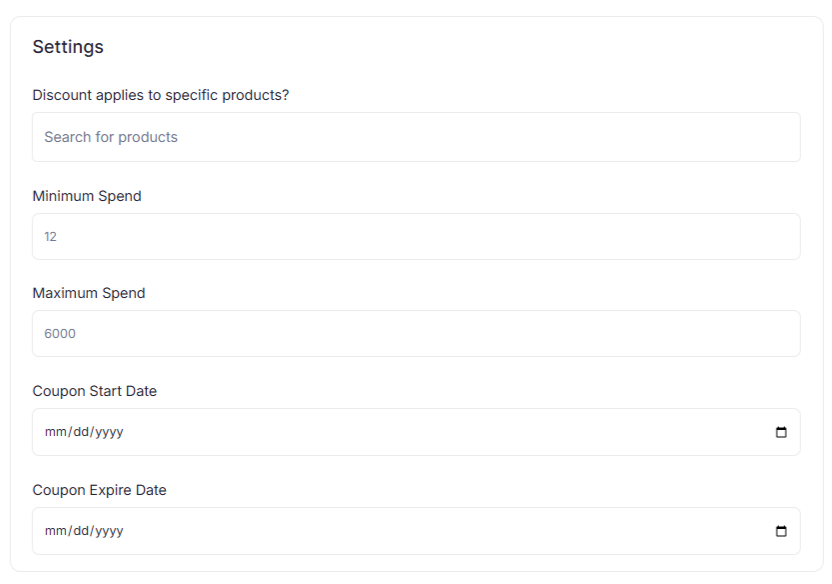
Once your coupon details are given, you must configure its settings to set up how it’s presented in your shop.
- Applicable Products: Select the products eligible for the discount.
- Minimum Spend: Lowest purchase amount to use the coupon.
- Maximum Spend: The Highest purchase amount to use the coupon.
- Coupon Start Date: When the coupon becomes active.
- Coupon Expire Date: When the coupon expires.
Step 4: Create Coupon and Manage
After filling in all the information and configuring its settings, click Create Coupon to save this specific discount.
You can also deactivate, edit, or delete multiple coupons from the coupons page.
Wrapping Up
To design online grocery store website, you need to plan every step carefully to ensure it provides a smooth shopping experience for your customers. Online grocery shoppers don’t want to spend much time picking out everyday essentials, so your store must be adaptable to meet these demands.
EasyCommerce WordPress ecommerce platform can help you design a stunning online grocery store website that reflects your brand and offers the much-needed convenience your shoppers expect from your store.
Frequently Asked Questions (FAQs)
What is an online grocery website?
An online grocery website lets customers browse, order, and pay for groceries digitally. These groceries can be picked up or delivered.
It includes features like real-time inventory, delivery scheduling, and secure checkout.
Is EasyCommerce a good platform to design online grocery store website?
Yes! EasyCommerce (a WordPress plugin) is designed for ecommerce, with built-in tools for inventory, delivery dates, and secure/local payment gateways.
How much does it cost to build an online shopping website?
The cost to build an online grocery store website can vary –
- Basic: $100–500/year (shared hosting + EasyCommerce).
- Advanced: $1,000+/year (cloud hosting, premium plugins, custom design).
What is the best WordPress theme for online grocery store?
If you want a fast-loading website with built-in ecommerce features, then we recommend Flatsome or Astra. Also, Astra themes works best for EasyCommerce.