EasyCommerce now supports Razorpay payments through a dedicated Razorpay Payment Integration add-on.
Store owners using Razorpay can accept payments directly through the EasyCommerce checkout while keeping payment verification, order updates, refunds, and webhook synchronization tied to their EasyCommerce orders.
Customers can pay using supported Razorpay methods such as credit and debit cards, UPI, net banking, and wallets without being sent through a separate payment flow outside the store.
The Razorpay integration is available as a free EasyCommerce add-on.
Why Razorpay Integration Matters for WordPress Store Owners
If you sell in India, or to Indian customers from anywhere, Razorpay closes a gap that’s been costing sales.
India’s Shift to UPI and Digital Wallets
UPI isn’t a niche payment rail anymore, it’s the default. The system processed 23.66 billion transactions in July 2026, its highest monthly volume on record, and that growth has held steady through most of the year despite the platform’s already massive scale. This isn’t a trend to watch. It’s already how most Indian shoppers expect to pay.
That volume shows up in ecommerce specifically, too. India’s ecommerce market is forecast to grow 12.4% in 2026 alone, reaching roughly $225.9 billion, with digital payment trust cited as one of the direct drivers of that growth. A store that can’t accept the payment method most of that growth runs on is competing with one hand tied behind its back.
What Happens When a Store Skips Local Payment Methods
The cost is not abstract. Research from Razorpay shared that 13% of shoppers abandon their cart specifically because their preferred payment method isn’t offered. And in markets where one payment rail dominates, the effect is sharper: no UPI in India functions the same way as no PIX in Brazil; it means losing a meaningful share of that market outright, not just a percentage of friction.
That loss compounds with every product page, every ad click, every customer who almost bought. Adding Razorpay isn’t a nice-to-have feature. For a store with Indian customers, it’s closer to table stakes.
Why Razorpay Works Well for Ecommerce Payments
Razorpay is more than a basic payment gateway. It gives eCommerce businesses a flexible payment infrastructure built around how customers prefer to pay.
Here’s what it adds to your store:
- Multiple payment methods: Accept cards, UPI, net banking, wallets, and other supported payment options through a single integration.
- Faster checkout experience: A streamlined payment flow helps customers complete purchases with fewer unnecessary steps.
- Better payment success rates: Razorpay’s payment infrastructure is designed to reduce transaction failures and improve successful checkout completion.
- Secure transactions: Built-in security, compliance measures, and fraud protection help keep customer payments safer.
- Built to scale: Razorpay can support stores ranging from growing businesses to high-volume eCommerce operations.
Combined with EasyCommerce, Razorpay gives WordPress store owners a modern payment experience without adding unnecessary complexity to checkout.
What’s Included in the EasyCommerce Razorpay Addon
The addon is built natively into EasyCommerce, not bolted on as a generic gateway wrapper. Here’s what you get out of the box:
| Feature | What It Does |
| One-click OAuth connection | Connect your Razorpay account via OAuth 2.0, no manual API key copying |
| Native checkout modal | Razorpay’s official checkout loads directly on your checkout page, pre-filled with the shopper’s name, email, and phone |
| Signature verification | Every payment is validated with an HMAC-SHA256 signature check before an order is marked successful |
| Real-time webhook sync | A dedicated, signature-verified webhook keeps order statuses current, even if the shopper closes their browser before returning |
| Built-in refunds | Issue full or partial refunds from the EasyCommerce order screen, no need to log into Razorpay separately |
| Test mode | Run full end-to-end test transactions before going live, with a single toggle |
The refund and webhook handling matter more than they might look at first glance. A lot of payment integrations get the “accept money” part right and leave you manually reconciling refunds or chasing missed webhook events.
This one handles both automatically and logs the activity as order notes, so you’re not digging through a separate dashboard to figure out what happened to an order, tying back into recover abandoned carts workflows where payment failures are often the hidden cause.
6 Key Benefits of the EasyCommerce Razorpay Addon
The EasyCommerce Razorpay addon brings Razorpay payments directly into your store with a secure, streamlined setup. It simplifies account connection, checkout, payment verification, refunds, and order synchronization without requiring customers or store owners to manage the process manually.
1. Connect Your Razorpay Account Easily
You don’t need to deal with complicated API credentials to get started. The addon lets you authorize your Razorpay account through OAuth 2.0 and handles token management in the background.
- Secure OAuth 2.0 authorization
- Encrypted token storage
- Automatic token refresh
- Easy account connection and disconnection
2. Smooth Razorpay Checkout
Customers can pay through Razorpay’s official checkout interface without leaving your EasyCommerce checkout page. Their basic details can also be pre-filled to reduce unnecessary steps during payment.
- Razorpay-hosted checkout modal
- Pre-filled customer information
- Support for cards, UPI, net banking, wallets, and other available methods
- Automatic order creation through Razorpay
3. Secure Payment Verification
The addon verifies payment responses before completing an order. HMAC-SHA256 signature validation helps ensure that payment confirmations received by your store are genuine.
- Payment signature verification
- Protection against unverified payment confirmations
- Failed verification automatically prevents successful order completion
4. Automatic Order and Payment Updates
Razorpay events can be synchronized with your EasyCommerce orders through webhooks. This helps keep order information accurate even when payment confirmation happens after the customer leaves the checkout page.
- Synchronizes captured and failed payments
- Processes refund events
- Verifies webhook signatures
- Automatically updates order statuses and adds relevant order notes
5. Manage Refunds From EasyCommerce
You can initiate refunds without switching between your store and the Razorpay dashboard. The addon supports both full and partial refunds and keeps the refund information connected to the relevant order.
- Full and partial refund support
- Refunds handled through the Razorpay Refunds API
- Refund references saved with the order
6. Configure How Razorpay Appears at Checkout
The integration includes several settings for controlling how Razorpay works inside the store.
You can configure the payment method name and logo shown to customers and choose the default status assigned to new Razorpay orders. Available default order status options include
- Pending
- Processing
- And completed
The add-on also supports multi-currency handling with the appropriate currency subunits when communicating with Razorpay.
Other Payment Addons Available in the EasyCommerce Ecosystem
EasyCommerce supports multiple payment options through dedicated integration, allowing store owners to choose gateways based on their business, location, and customers. Alongside the Razorpay addon, you can integrate popular payment providers such as
- Stripe: Accept online payments through cards and various supported payment methods.
- PayPal: Let customers pay using their PayPal accounts and supported payment options.
- Mollie: Support multiple local and international payment methods through Mollie.
- Braintree: Accept card and other supported digital payments through Braintree.
How to Set Up Razorpay on EasyCommerce
The Razorpay integration can be configured from the EasyCommerce payment settings.
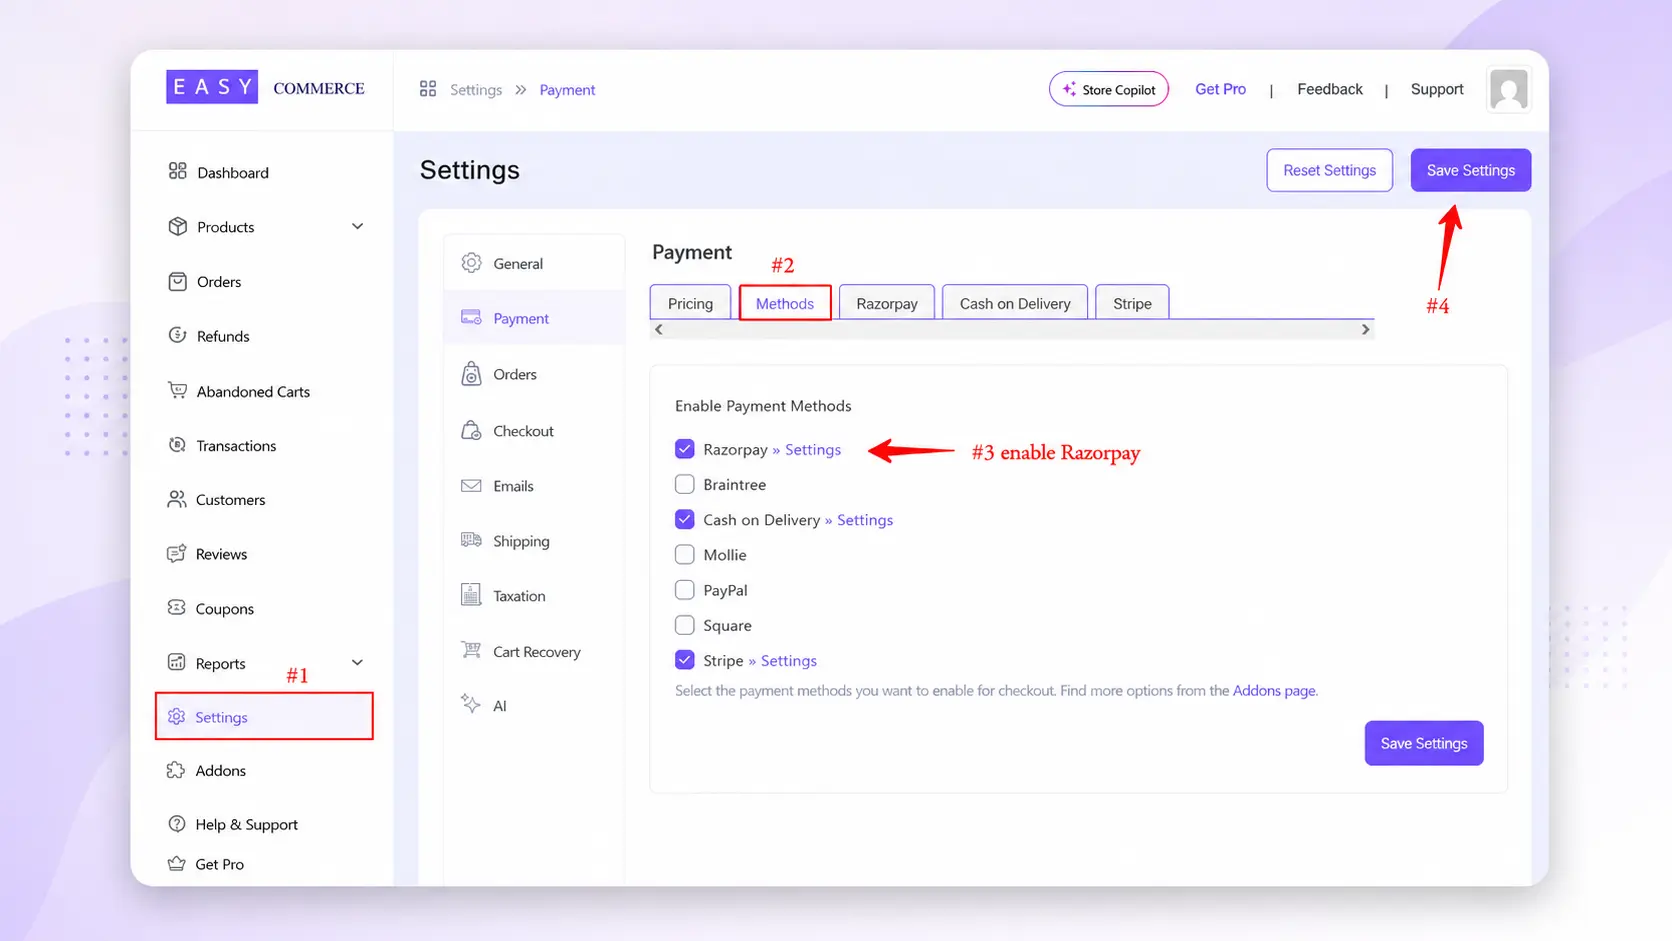
Step 1: Enable Razorpay
Go to Store → Settings → Payment → Methods
Select Razorpay as the payment gateway and save the settings.
Step 2: Create a Razorpay OAuth App
Log in to the Razorpay Dashboard and create an OAuth app.
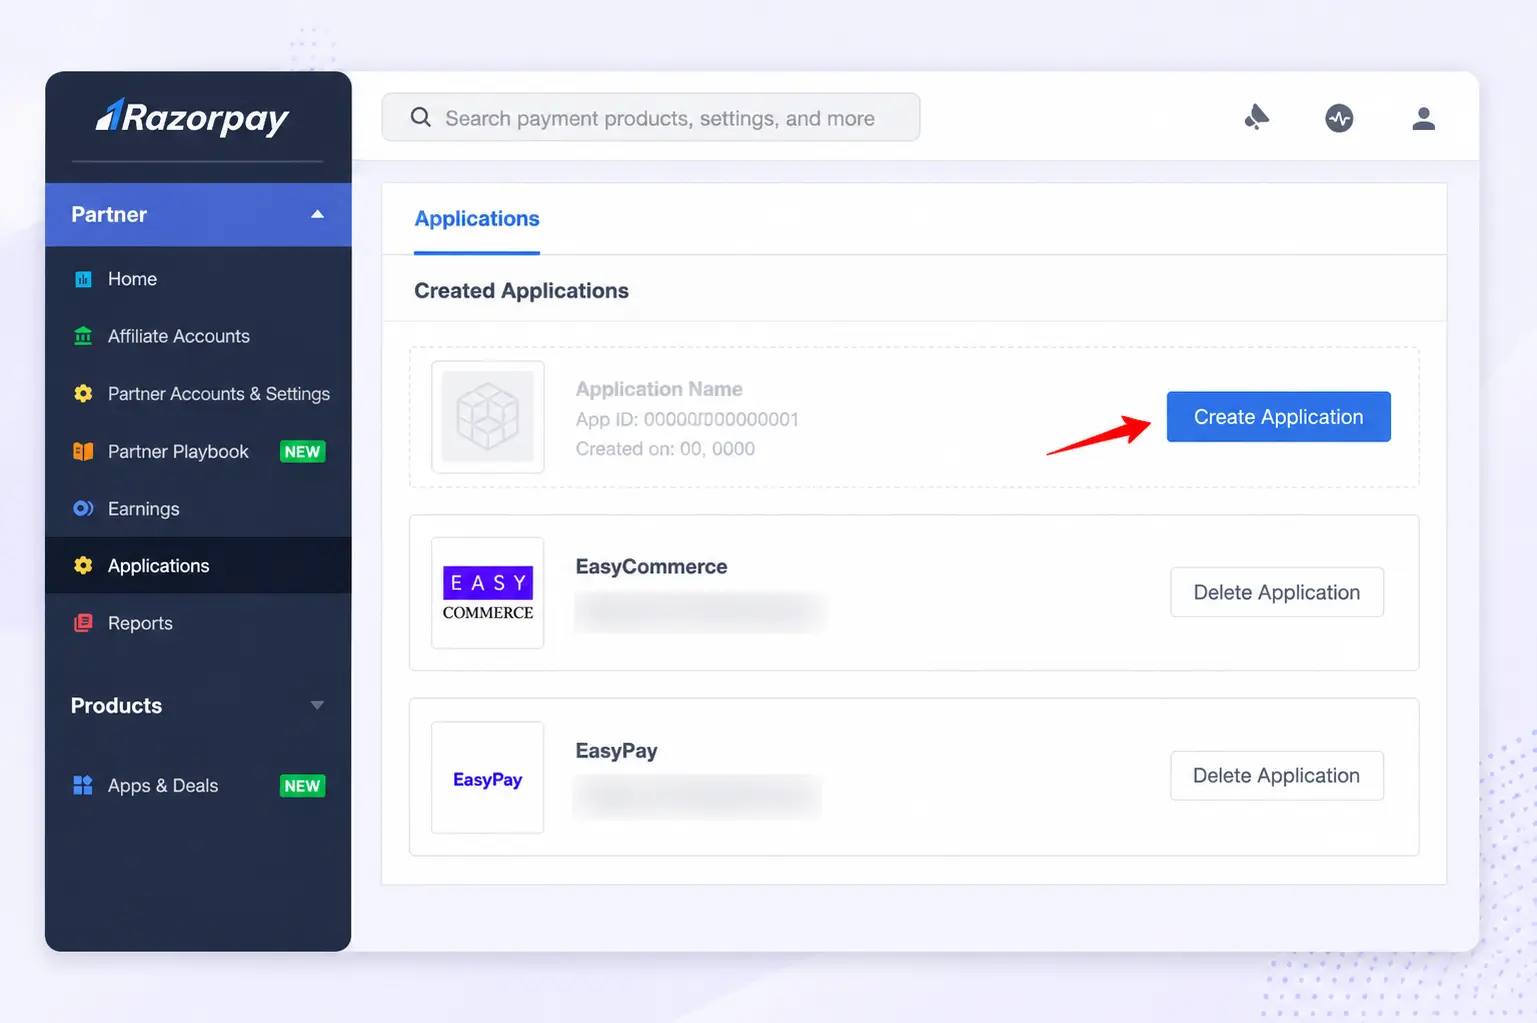
After that, copy the Client ID and Client Secret. You will need both in the next step.
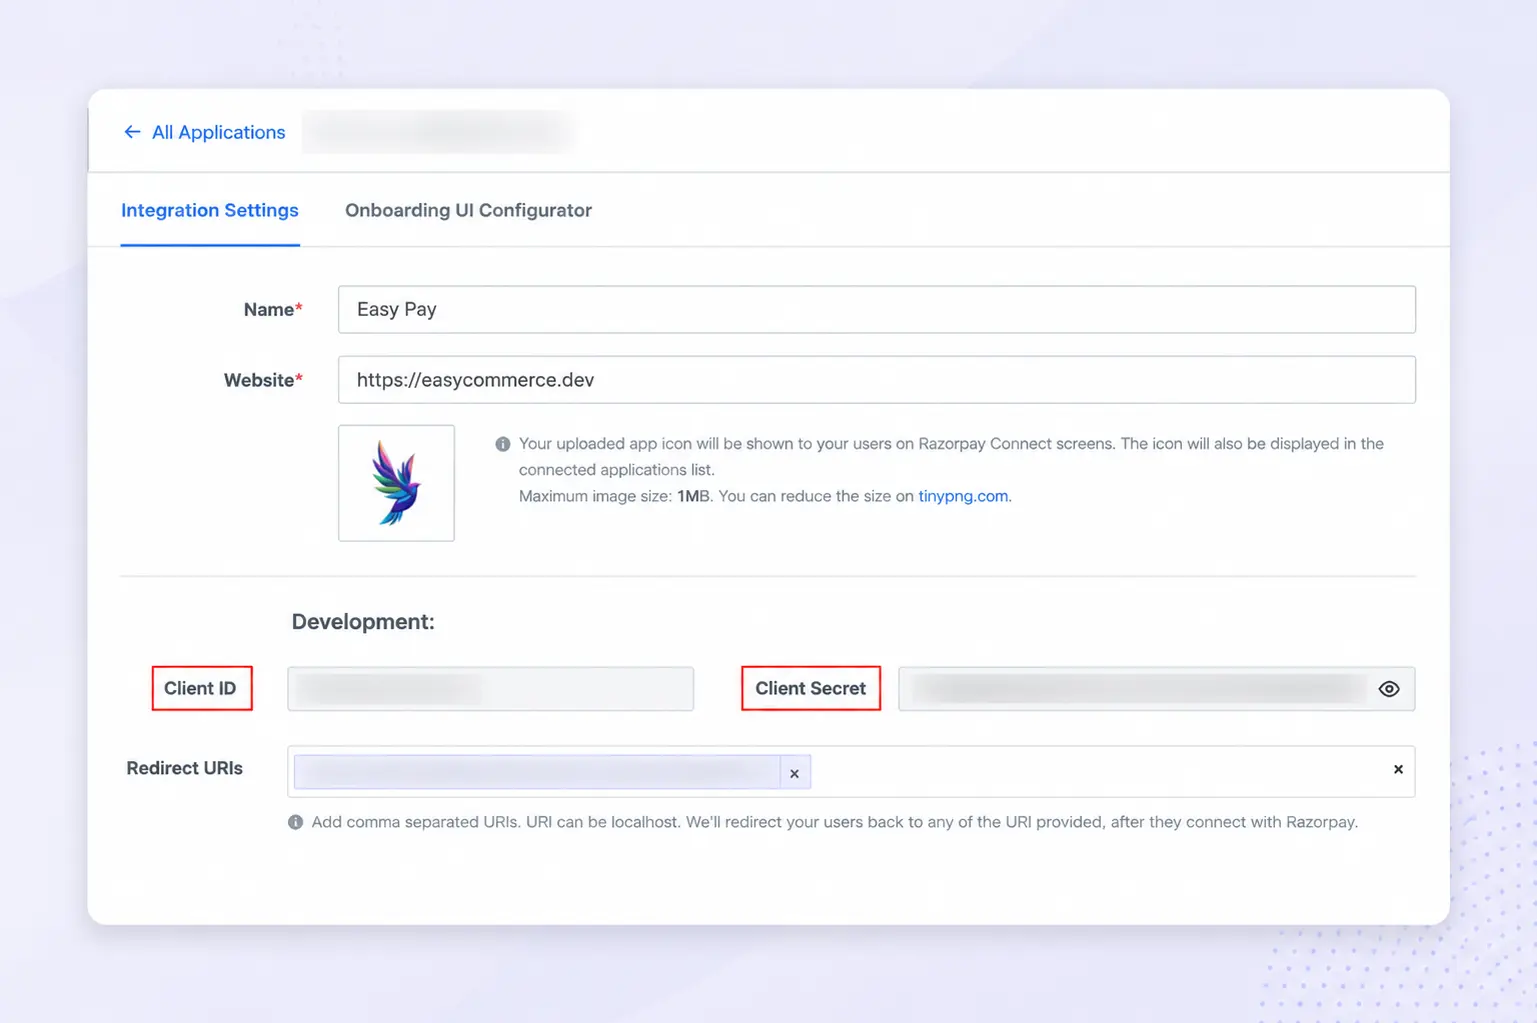
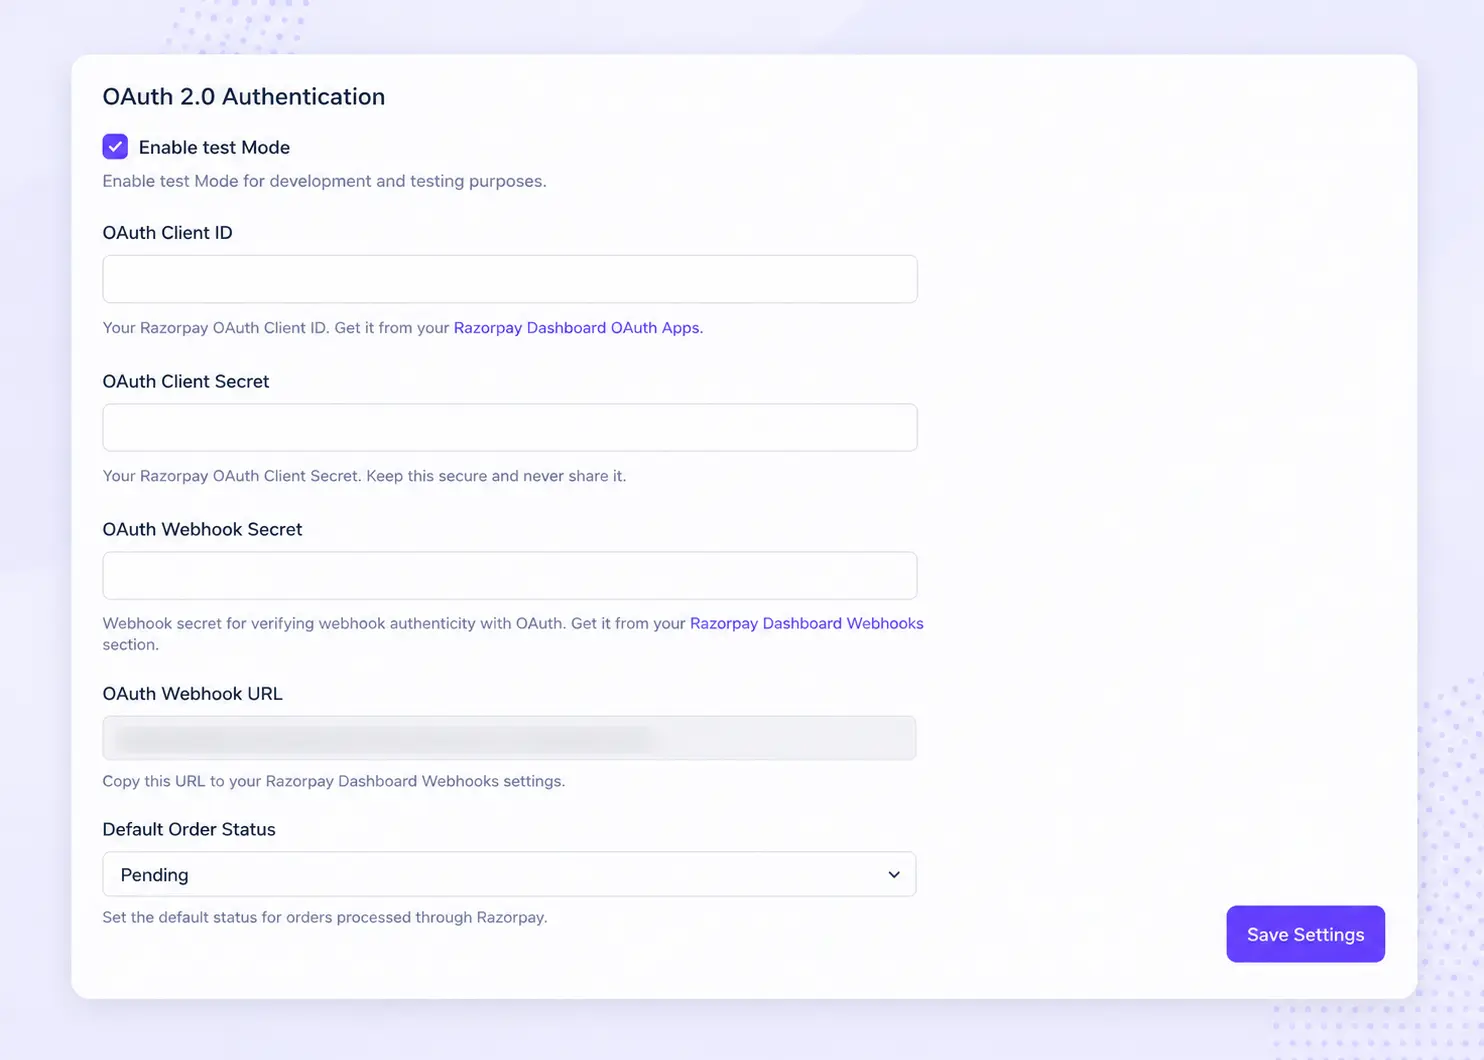
Step 3: Configure Razorpay Settings
Open the Razorpay addon settings next to the Methods tab and configure the gateway for your store.
- Enable Test Mode if you want to test the integration before accepting live payments.
- Add a payment method name and logo, and select the default order status.
- Enter the OAuth Client ID and OAuth Client Secret obtained in Step 2.
- Click Save Settings to apply your configuration.
Step 4: Connect Your Razorpay Account
Once the addon is configured, connect your Razorpay merchant account to EasyCommerce.
- In the Connect Account section, copy the Redirect URL provided by EasyCommerce.
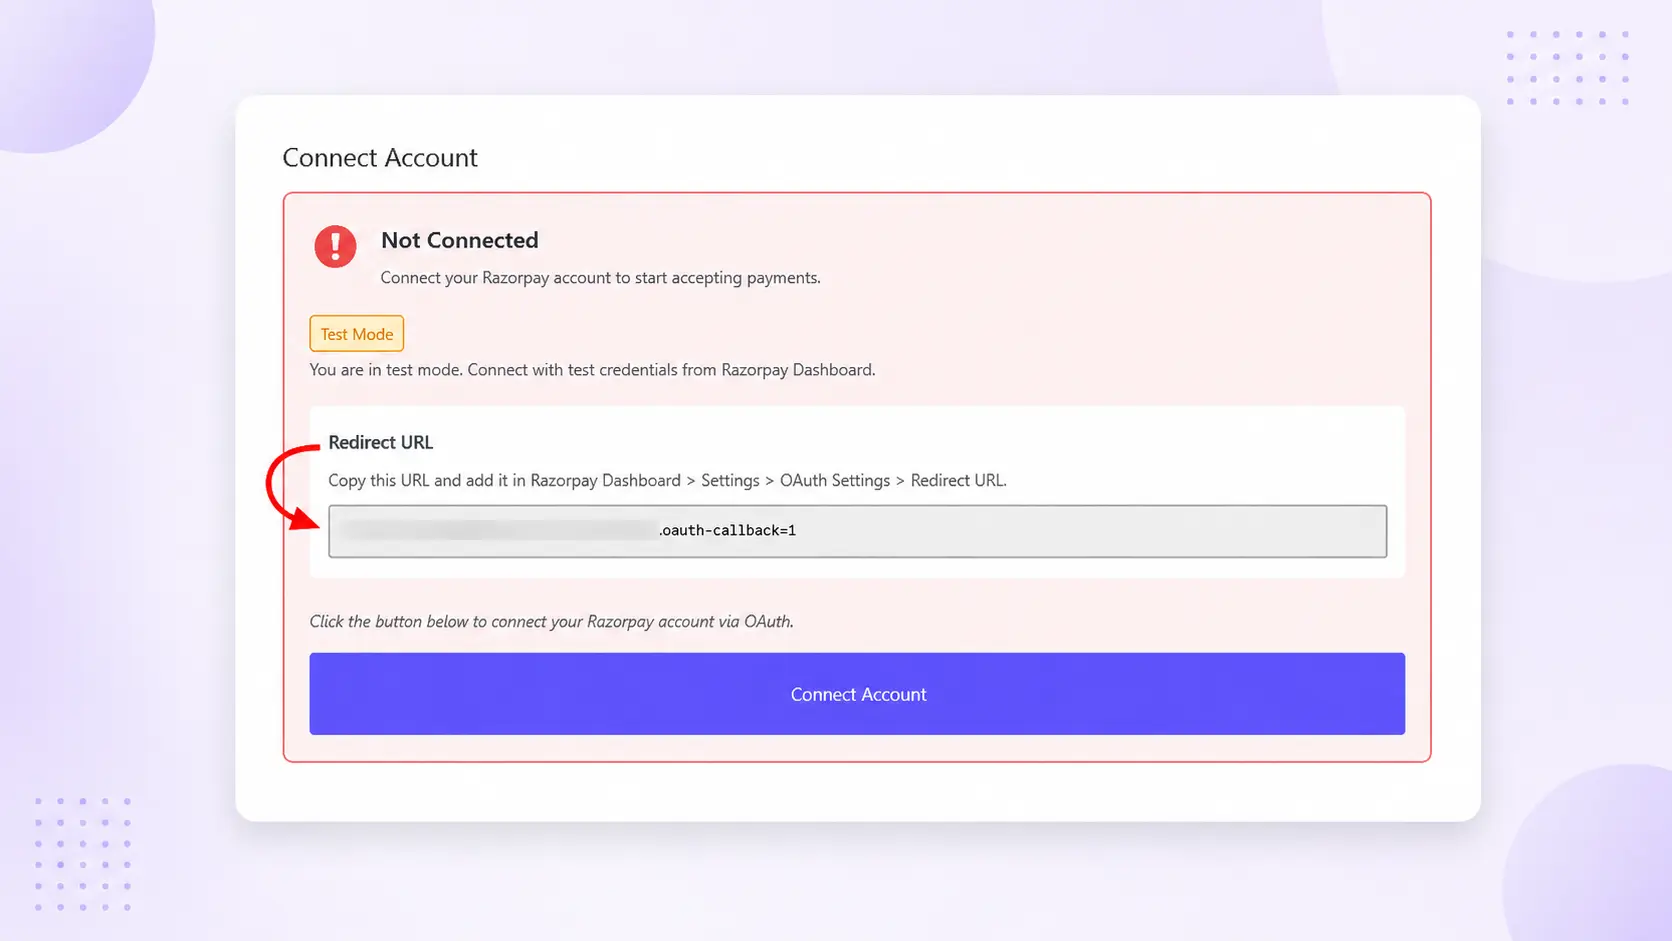
- Add this URL to your Razorpay OAuth application settings.
- Click Connect Account in EasyCommerce.
- You’ll be redirected to Razorpay to authorize the connection.
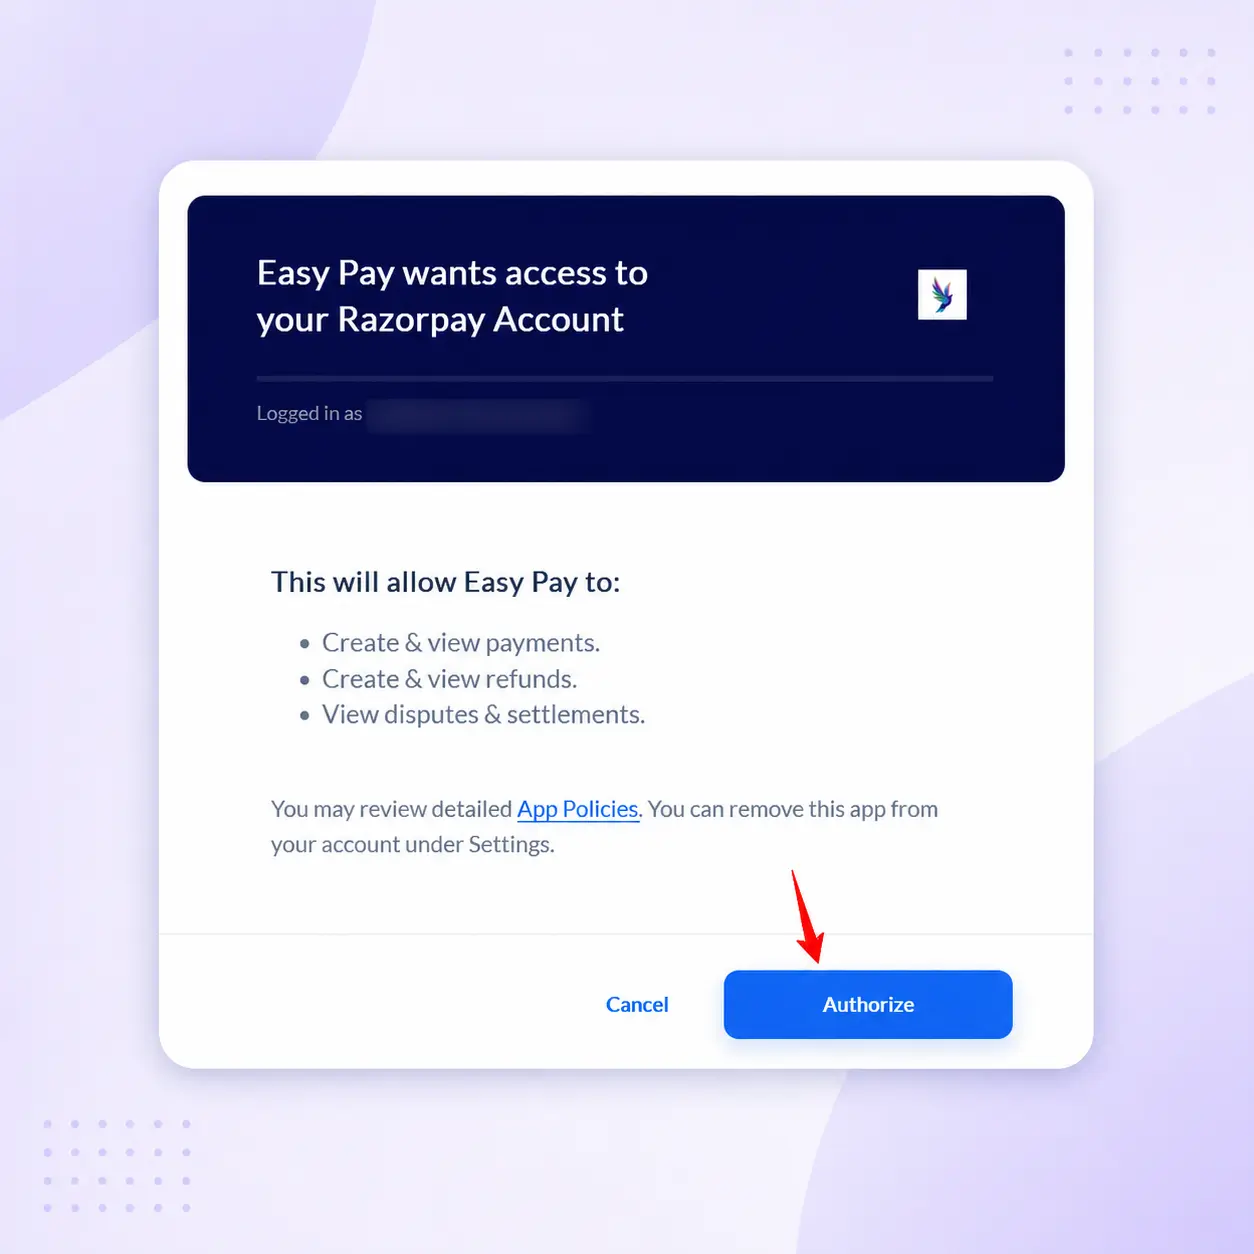
- Approve the authorization request and return to your store.
- Once successful, EasyCommerce will display a Connected to Razorpay confirmation.
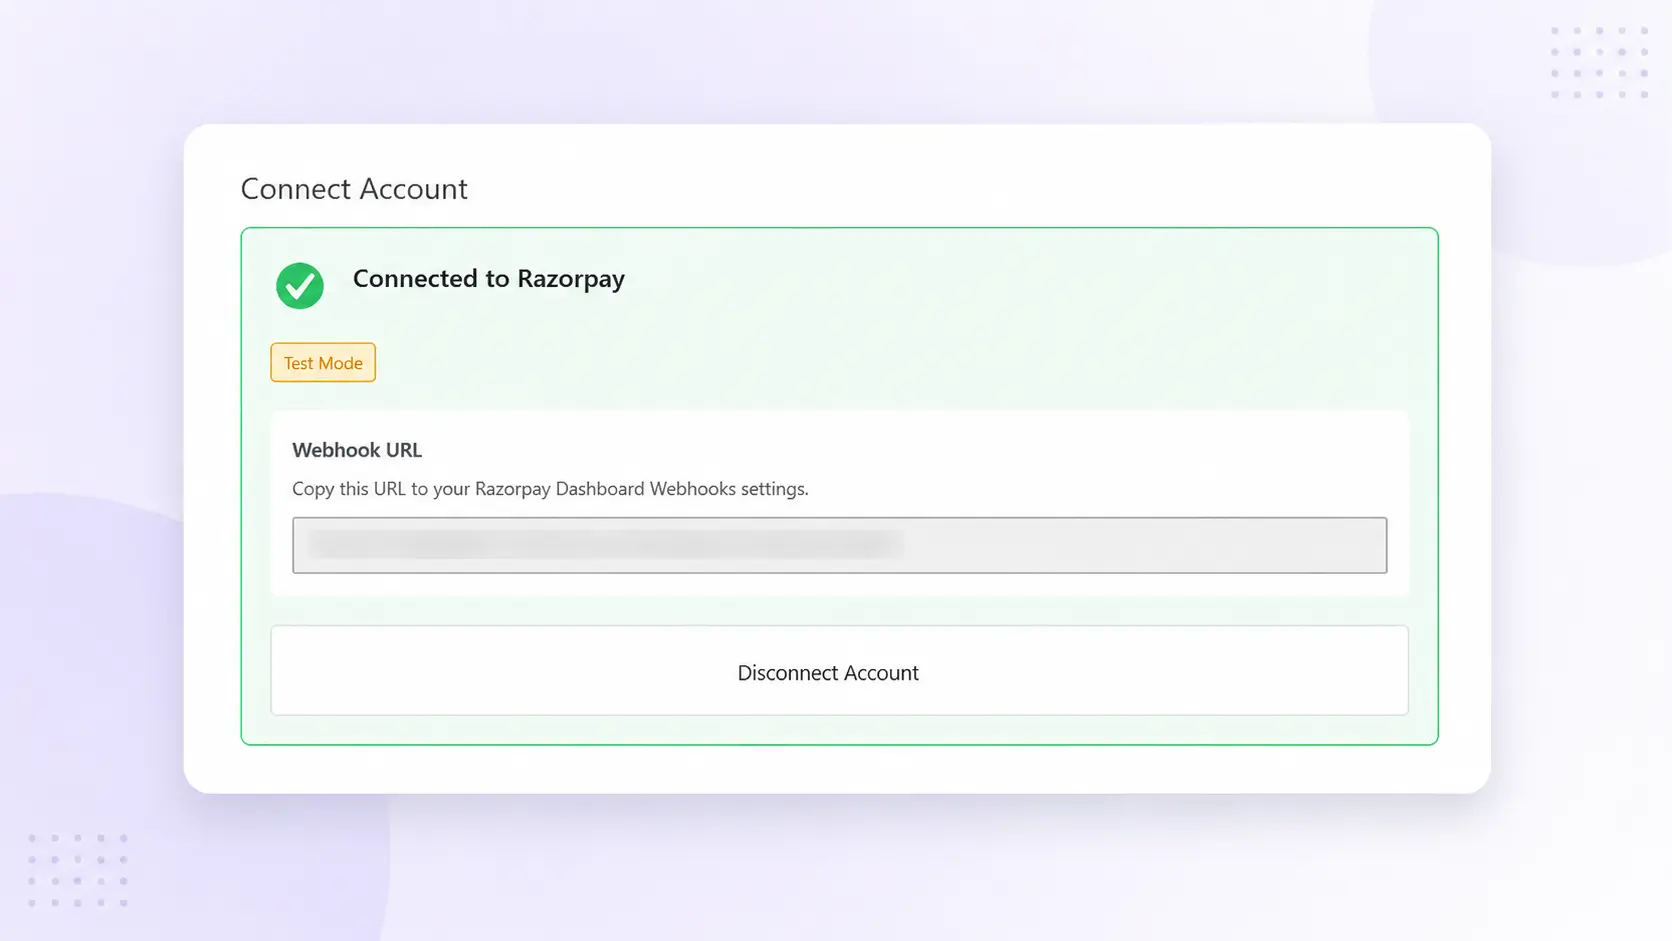
Your authorization tokens are securely encrypted and refreshed automatically. If you need to remove the connection later, you can use Disconnect Account from the same settings area.
Step 5: Configure the Razorpay Webhook
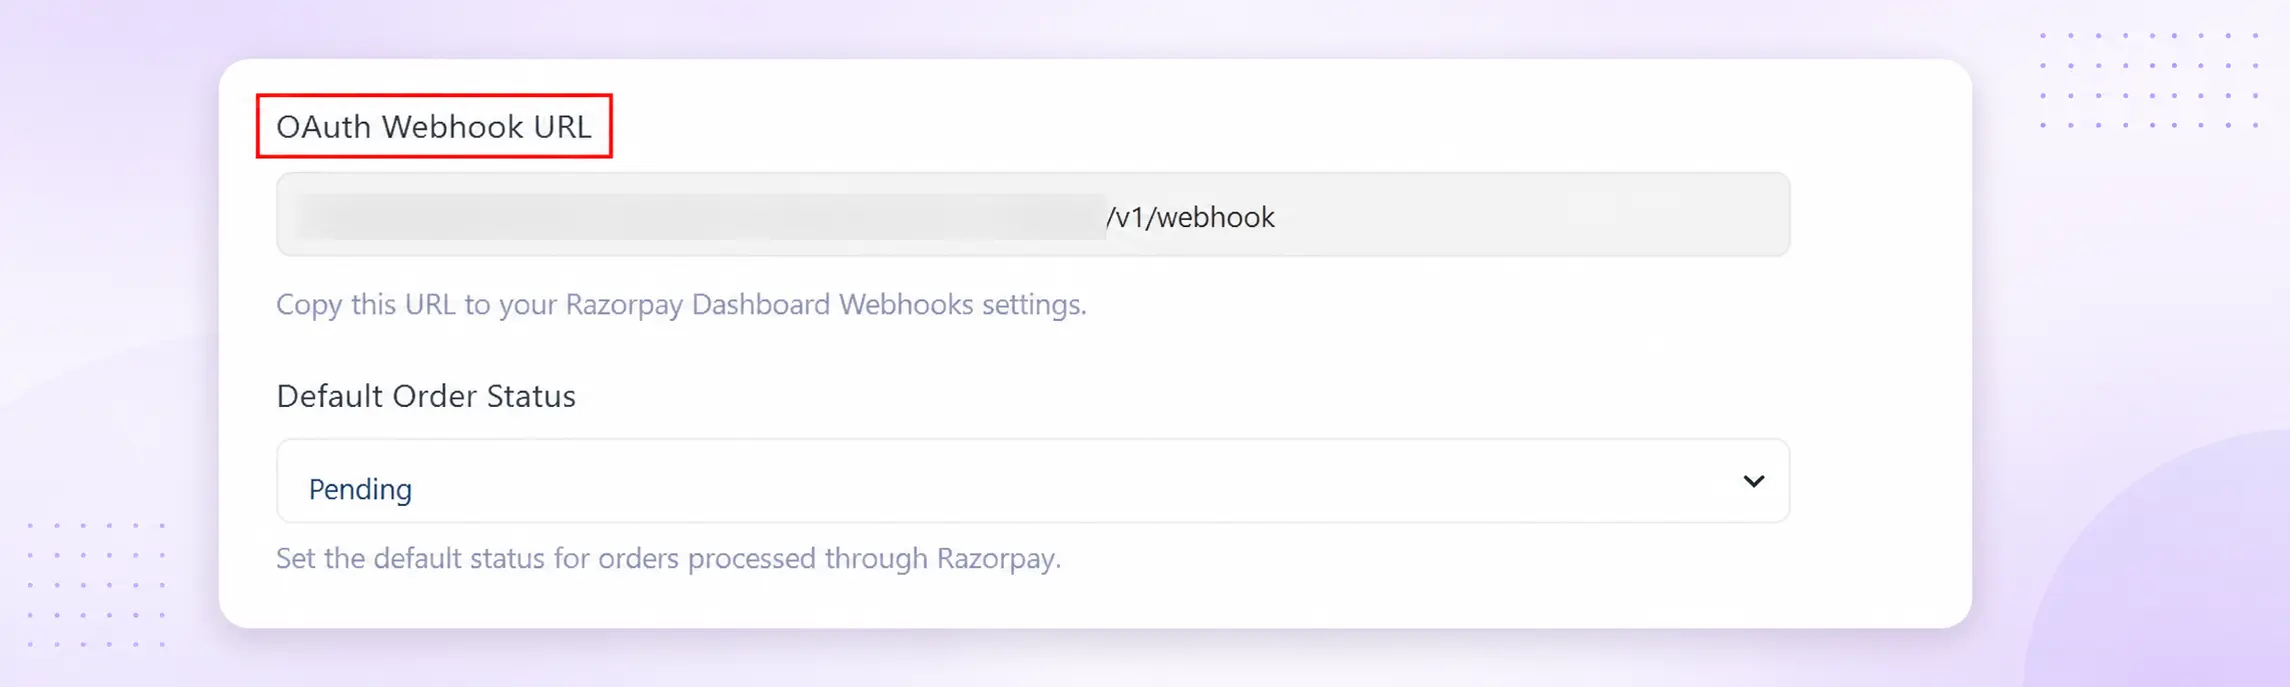
Webhooks allow Razorpay to send payment updates directly to EasyCommerce, helping keep your order statuses synchronized even when a customer leaves the checkout before being redirected back to your store.
- Copy the OAuth Webhook URL from the Razorpay addon settings.
- Log in to your Razorpay Dashboard and open the Webhooks section.
- Add the copied URL as a new webhook endpoint.
- Enable the following events:
- payment.captured
- payment.failed
- refund.created
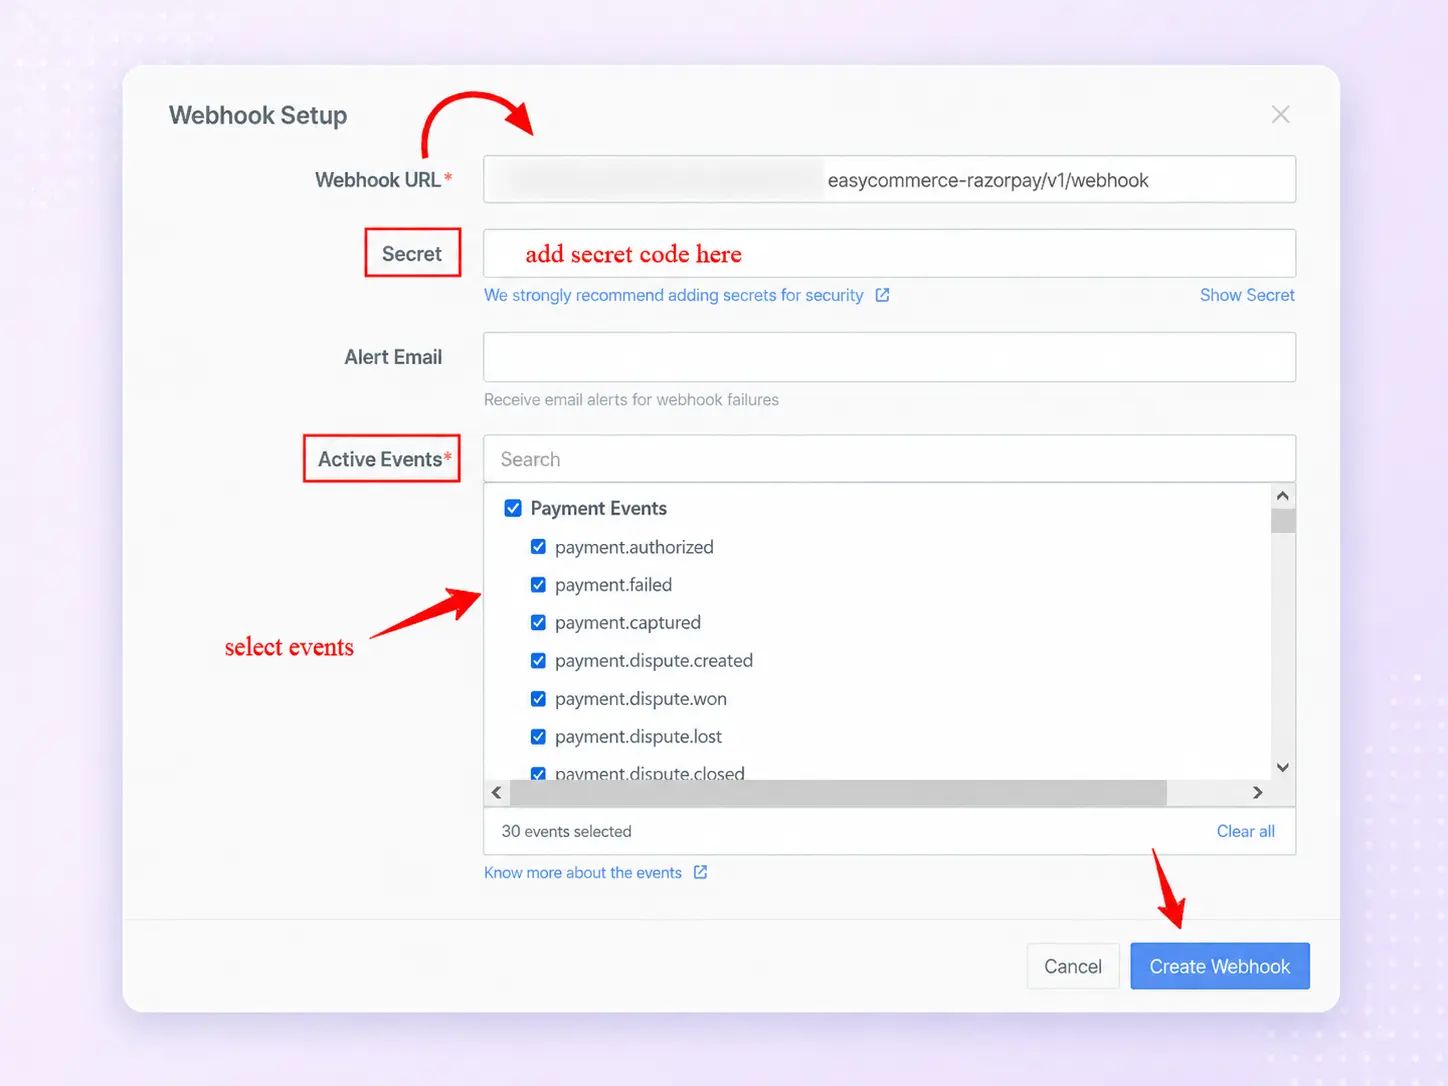
- Copy the Webhook Secret generated by Razorpay.
- Paste it into the OAuth Webhook Secret field in EasyCommerce.
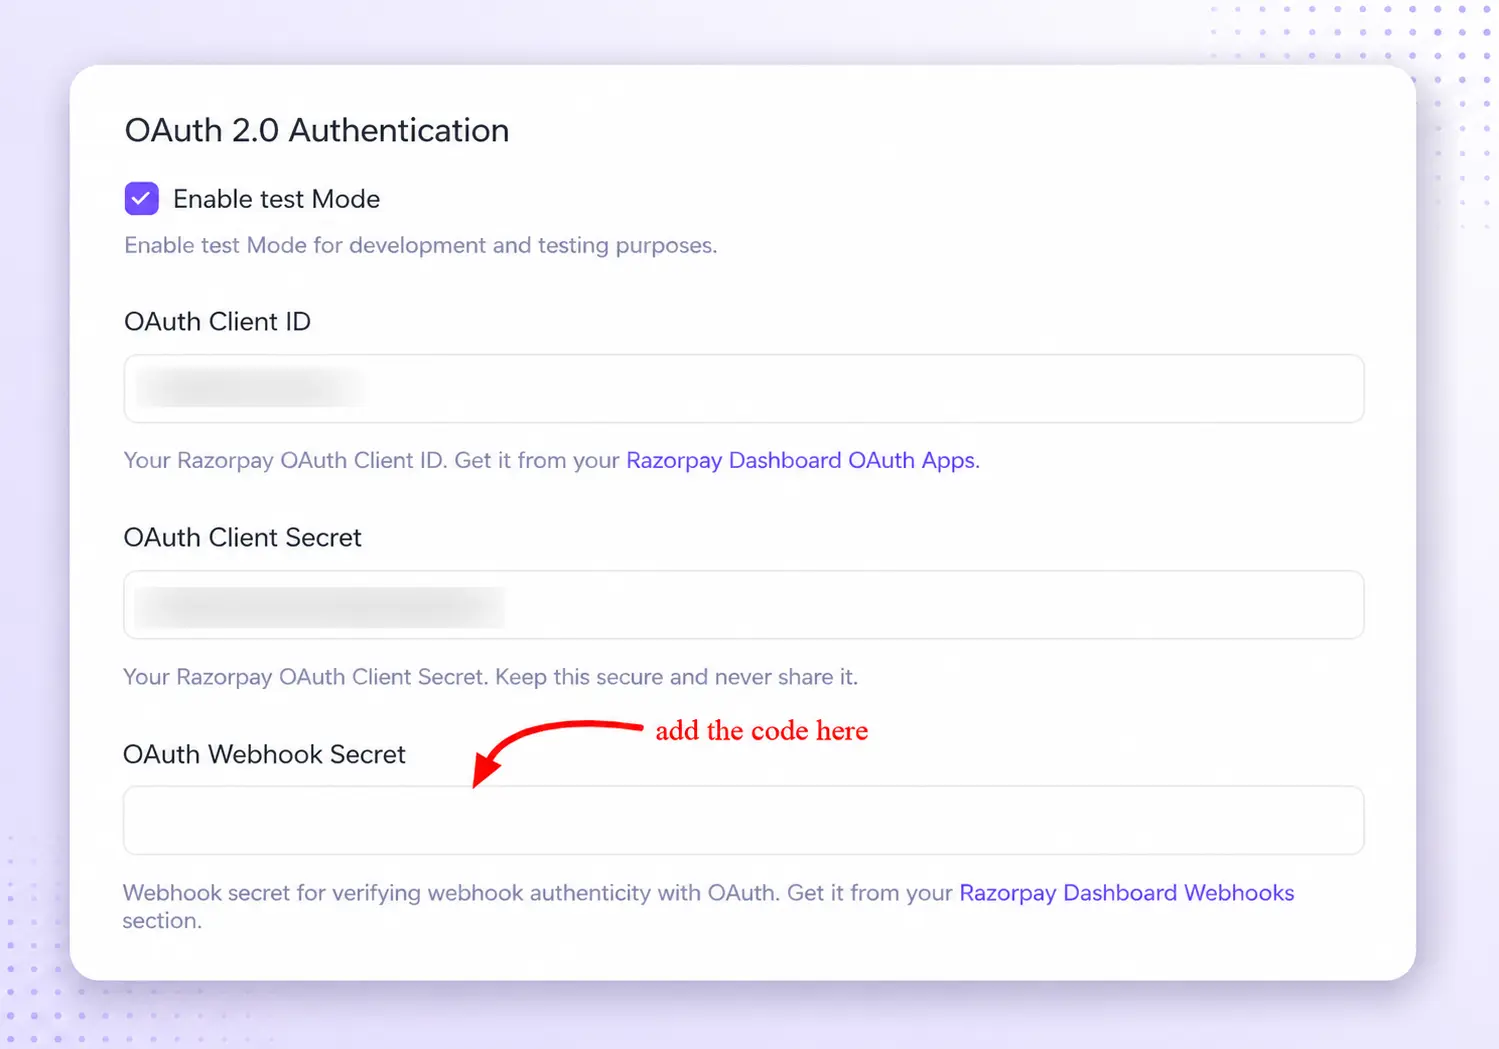
- Click Save Settings to complete the webhook configuration.
Step 6: Test Razorpay Before Accepting Live Payments
The Razorpay add-on includes a Test Mode for checking the complete payment flow before enabling Razorpay for customers.
With Test Mode enabled, you can connect using Razorpay test credentials and place a test order.
The recommended test should confirm that:
- Razorpay opens correctly during checkout
- The test payment completes
- The EasyCommerce order status changes correctly
- The transaction appears in the Razorpay Dashboard
- Configured webhook events reach the store
After testing, Test Mode can be disabled, and the account can be reconnected using live Razorpay credentials.
Final Words: Use EasyCommerce Razorpay Today
The Razorpay Payment Integration for EasyCommerce is available as a free add-on.
It brings Razorpay checkout, OAuth account authorization, payment verification, webhook-based order synchronization, test transactions, and full or partial refunds into the EasyCommerce payment workflow.
If Razorpay is already part of your payment stack, you can now use it directly with your EasyCommerce store instead of relying on a separate ecommerce payment integration.
For the complete configuration process, follow the Razorpay Payment Integration documentation before enabling the gateway for live transactions.
Frequently Asked Questions
Yes. The addon is free to download and use, with no registration or license fee. You’ll need an active Razorpay merchant account with completed KYC to accept live payments.
Yes. It supports Razorpay’s available payment methods, including UPI, credit/debit cards, net banking, and digital wallets. Customers can select their preferred method directly through Razorpay Checkout.
Yes. Payments are verified using HMAC-SHA256 signatures before being marked as successful. OAuth tokens are encrypted with libsodium, and webhook payloads are signature-verified to help prevent unauthorized or tampered transactions.