To build an ecommerce store in WordPress used to mean assembling several separate tools before you could sell a single product.
Today, the process can be much simpler. Modern storefront templates give you a professional starting point, native WordPress blocks make customization more accessible, and AI can help with repetitive tasks such as drafting product descriptions or generating supporting images.
You still need to make important decisions about your products, positioning, payments, shipping, and customer experience. But you no longer need to build every part of the store from scratch.
In this guide, you will learn how to build an ecommerce store, customize, test, and launch using WordPress and EasyCommerce, without writing code.
Key Takeaways
To build your WordPress ecommerce store, you will need to:
- Install WordPress and EasyCommerce
- Complete the initial store setup
- Select a ready-made store design
- Customize the design around your brand
- Add products, write descriptions with AI, pricing, images, and inventory
- Configure payments, shipping, and taxes
- Prepare your store for search engines
- Test the full buying experience before launch
Why Use WordPress for Your Ecommerce Store?
WordPress remains one of the most widely used content management systems (CMS) in the world. As of 2026, it powers approximately 41.2% of all websites measured by W3Techs.
Popularity alone is not the main reason to use it, though.
A self-hosted WordPress store gives you greater control over your website, content, customer records, and product data. You can choose your hosting provider, change the design, add new functionality, and move the website when your business needs change.
That flexibility makes WordPress particularly useful for businesses that want their store and content platform under one roof. With EasyCommerce, you can even run a full store on WordPress without WooCommerce.
It may be a good fit when you want to:
- Publish search-optimized articles alongside your products
- Control your storefront design and customer experience
- Avoid being locked into one hosted platform
- Add functionality as your business grows
- Keep your ecommerce data within your own WordPress environment
You will still have hosting, payment-processing, maintenance, and potentially premium-extension costs. The advantage is that you have more control over which services you use and how your store develops.
What You Need Before You Start
Prepare the following before building your store:
- A domain name
- Reliable WordPress hosting
- An SSL certificate
- A working WordPress installation
- The EasyCommerce plugin
- Your store name and logo
- Product names, prices, descriptions, and images
- Payment account information
- Shipping locations and rates
- Basic refund, privacy, and delivery policies
Having your product information ready will usually save more time than any technical shortcut.
You do not need to finalize every product before starting. Begin with a small, representative selection so you can design and test the store around real content.
Step 1: Install and Set Up EasyCommerce
Install the plugin
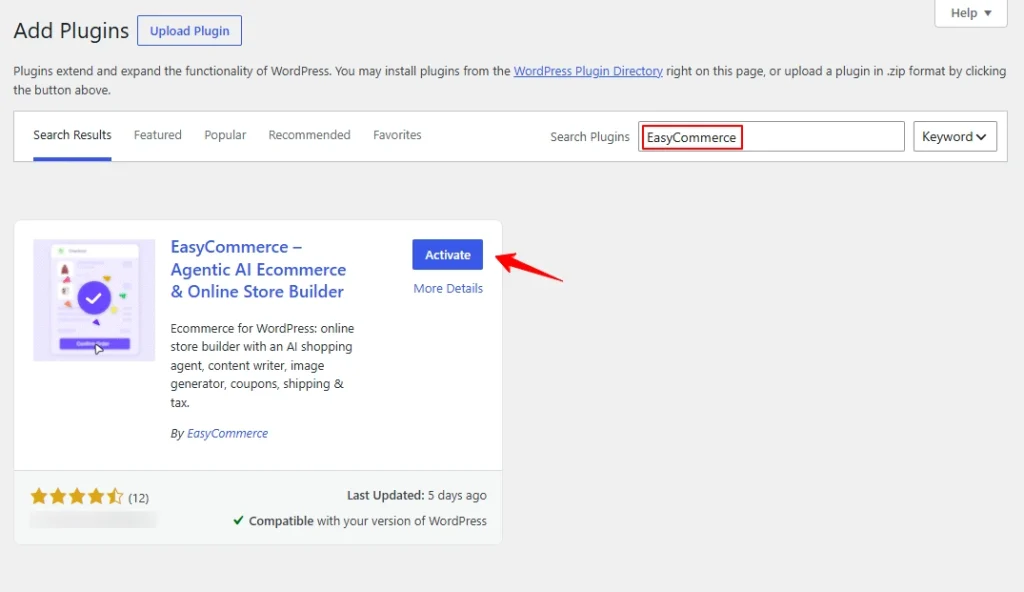
From your WordPress dashboard:
- Go to Plugins → Add New.
- Search for EasyCommerce.
- Click Install Now.
- Activate the plugin.
After activation, EasyCommerce provides access to its setup wizard.
Complete the setup wizard
The EasyCommerce setup wizard covers three core areas:
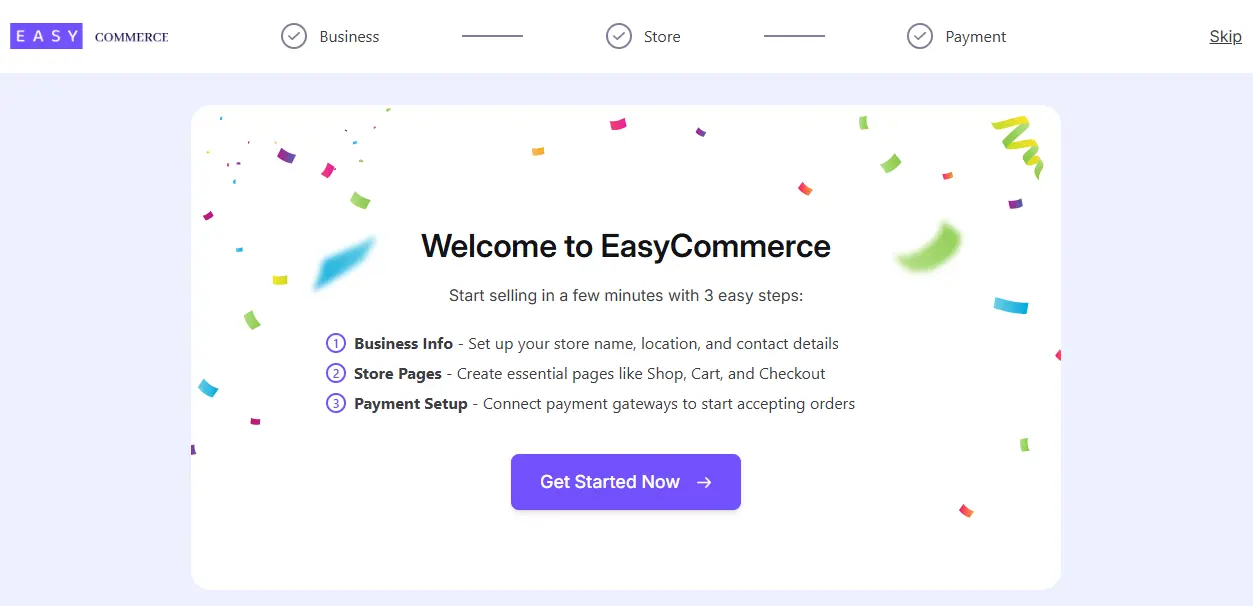
- Business: Add your store name, business type, logo, country, and contact information.
- Store: Assign or automatically create important pages such as the shop, checkout, payment page, and customer dashboard.
- Payment: Set your currency, currency format, and initial payment preferences.
You can return to these settings later, so the goal at this stage is to create a functional foundation rather than perfect every detail.
Step 2: Choose a Store Design
Starting from a professionally designed layout is faster and more consistent than building every store page from an empty canvas.
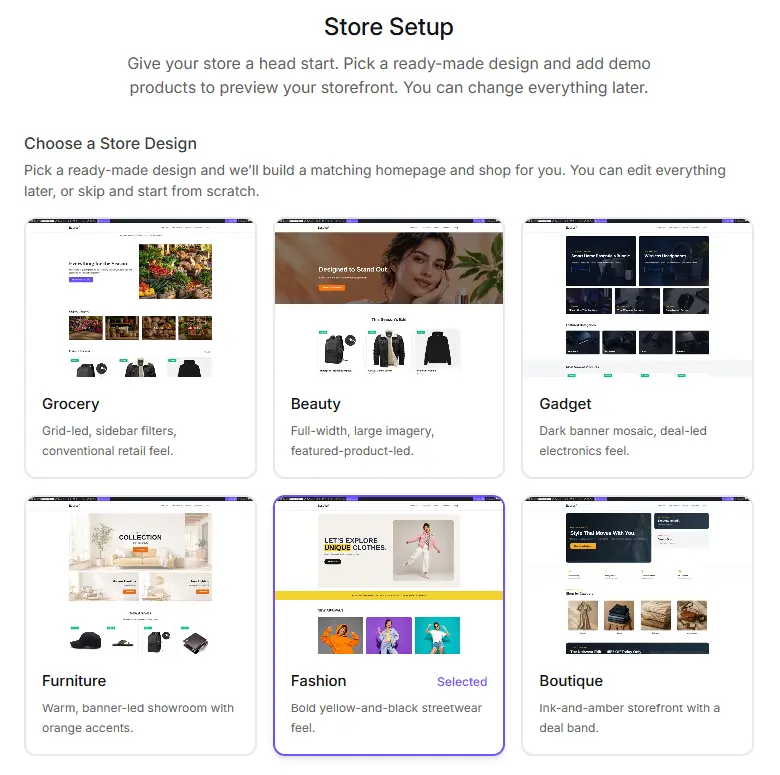
During setup, EasyCommerce shows a “Choose a Store Design” step. Each design is a ready-made storefront tuned for a specific kind of business, and EasyCommerce builds a matching homepage and shop to go with it.
The current library covers common store types, including:
- Digital Products and Memberships: an airy, subscription-led storefront for downloads and member access.
- Ebook / Template / PDF Store: a bookish, text-forward layout for ebooks and printables.
- Software / Plugin Licenses: a developer-tooling feel for licenses and subscriptions.
- Hybrid Store: a neutral layout that mixes physical goods and downloads.
- Fashion / Boutique: a bold streetwear look built around large imagery.
- Electronics: a dark, deal-led banner mosaic.
- Grocery: a grid-led layout with sidebar filters and a conventional retail feel.
- Furniture: a warm, banner-led showroom style.
- Classic / General Store: a traditional department-store look for a mixed catalog.
- Online Courses: an academy layout for cohorts, lessons, and bundles.
- Fruits: a fresh-market produce look.
You can also import demo products during this step to preview how a design looks with real content, then remove them at any time.
All of the designs include built-in search, filtering, sorting, and responsive behavior, and you can switch designs later without replacing your underlying product data.
If none of the designs fit, you do not have to use one. Leave every design unselected and click Next to start from a blank storefront and build your own. Because you can change and customize your design later, this choice is a starting point rather than a permanent decision.
How to choose the right design
Do not choose based only on which demo looks most attractive.
Pick the design that most closely matches what you sell, because each one is already arranged for that type of product. A fashion store leads with large lifestyle imagery, a grocery or general store leans on filters and dense grids, and a digital or membership store is built around downloads and access rather than shipping.
If your catalog spans more than one type, the Hybrid Store or Classic / General Store designs give you a neutral starting point.
Whatever you pick, the goal is the same: the best design is the one that helps shoppers find, understand, and purchase your products with the least friction.
Step 3: Customize the Store Around Your Brand
Most guides tell you to perfect the design first. That is backwards. Build the store around three or four real products before you touch a single color, because placeholder content hides the problems that real prices, long product names, and actual photos will expose. Design around fake products, and your store will look finished while quietly lying to you about how it behaves.
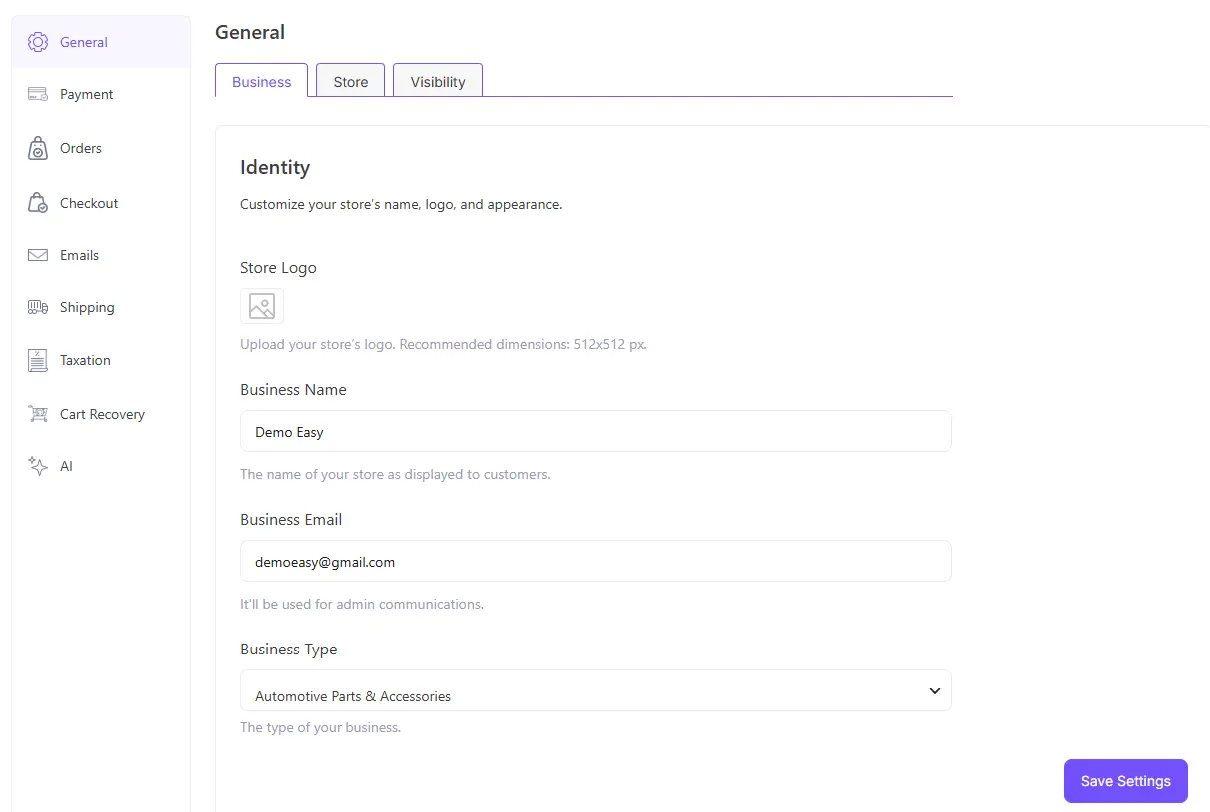
Once you select a design, customize it so the store feels like your business rather than a generic demo.
EasyCommerce store designs are built with Gutenberg blocks and WP Bakery Builder. This will allow you to work inside the native WordPress block editor and WP Bakery Builder.
Start with the brand elements that affect the entire store:
- Logo
- Brand colors
- Typography
- Button styles
- Header and navigation
- Footer information
- Product-image style
- Spacing and page width
Avoid making dozens of visual changes before adding real products. A design that looks polished with placeholder content may behave very differently once longer names, prices, variations, and actual images are added.
Keep the homepage focused
A useful ecommerce homepage usually needs:
- A clear explanation of what the store sells
- A reason to choose the brand
- Featured products or categories
- Relevant trust signals
- A direct next step
Do not fill the homepage with every available block. Each section should help the visitor understand the offer or move closer to a product.
Check the mobile experience early
Don’t wait until launch day to test mobile responsiveness. Mobile compatibility is primarily determined by your theme rather than a core EasyCommerce feature, so validate it as early as possible.
Review:
- Menu usability
- Text size
- Product-image cropping
- Filter controls
- Button size
- Cart accessibility
- Checkout form spacing
A store is not mobile-friendly simply because the layout technically adjusts to a smaller screen. It must also remain easy to browse and buy from.
Step 4: Add Your Products
Your product information does most of the selling. Design attracts attention, but product clarity helps customers decide.
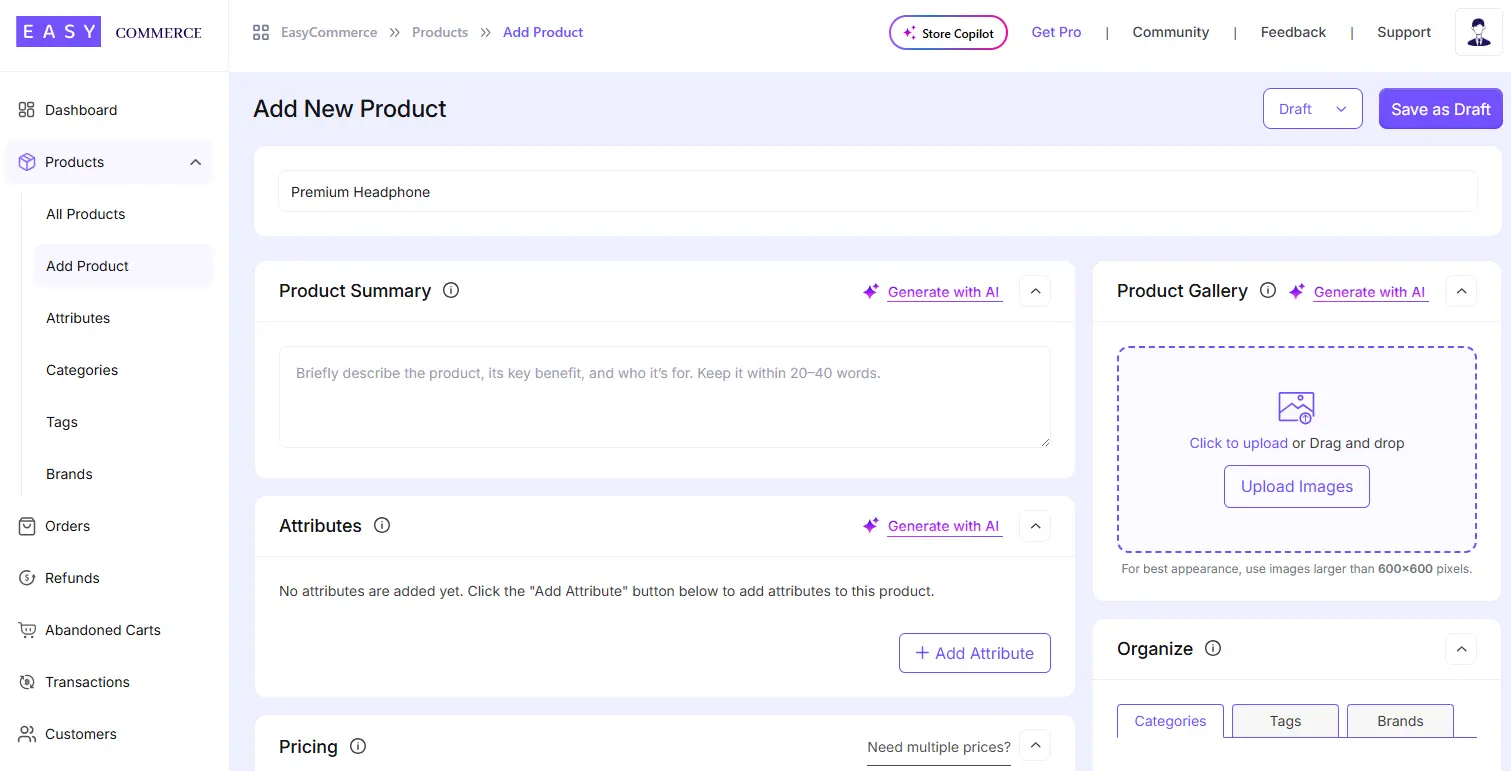
For each product, prepare:
- Product name
- Short summary
- Full description
- Regular and sale price
- Product images
- Categories and tags
- Variations such as size or color
- Stock quantity or inventory status
- Shipping information
- Relevant specifications
- Downloadable files, when applicable
EasyCommerce lets you manage these elements from its product interface and supports physical and digital products.
Write descriptions around buying decisions
A good product description should not simply list features.
Explain:
- Who the product is for
- What problem it solves
- What makes it different
- What the customer receives
- How it should be used
- What the customer needs to know before ordering
For example, instead of writing: Made with premium cotton and available in three colors. Write: A breathable everyday shirt made for warm weather, with a relaxed fit and three neutral color options that are easy to match. The second version translates product information into a customer benefit.
Use AI as a starting point
EasyCommerce includes tools such as AI Copywriter and AI Image Generator. These can reduce the time required to create first drafts and supporting visuals.
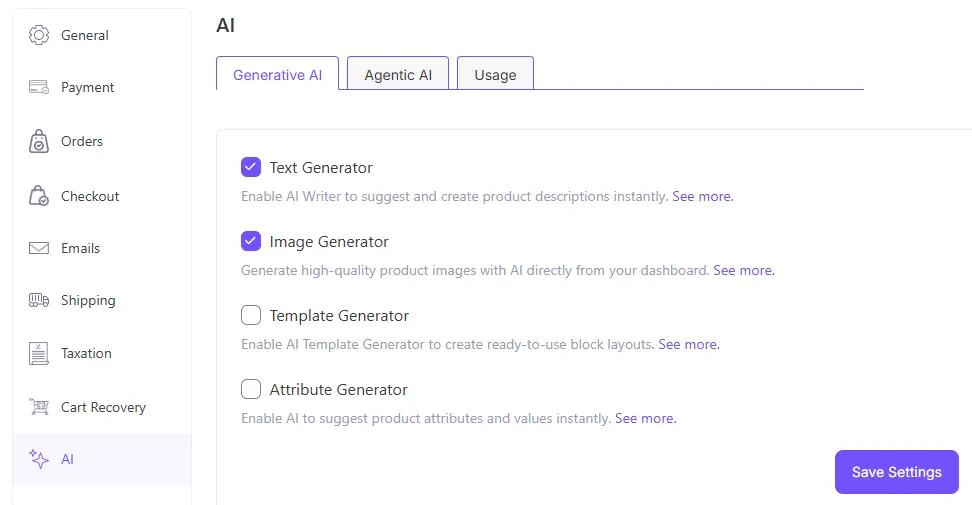
However, beware of publishing AI-generated content without reviewing it.
Check every draft for:
- Incorrect specifications
- Generic language
- Repeated phrases
- Unsupported promises
- Tone inconsistencies
- Missing customer objections
- Search terms forced into the copy
AI can accelerate the first draft. Your product knowledge should create the final version.
For important products, original photography will usually build more trust than a generated image. Use generated visuals selectively, for concepts, backgrounds, lifestyle scenes, or early-stage placeholders, not to misrepresent the product customers will receive.
Step 5: Build Product Pages That Help People Buy
A product page should answer the questions a customer would normally ask before purchasing.
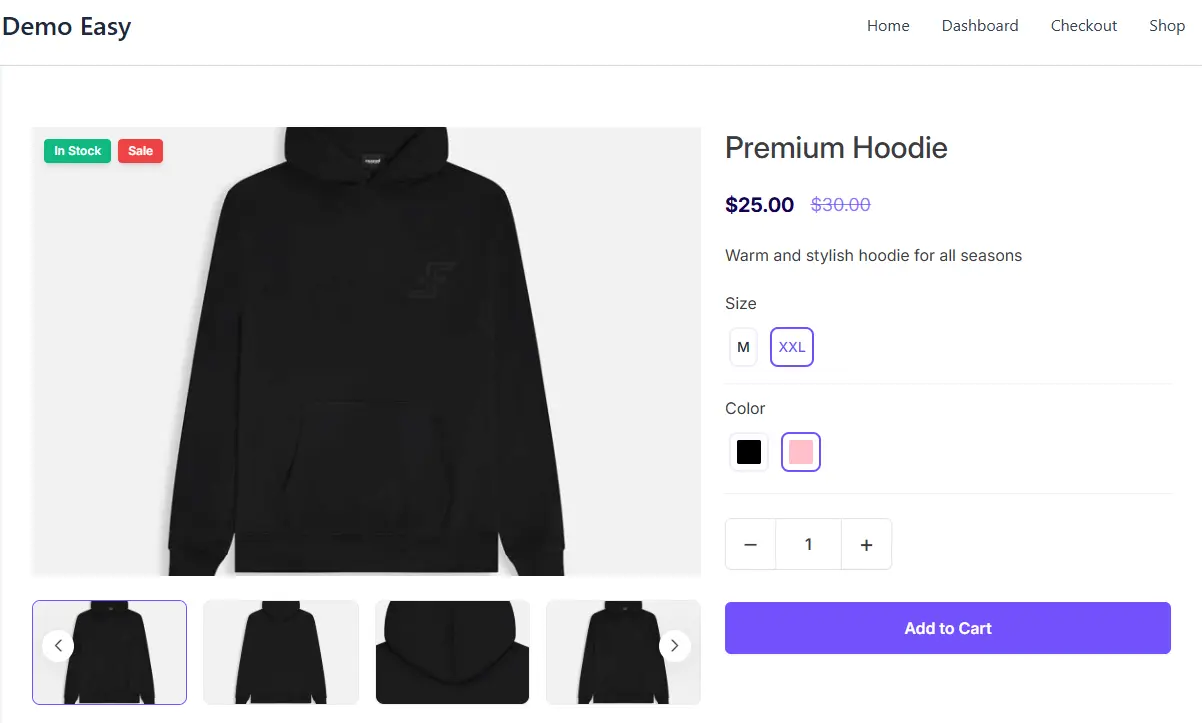
If you are launching around a single hero product, our guide on how to make a single-product website walks through the same page structure in more depth.
That includes:
- What exactly is this?
- Is it suitable for me?
- What is included?
- How much does it cost?
- Is it currently available?
- When will it arrive?
- Can I return it?
- Can I trust this business?
EasyCommerce product pages include important commerce elements such as image galleries, variation selectors, stock status, description and review tabs, related products, and prominent add-to-cart controls.
Your job is to fill that structure with persuasive, accurate information.
Use clear product images
Include enough images to remove uncertainty:

- Front and back views
- Close-up details
- Scale or size references
- Different variants
- The product in use
- Packaging or included accessories
Avoid uploading unnecessarily large files. Compress your images while keeping them clear enough for customers to inspect.
Make the primary action obvious
The add-to-cart button should be easy to find and clearly separated from secondary actions.
Avoid placing too many competing buttons, promotional badges, popups, and banners around it. The closer a customer gets to purchasing, the fewer distractions they should encounter.
Add genuine customer reviews
Reviews can reduce uncertainty, particularly for products that customers cannot examine in person.
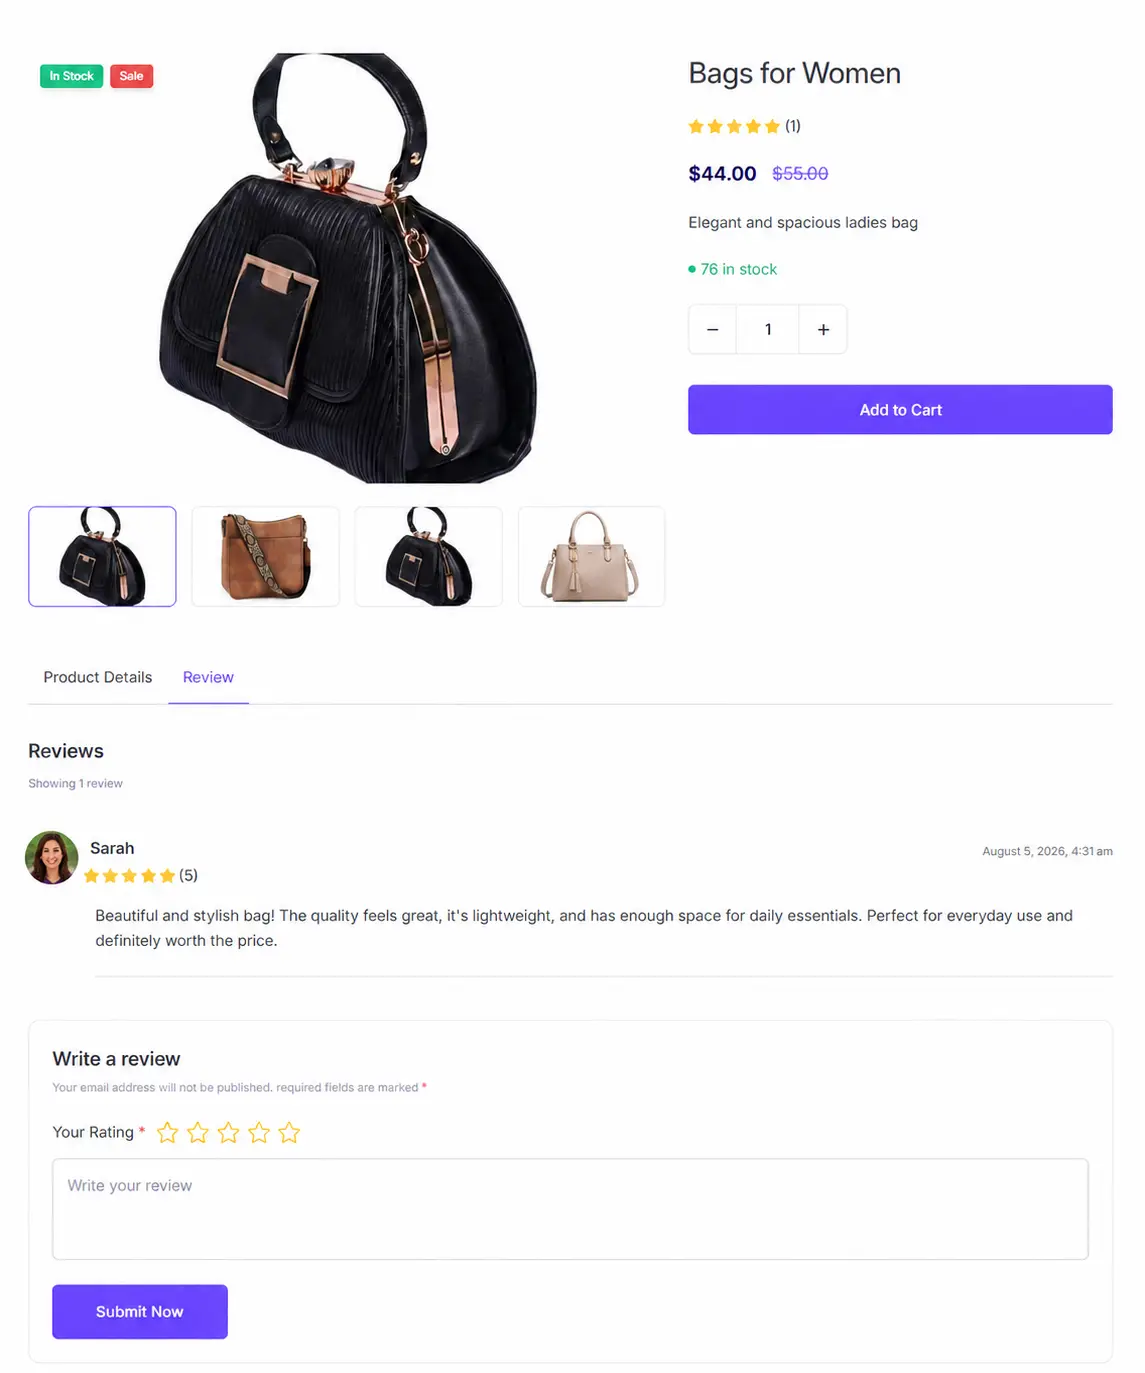
Research from Northwestern University’s Spiegel Research Center found that, in the retailer it studied, purchase likelihood for a product displaying five reviews was 270% greater than for a product displaying none.
The study also found that the first few reviews delivered the greatest incremental impact. This is a useful directional insight, although the exact result should not be treated as a guaranteed increase for every store.
Ask verified customers for honest feedback after purchase. Do not wait until you have hundreds of reviews. The first credible reviews can already make the buying decision easier.
Step 6: Configure Payments, Shipping, and Taxes
This is one of the most important parts of your setup. A beautiful storefront cannot compensate for a confusing or unreliable checkout.
Set up payments
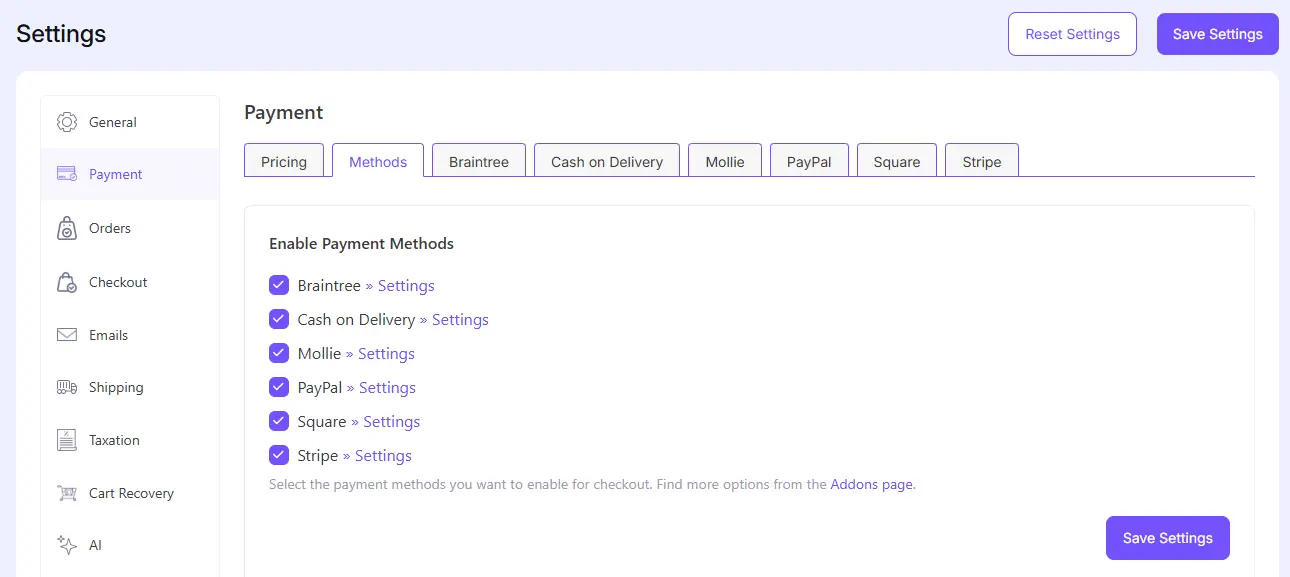
EasyCommerce supports payment methods for free including:
- Stripe
- PayPal
- Braintree
- Square
- Mollie
- Paddle
- Authorize.net
- Cash on delivery
Availability and setup requirements may vary by gateway, addon, account, country, and plan.
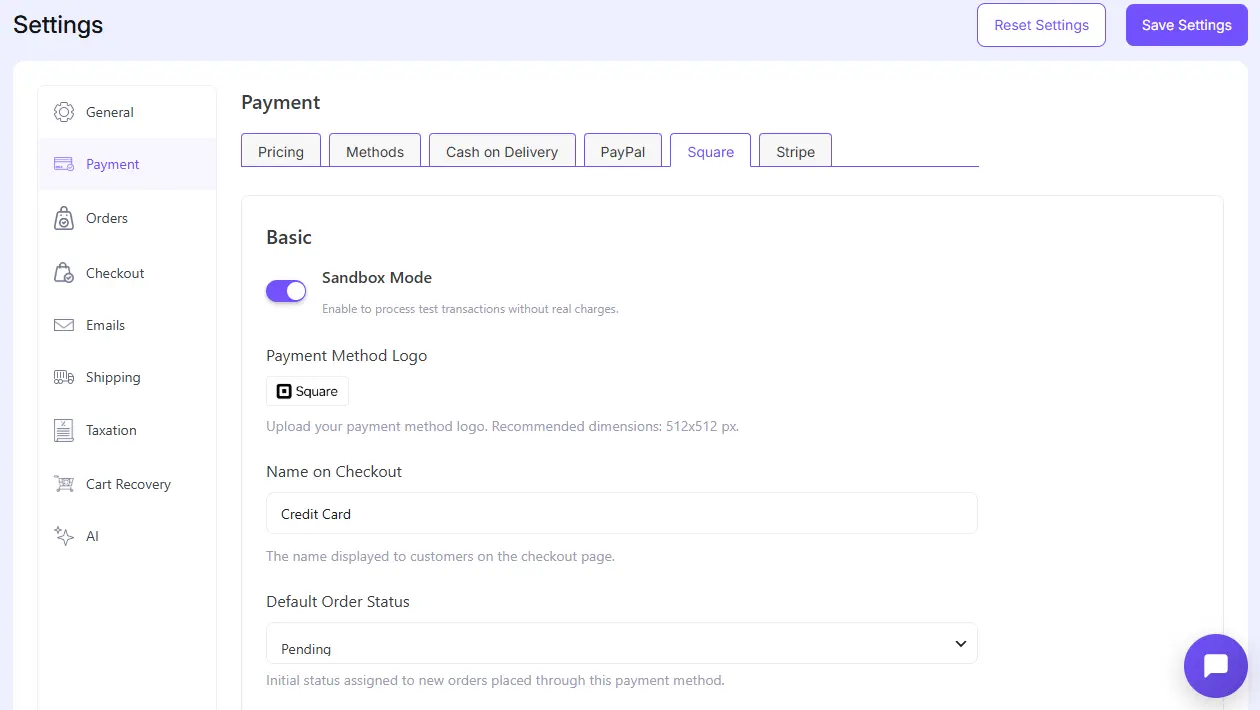
EasyCommerce does not add its own percentage-based transaction charge. Your payment gateway may still charge processing, currency-conversion, dispute, or other service fees.
Before launch:
- Connect the gateway.
- Enter the required credentials.
- Enable its test or sandbox mode.
- Complete a test transaction.
- Confirm the order appears correctly.
- Verify that confirmation emails are delivered.
- Switch the gateway to live mode only after testing.
Configure shipping
EasyCommerce allows shipping rules to be created using conditions such as location, weight, quantity, or cart value.
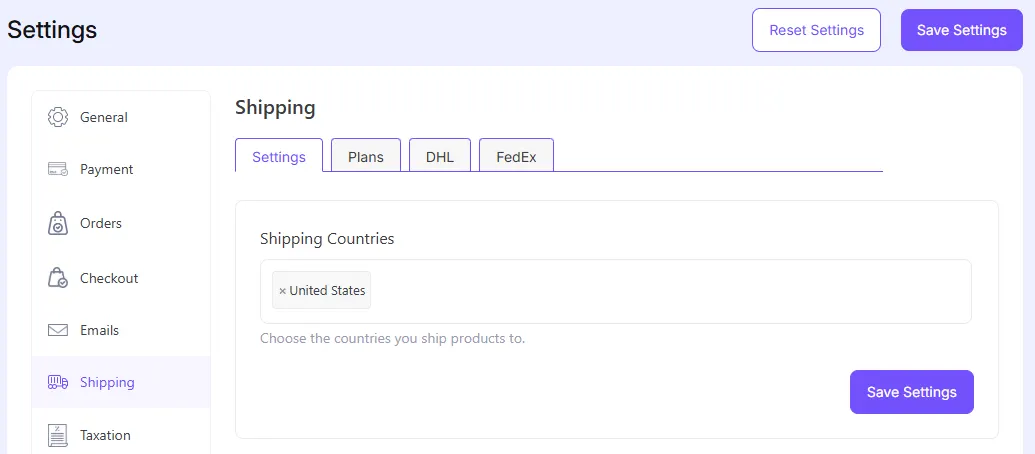
Keep your shipping structure easy to understand. Customers should know:
- Where you deliver
- How much delivery costs
- When free shipping applies
- Estimated delivery times
- Whether tracking is available
- Which products have special conditions
Do not hide unavoidable costs until the final checkout step.
Baymard Institute currently reports an average cart abandonment rate of approximately 70.19%. In its latest published breakdown, 39% of surveyed shoppers who abandoned for reasons other than casual browsing cited high additional costs such as shipping, tax, and fees.
Display delivery costs or clear calculation rules as early as reasonably possible.
Configure taxes carefully
Set the relevant tax classes and location-based rates for your products.
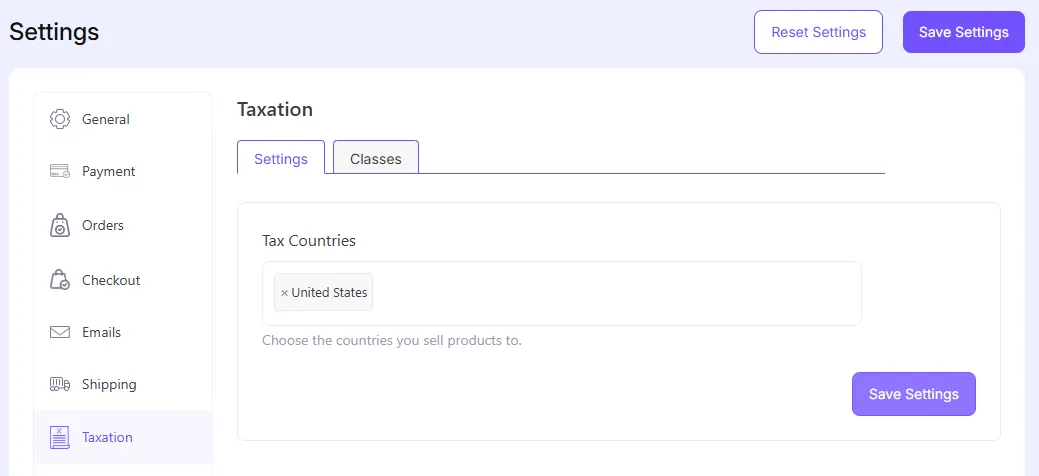
Ecommerce software can apply the rules you configure, but it cannot decide your legal tax obligations for you. Requirements vary according to your business location, customer location, registration status, and the type of product you sell.
Consult an appropriate tax professional when you are unsure.
Enable cart recovery
Even a well-designed checkout will not convert every visitor.
EasyCommerce includes abandoned-cart tracking and recovery reminders. You can define when a cart becomes abandoned and configure the reminder content sent to the customer.
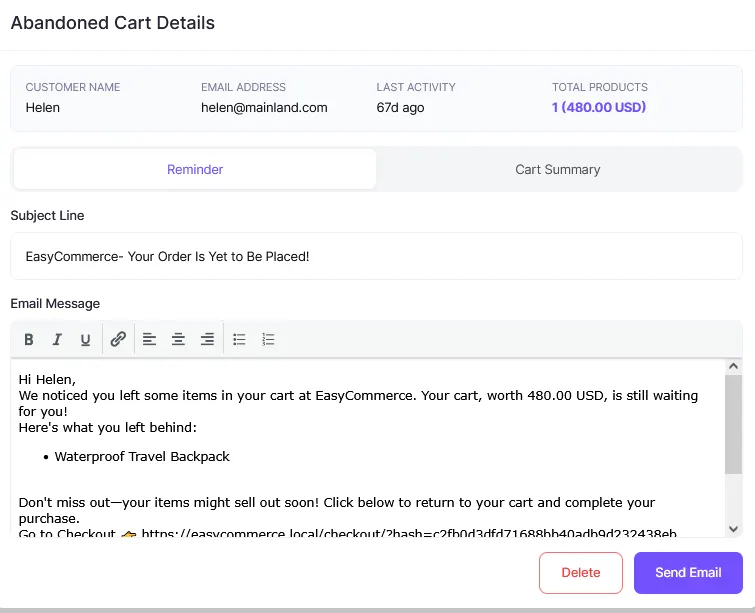
Recovery emails are most effective when they support a checkout that is already transparent and easy to use. They should not be used to compensate for unexpected costs, missing payment methods, or technical errors.
Step 7: Prepare the Store for Search and Measurement
Publishing a store does not automatically bring qualified traffic.
Before launch, make your important pages easier for search engines and customers to understand.
Optimize product and category pages
For each important page:
- Use a descriptive product or category title
- Create a short, readable URL
- Write unique page copy
- Add useful image alt text
- Link related products and categories
- Avoid copying manufacturer descriptions without adding value
- Write a relevant search title and meta description using your preferred SEO tool
Write for a specific search need rather than repeating the same keyword unnaturally.
A page selling waterproof hiking backpacks should answer questions about capacity, materials, comfort, weather protection, sizing, and intended use, rather than repeat “best hiking backpack” in every paragraph.
Connect analytics
Set up analytics before launch so your earliest visits and sales are measured.
At minimum, track:
- Product views
- Add-to-cart actions
- Checkout starts
- Completed purchases
- Revenue
- Conversion rate
- Cart abandonment
- Traffic sources
- Top landing pages
This information will help you distinguish a traffic problem from a product-page or checkout problem.
Without measurement, store optimization becomes guesswork.
Step 8: Test the Complete Customer Journey
Do not test only the homepage.
“The stores that struggle are almost never the ones that picked the wrong design. They are the ones that never placed a single test order before going live. Buy from your own store first, on your own phone, and you will catch most of the problems a customer would have hit.” — [Name], [Product Lead], EasyCommerce
EasyCommerce includes Store Mode, which allows administrators to work with the real store in Test mode while public visitors see a maintenance page. When the store is ready, it can be switched to Live from the WordPress admin bar.
Before launching, behave like a new customer.
Test the storefront
- Browse several categories
- Use search and filters
- Open products with and without variations
- Check sale prices and stock messages
- Review the store on desktop and mobile
Test the cart and checkout
- Add and remove items
- Change quantities
- Apply a coupon
- Test shipping calculations
- Check tax calculations
- Complete a test payment
- Try an unsuccessful payment
- Confirm that the order status updates correctly
Test customer communication
- Review the order-confirmation email
- Check the sender name and reply address
- Test password-reset and account emails
- Verify abandoned-cart reminders
- Open emails on mobile
Test store operations
- Confirm inventory changes after an order
- Review the order inside the dashboard
- Test refunds or cancellations where possible
- Confirm downloadable products are delivered correctly
- Check that administrators receive the necessary notifications
Testing for 15 minutes is better than not testing at all, but a complete launch review should cover every major product type, payment method, shipping condition, and customer message you plan to use.
19 WordPress Ecommerce Store Launch Checklist
Before switching your store to Live, you need to confirm that you have done everything carefully:
- Business name and contact details are correct
- Logo, colors, and typography are consistent
- Navigation works on desktop and mobile
- Products have accurate descriptions and prices
- Product images are clear and compressed
- Variations work correctly
- Inventory rules are configured
- Payment gateway credentials are correct
- Test transactions have succeeded
- Shipping rates have been tested
- Tax rules have been reviewed
- Refund, privacy, shipping, and terms pages are published
- Order emails are being delivered
- Analytics is connected
- Search titles and descriptions are prepared
- SSL is active
- Website backups are configured
- The store has been checked on multiple devices
- Store Mode is ready to switch from Test to Live
7 Common Mistakes to Avoid
A successful store launch is not just about getting everything online. Avoiding these common mistakes can prevent lost sales, customer frustration, and unnecessary technical problems.
- Launching before placing a test order: Never assume that checkout works because the pages look correct. Test the transaction, email, order status, inventory change, and customer experience.
- Publishing generic AI descriptions: AI-written copy can save time, but generic text gives customers little reason to trust or choose the product. Add real specifications, use cases, objections, and brand knowledge.
- Hiding delivery costs: A customer should not discover a major shipping charge after completing most of the checkout. Explain your costs and thresholds earlier.
- Using weak or misleading images: Customers need to understand what they are buying. Use accurate images and avoid generated visuals that could create the wrong expectation.
- Installing unnecessary plugins: Do not add a separate plugin for every small requirement without checking what your ecommerce system already provides. Every additional plugin creates another update, compatibility, security, and maintenance dependency. Add one only when it solves a meaningful requirement.
- Ignoring mobile checkout: A responsive layout can still be difficult to use. Test form fields, menus, filters, buttons, payment options, and validation messages on a real mobile device.
- Launching without analytics: You need a baseline before you can improve conversion. Connect measurement before sending paid, social, affiliate, or email traffic to the store.
Final Thoughts
Building an ecommerce store in WordPress is no longer primarily a technical challenge.
The more important challenge is creating a store that customers can understand and trust.
Start with a proven storefront structure. Add accurate product information. Make shipping and payment terms clear. Utilize AI to automate repetitive tasks, while maintaining human judgment in the outcome. Then test the entire buying journey before asking real customers to use it.
EasyCommerce combines product management, store designs, payments, shipping, taxes, reviews, abandoned cart recovery, AI tools, and Store Mode into a single WordPress ecommerce system.
You can install EasyCommerce for free and begin building your store with a small selection of real products. Once the customer journey works from product discovery through payment and confirmation, you will have a stronger foundation for adding more products, traffic, and marketing campaigns.
Frequently Asked Questions
Yes. EasyCommerce provides setup tools, ready-made store designs, Gutenberg blocks, and dashboard-based settings for products, payments, shipping, and taxes. Advanced customizations may still require development help, but a standard store can be created without writing code.
A basic store with a small, prepared catalog may be assembled and tested within a day. A complete business launch may take longer because product photography, copywriting, payment approval, shipping decisions, policy pages, branding, and testing require additional work. The software setup is only one part of the launch.
Yes. EasyCommerce lets you switch between its ready-made store designs without removing your product data. Review the store after switching to make sure your images and content still fit the new layout properly.
EasyCommerce supports Stripe, PayPal, Braintree, Square, Mollie, Paddle, Authorize.net, and cash on delivery. Some options may require separate activation, credentials, addons, or eligible gateway accounts.
EasyCommerce does not take an additional percentage from each transaction. However, your selected payment processor may charge its standard processing and service fees.
Yes. EasyCommerce can identify abandoned carts and send configurable recovery reminders. You should still optimize your checkout first so the emails are recovering distracted shoppers rather than repeatedly sending them back to unresolved friction.