Starting an online store can get expensive before you even make your first sale.
Hosting, a domain, ecommerce software, payment fees, premium extensions, and marketing tools can quickly add up.
But the ecommerce software itself does not have to be one of those costs.
You can keep the starting setup simpler.
With WordPress and EasyCommerce, you can build a store using a free ecommerce plugin, list unlimited products, and manage orders from your own website. You’ll still need hosting and a domain, but you don’t need to buy the store software first.
Let’s build the essentials: one product, a working checkout, and a successful test order.
Can You Really Start an Online Store for Free?
Yes, if we are talking about the ecommerce software.
WordPress is open-source software, and EasyCommerce offers its core ecommerce plugin for free. According to EasyCommerce, the core plugin includes everything you need to launch and sell, while optional advanced features and additional AI usage cost extra.
A real online business will still have some basic expenses.
| Requirement | Typical cost |
| WordPress | Free |
| EasyCommerce core | Free |
| Product listings | No product limit |
| EasyCommerce transaction fee | None |
| Domain | Usually paid |
| Hosting | Usually paid |
| SSL certificate | Often included with hosting |
| Payment processing | Depends on your payment gateway |
| Advanced features | Optional |
| Additional AI usage | Optional |
So, “free online store” does not mean every part of running a business costs $0.
It means you can avoid paying for the core ecommerce software or upgrading simply because you want to list more products.
Why Use WordPress for Your Online Store?
WordPress remains the most widely used content management system on the web.
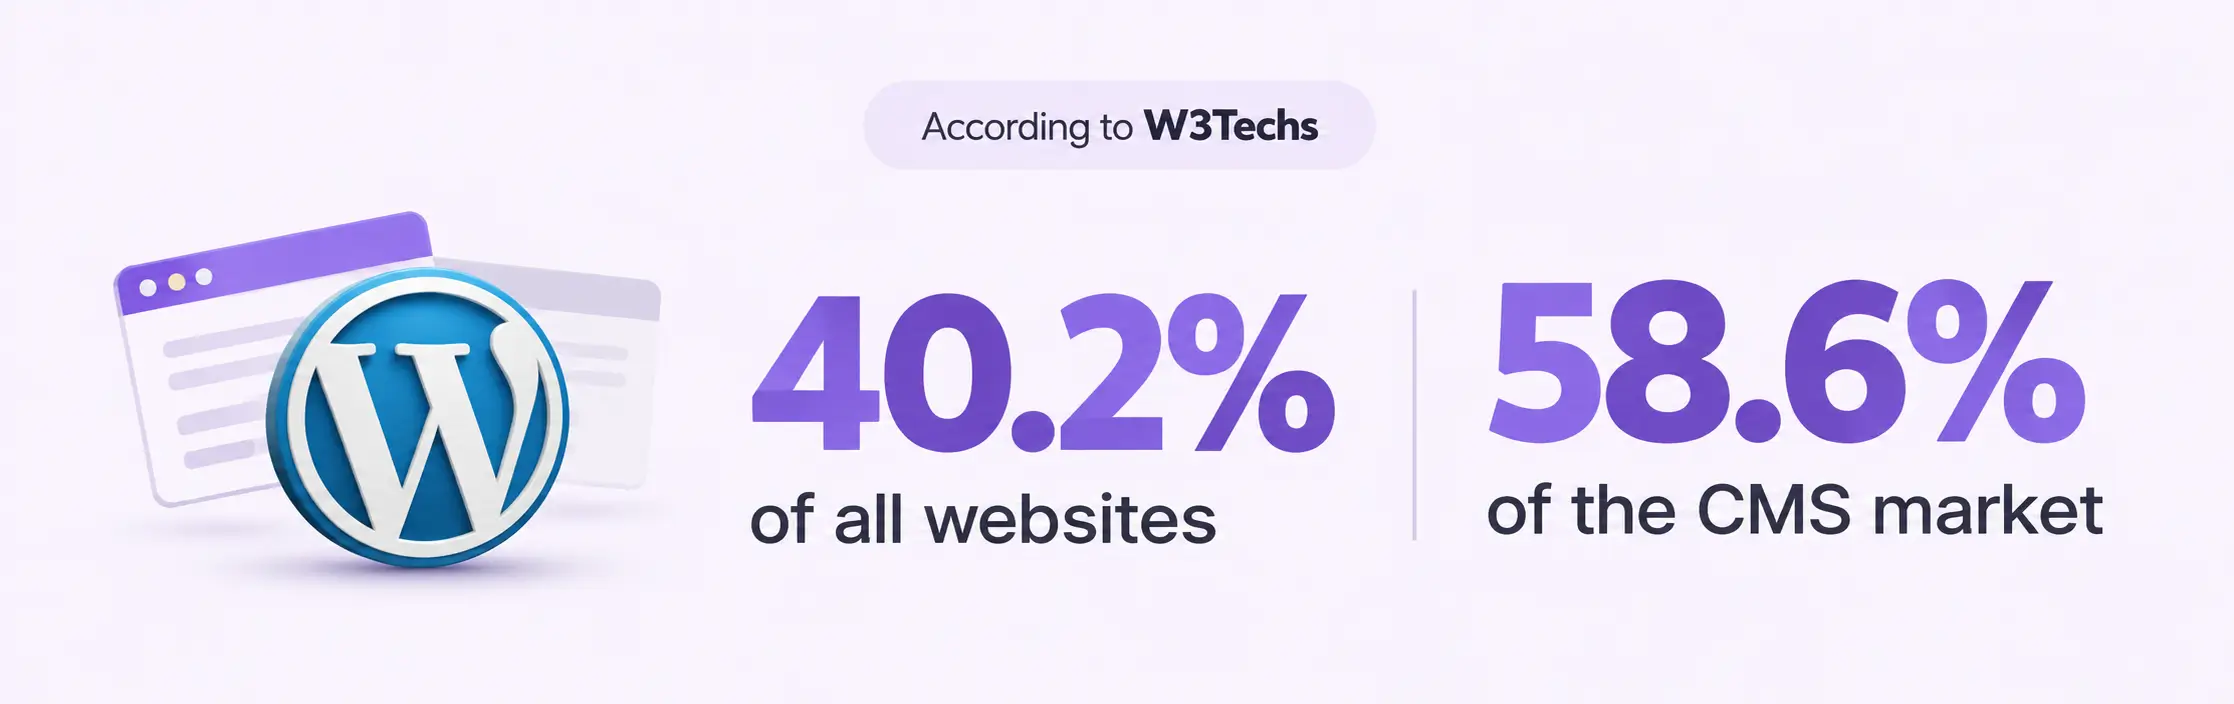
As of October 4, 2026, W3Techs reports that WordPress powers 40.2% of all websites and holds 58.6% of the CMS market.
That makes it a familiar foundation for businesses that want more control over their website.
Unlike a hosted ecommerce service where your storefront lives entirely inside someone else’s platform, WordPress lets you manage your store alongside the rest of your website.
That can include:
- Product pages
- Blog content
- Landing pages
- Buying guides
- Documentation
- FAQs
- Customer resources
You also have much more control over themes, plugins, content, data, and how the site develops as the business grows.
The trade-off is that you are responsible for hosting and maintaining the WordPress website.
Why EasyCommerce?
WordPress does not include ecommerce functionality by default. You need an ecommerce plugin to turn it into a store.
EasyCommerce is an AI-powered WordPress ecommerce plugin built to handle the core parts of running an online store, including products, orders, checkout, payments, shipping, tax, coupons, abandoned carts, customer accounts, reviews, and reporting.
For someone starting with a limited budget, a few things are especially useful.
(i) Free at the Core
EasyCommerce states that its core plugin is completely free and includes what you need to launch and sell.
You can upgrade later if your business needs more advanced functionality, but you do not have to start with a paid ecommerce plan.
(ii) Add Unlimited Products
EasyCommerce does not limit how many products you can add to your store.
Its own documentation and guides describe the platform as supporting unlimited products, making it useful for businesses that expect their catalogs to expand over time.
That means a store can start with five products and later grow to 50, 500, or more without upgrading just because the catalog grew.
(iii) No EasyCommerce Transaction Fee
EasyCommerce does not add its own percentage fee to your orders.
Your payment gateway may still charge its normal processing fee, but EasyCommerce itself does not take another percentage of each sale.
(iv) Core Features in One System
A store needs more than products and a checkout button.
You may also need coupons, abandoned cart recovery, tax settings, shipping rules, customer accounts, inventory management, emails, and analytics.
EasyCommerce includes many of these core functions directly instead of requiring a separate plugin for every basic requirement.
That can make the starting setup easier to manage.
What About WooCommerce?
WooCommerce also offers a free core plugin, unlimited products, and no revenue share. The useful comparison is which features you need and how you’ll add them.
For example, WooCommerce’s pricing guide lists paid extensions at 29–299 per year per extension. That is a published range, not a required cost for every store. Free extensions are available too.
EasyCommerce includes features such as coupons and abandoned cart recovery in its core experience. Compare the complete setup your business needs before paying for extras.
Explore EasyCommerce’s store features →
Before You Start: Get Prepared
You don’t need your entire catalog ready. Gather these essentials:
- Your business details: store name, logo, and contact email.
- Domain and hosting: Your store needs a place on the internet
- One product: title, description, price, and clear photos.
- Delivery information: shipping details or a downloadable file.
- A payment account: with a provider that supports your business and country.
For this walkthrough, imagine you’re launching a small store selling cotton tote bags in two colors. Start with that one product, complete the purchase journey, and expand afterward.
10 Cost-Free Steps to Start an Online Store
Follow these 10 steps to set up WordPress, add your first product, and test your checkout with EasyCommerce.
Step 1: Get WordPress Ready
If you already have a WordPress website, skip ahead.
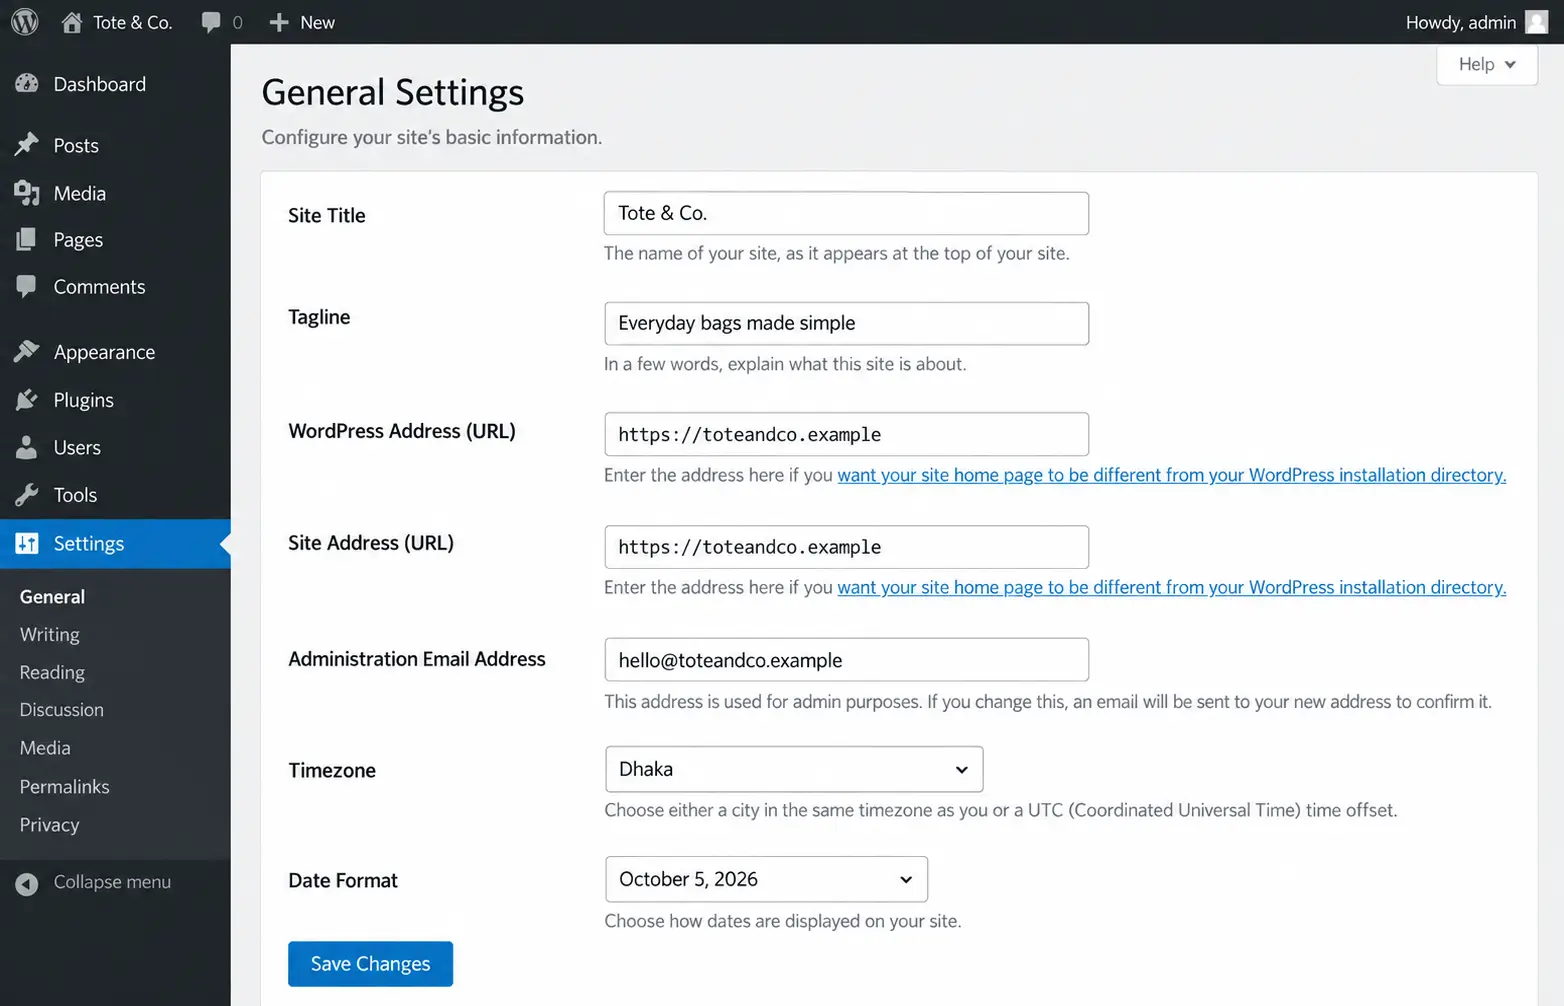
Otherwise, connect your domain to your hosting account and install WordPress using your host’s setup process. Then complete these basic checks:
| Check | Where to look |
| Your website loads over HTTPS | Open the website in your browser |
| Site title and timezone are correct | Settings → General |
| URLs use your preferred structure | Settings → Permalinks |
| The theme works on mobile | Preview a page on your phone |
Leave detailed design work until the buying journey works.
Step 2: Install EasyCommerce
From your WordPress dashboard:
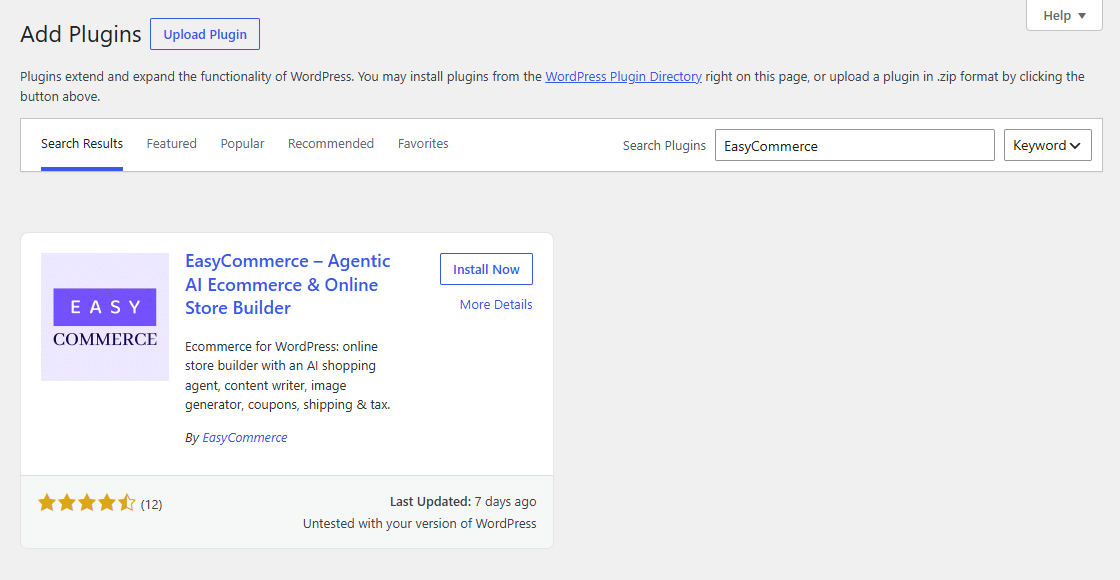
1. Go to Plugins → Add New Plugin. Search for EasyCommerce.Click Install Now, then Activate.
2. Open the setup wizard.
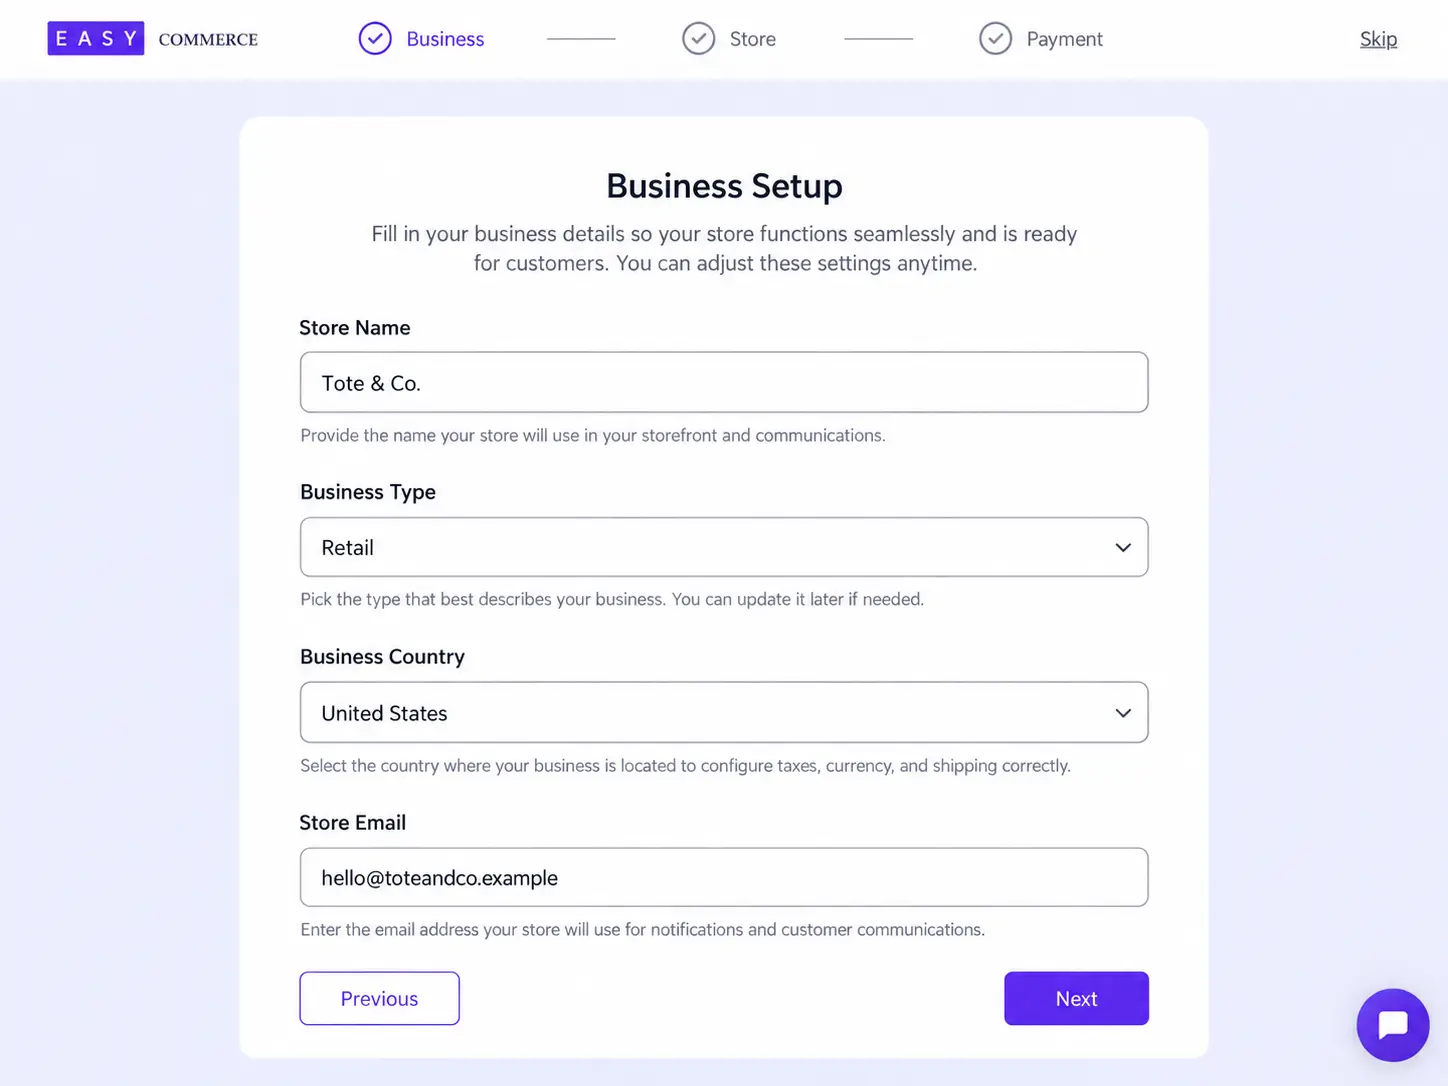
Enter your business details where requested and review the store currency. Recent versions automatically create the Shop, Checkout, and Customer Dashboard pages, so check for those before creating duplicates.
You can reopen the wizard through Plugins → Installed Plugins → EasyCommerce → Setup Wizard.
Keep Store Mode set to Test while you build. Its control is available in the WordPress admin bar.
Navigation note: Depending on the screen or documentation version, the administration area may be labeled Store or EasyCommerce. Open it first, then follow the paths below.
Step 3: Add a Product Someone Can Understand
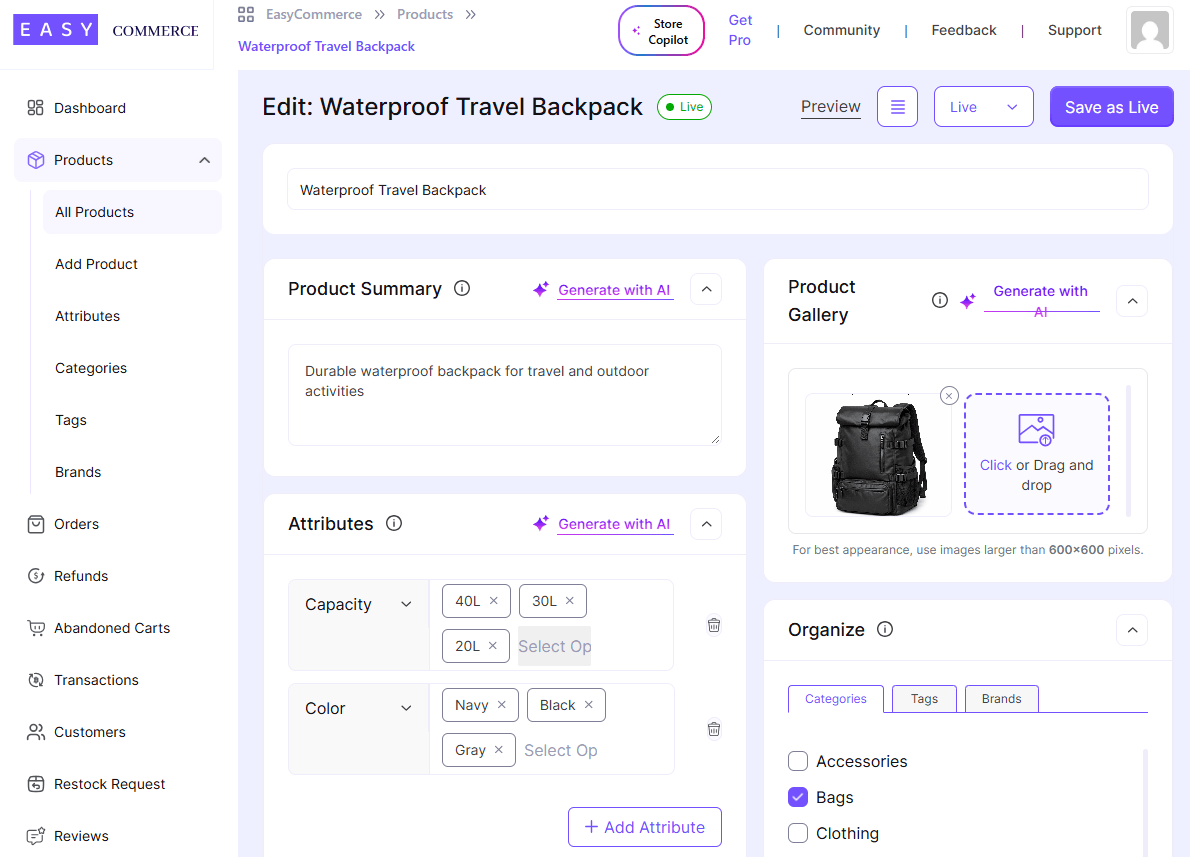
Open Store → Products → Add Product. Start with a specific title. For our example:
| Too vague | More useful |
| Everyday Essential | Cotton Tote Bag with Inside Pocket |
| Premium quality bag | Explain the fabric, dimensions, and carrying capacity |
| Perfect for everyone | Describe the shopping, work, or everyday use it suits |
Next, complete the product details:
- Write a short summary and fuller description.
- Use Upload Images to add photos.
- Choose the main image with Set as Thumbnail.
- Select Physical or Digital in the pricing area.
- Enter the price, SKU, and relevant stock information.
- Assign a category under Organize, then save.
For a digital product, attach the correct download file. Need help with a field? Follow our product editor walkthrough.
Step 4: Add Options Without Creating a Messy Catalog
Our tote bag comes in Black and Natural. Those belong as options within the same product.
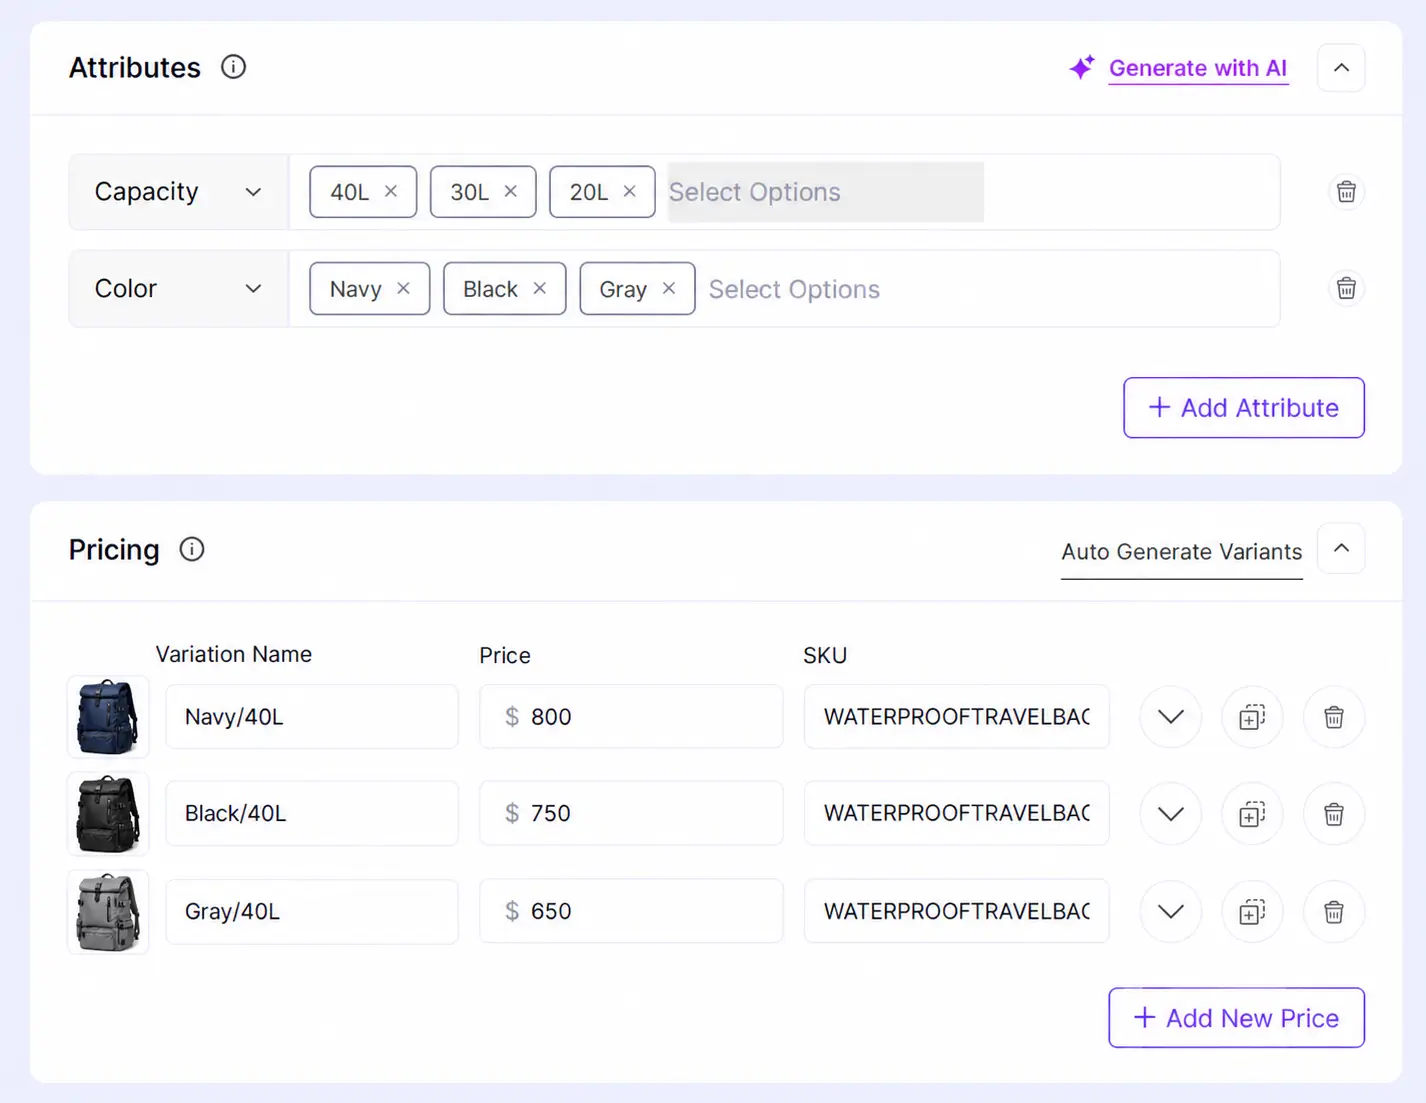
Open Products → Attributes, create a Color attribute, add both options, and click Create Attribute.
Return to the product editor and assign the attribute. You can use Auto Generate Variants to create combinations or + Add New Price to add them individually.
Review each option before saving:
| Variation | Example SKU | What to check |
| Black tote bag | TOTE-BLK | Correct price and available stock |
| Natural tote bag | TOTE-NAT | Correct price and available stock |
Only create combinations you actually sell. If a product has two colors and three sizes, that produces six combinations to check.
Checkpoint: Customers can select the right option, and every option has accurate pricing and availability.
Step 5: Set Up Your First Payment Method
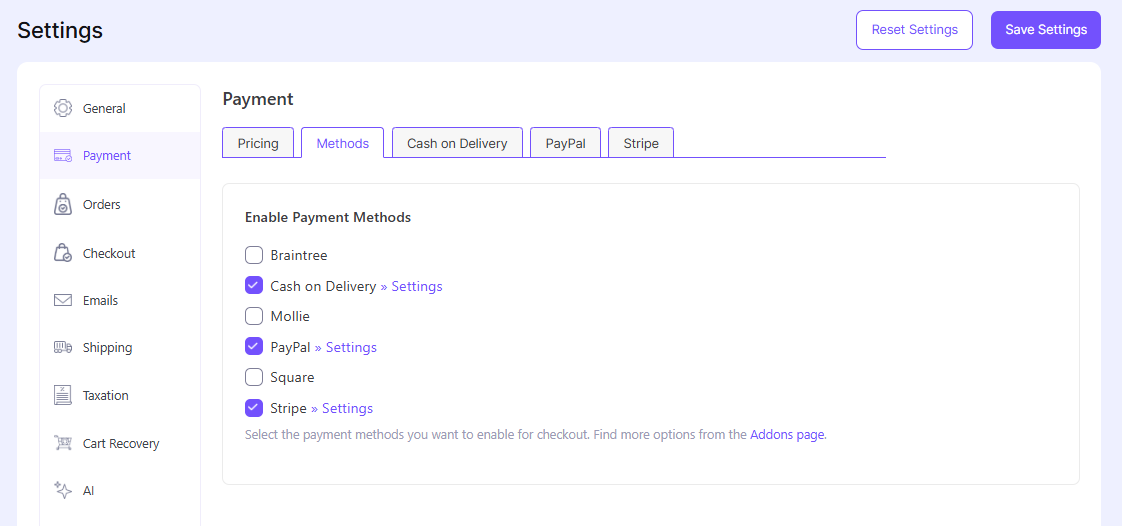
Open Settings → Payment → Methods inside EasyCommerce. Enable your chosen provider, save, and open its settings to enter the required credentials.
For Stripe, our payment setup guide explains the Publishable Key, Secret Key, and Webhook Secret.
Start with one working payment method. You can add more once the first one is properly connected.
Before testing, understand these two controls:
| Control | What it does |
| Store Test mode | Controls public access while you build |
| Payment sandbox or test mode | Lets you test payments without using the live payment environment |
Check both. Making your store private does not automatically mean every payment attempt is a sandbox transaction.
Checkpoint: Your provider is connected, and you know which payment environment is active.
Step 6: Decide Where You Ship and What It Costs
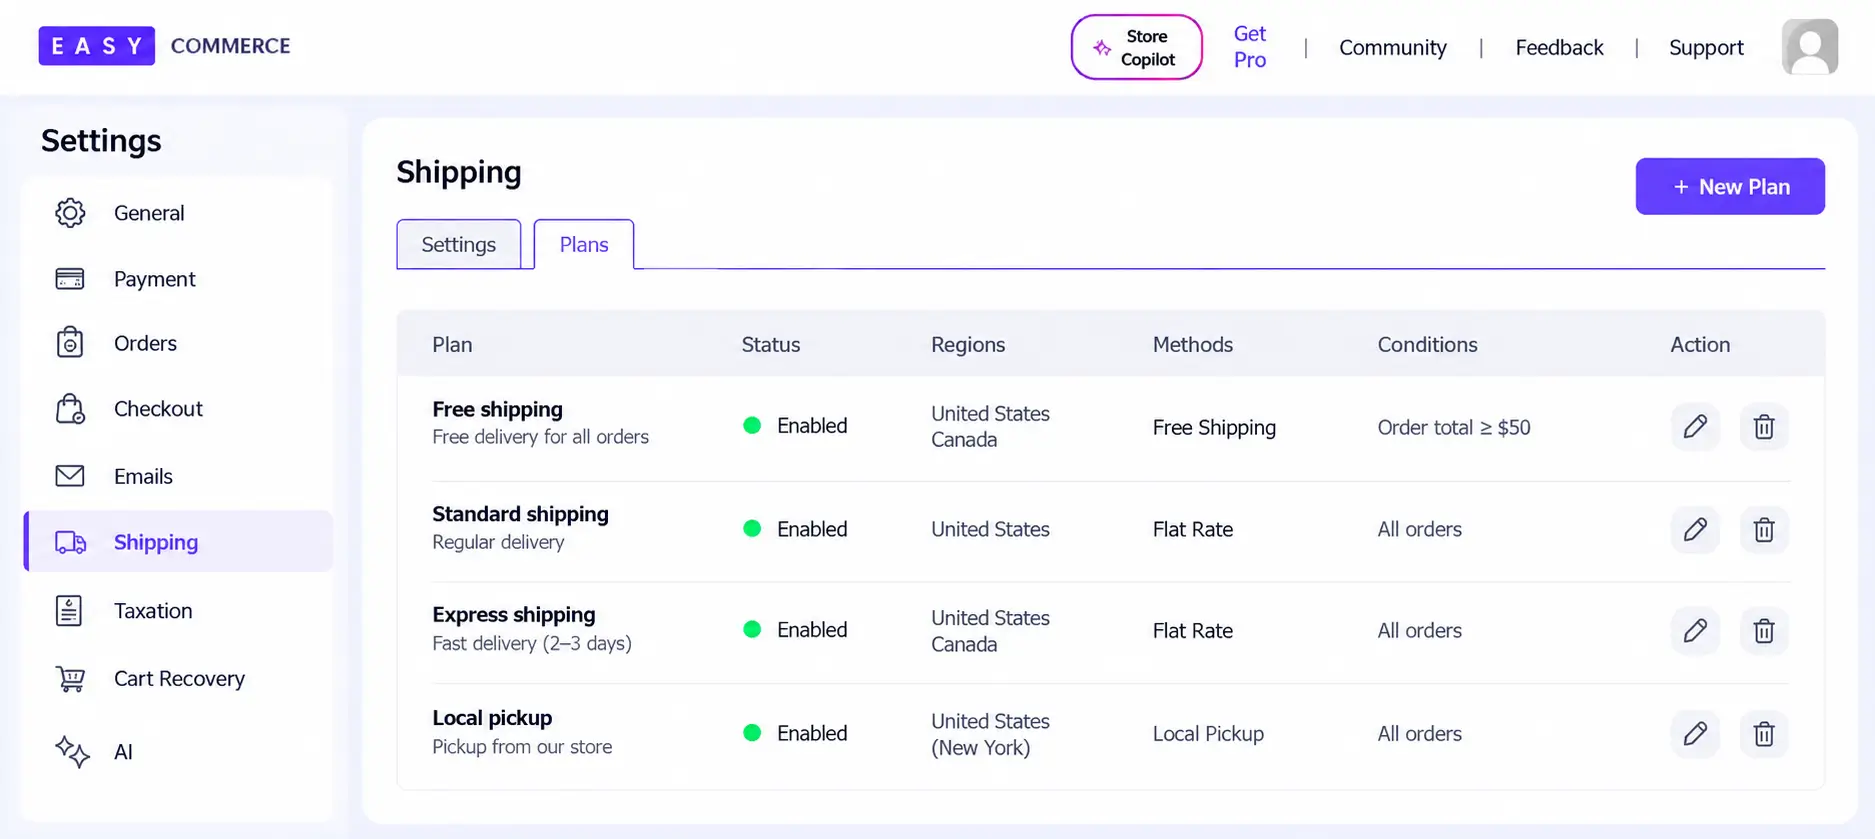
For physical products, open Settings → Shipping → Settings. Select the countries you serve and save.
Then go to Plans → Add Plan and configure:
- Regions: where the plan applies.
- Calculation Base: Cart Total, Total Weight, or Item Count.
- Fee ranges: what customers pay for each applicable range.
Click Save Shipping Plan when finished.
For our tote bag store, the practical question is simple: does sending three bags cost more than sending one? Choose rules that reflect your delivery costs.
If you use weight-based shipping, enter accurate product weights. If you offer free delivery above a threshold, test an order just below and at that threshold.
Our shipping settings guide explains the available fields.
Step 7: Add the Tax Rules Your Business Needs
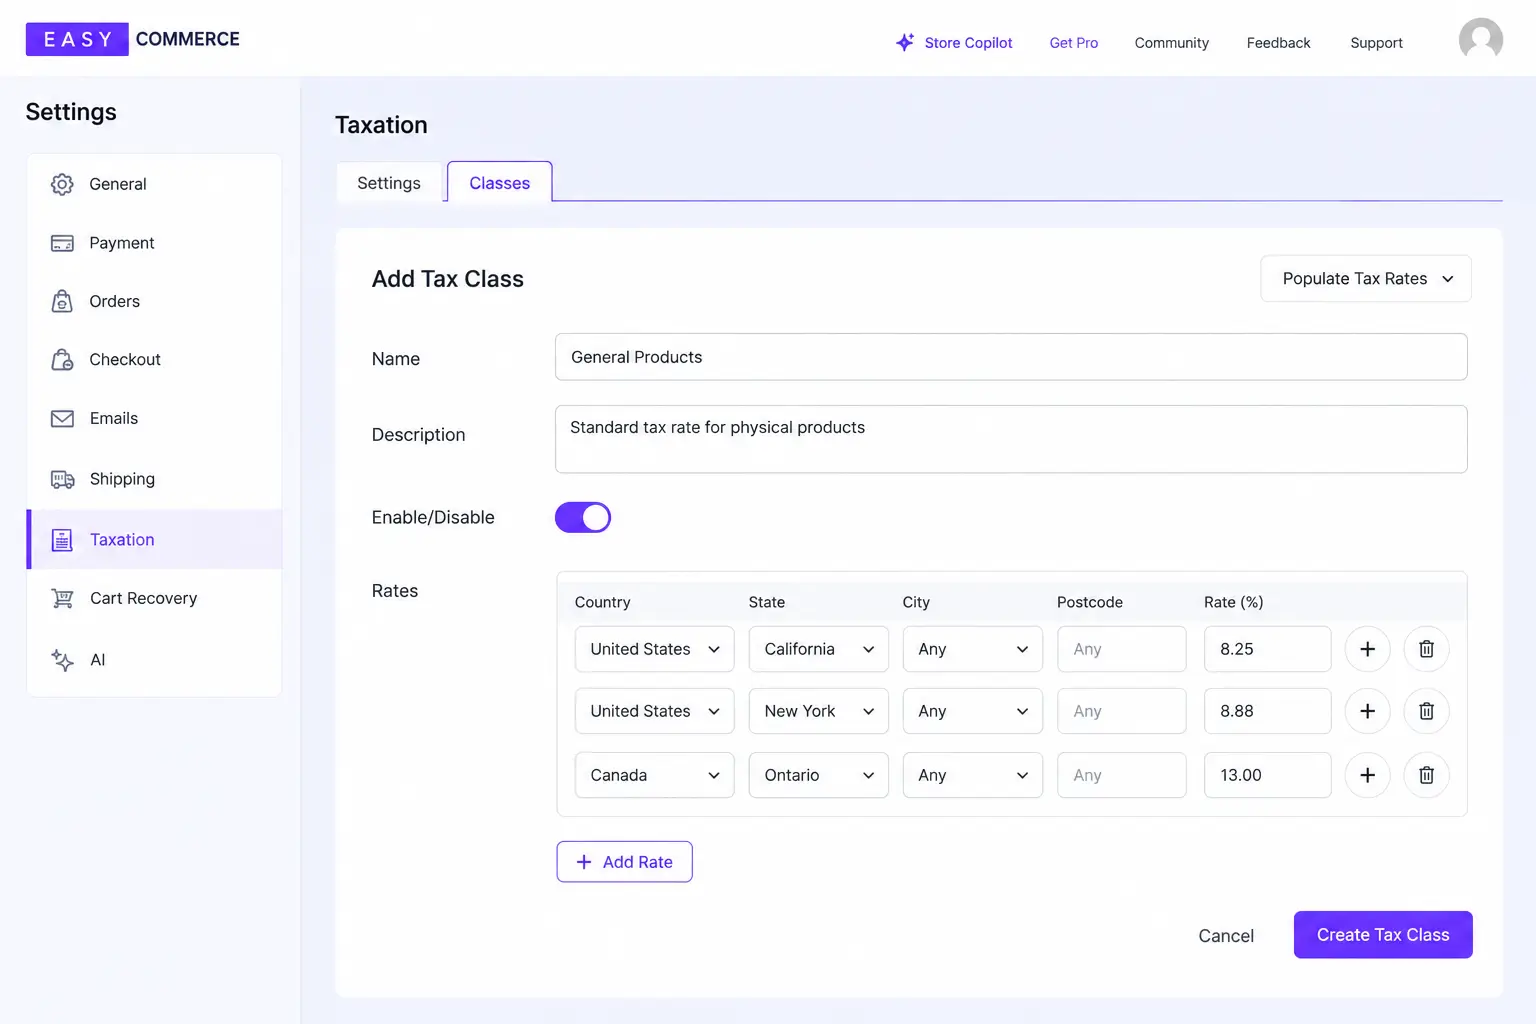
Go to Settings → Taxation → Settings, select the applicable countries, and save. Then open Classes → + Add Class.
Enter the class details, geographical coverage, and applicable rates. Set its active status and click Create Taxation. Assign the appropriate class in the product’s pricing settings.
Use our taxation guide for the configuration process. Obtain the actual rates and requirements from guidance relevant to your business.
Don’t stop at saving the rule. Enter a test address and check whether checkout calculates the intended amount.
Step 8: Make Buying Easy on a Phone
Now open the store as a shopper.
- Can you see the product clearly?
- Choose a color?
- Find the purchase button?
- Read the total without zooming?
For checkout settings, open Settings → Checkout and review the Default Checkout Template and Columns options.
There is also an Enable Direct Checkout option. Consider how customers shop before enabling it: someone buying one download may prefer a different flow from someone building a basket of products.
Use our checkout settings guide to review the controls.
Checkpoint: A customer can move from product selection to checkout comfortably on mobile.
Step 9: Answer the Questions That Stop a Purchase
Before someone buys your tote bag, they may want to know:
- When will it arrive?
- Can I return it?
- How do I contact you?
- Who is behind this store?
Create the relevant pages through WordPress → Pages → Add New Page. Include contact information, an introduction to your business, and policies appropriate to your products and selling locations.
Keep delivery and refund wording consistent with what customers see at checkout. Link the pages from your navigation or footer.
Step 10: Complete a Test Order Before Launch
This is the step that tells you whether the store is ready.
Using your payment provider’s sandbox, buy the product from start to finish. Then open Store → Orders and select View to inspect the order.
| Test | Pass condition |
| Select a variation | The correct option and price appear |
| Change quantity | The total updates correctly |
| Enter an address | Shipping and tax match your rules |
| Complete payment | The provider reports the expected test result |
| Open the order | Products, customer details, and totals are correct |
| Check email | The confirmation arrives with accurate information |
| Test a download, if applicable | The paid-order flow provides the correct file |
Repeat the purchase flow on mobile. Also test an unsuccessful payment to see whether the customer receives a useful message.
When everything works, configure the correct live payment credentials, turn off payment test mode, and switch Store Mode to Live. Open the website while logged out to confirm public access.
What Do EasyCommerce Users Say?
Two short excerpts from WordPress.org reviews offer a perspective beyond our feature list.
“Very easy to set up and use, even without advanced technical skills.”
By SEO Coder
Read the WordPress.org review
“It’s rare to find an ecommerce plugin that balances power and simplicity this well.”
By Mehraz Morshed
Read the WordPress.org review
How Much Should You Budget to Start?
The simplest setup may be: WordPress + EasyCommerce + domain + hosting + payment gateway
That is enough to get a functional store online. You may choose to spend more later on:
- Premium ecommerce features
- Better hosting
- Email marketing
- SEO tools
- Analytics
- Product photography
- Advertising
- Professional design
- Custom development
The key is not to purchase everything before you know what the business needs.
Start with the essentials. Once customers begin using the store, you will have much better information about where additional investment can actually help.
Final Words: Your First Goal Is One Successful Order
You don’t need a huge catalog or a perfect homepage to begin.
You need a product customers understand, a checkout that works, and a reliable way to deliver what they buy.
Build that first. Then expand your catalog and improve the store using actual customer questions and feedback.
Download EasyCommerce Free and Build Your First Product Page →
Frequently Asked Questions
No. EasyCommerce is a standalone WordPress ecommerce plugin. You can install it without WooCommerce.
No. Product limits and server resources are different. A growing catalog, large image library, or higher traffic may eventually require more hosting capacity.
You can enter product information and configure the store manually. AI tools can help with tasks such as writing product content, but their usage runs on credits.
Yes. EasyCommerce supports physical, digital, and hybrid products. Test a mixed cart before launch to check shipping charges and access to purchased files.