


EasyCommerce AI allows your customers to chat with your shopping assistant directly through Facebook Messenger. Instead of visiting your website, customers can find your Facebook Page, send a message, and the AI agent will help them browse products, check inventory, and even place orders—all within Messenger.
What you’ll need before starting:
- A Facebook Business Page (or ability to create one)
- Admin access to your Facebook Page
- Access to your EasyCommerce store settings
- A few minutes to set up the integration
Here’s how to set up Facebook Messenger integration:
Step 1: Create a Facebook App
First, you’ll create a new Facebook App that will act as the bridge between Messenger and your store.
- Go to developers.facebook.com and log in with your Facebook account
- Click My Apps in the top right corner
- Click the blue Create App button
- A pop-up will appear asking you to select a use case. Choose “Engage with customers on Messenger from Meta”; this is the option that enables Messenger integration.
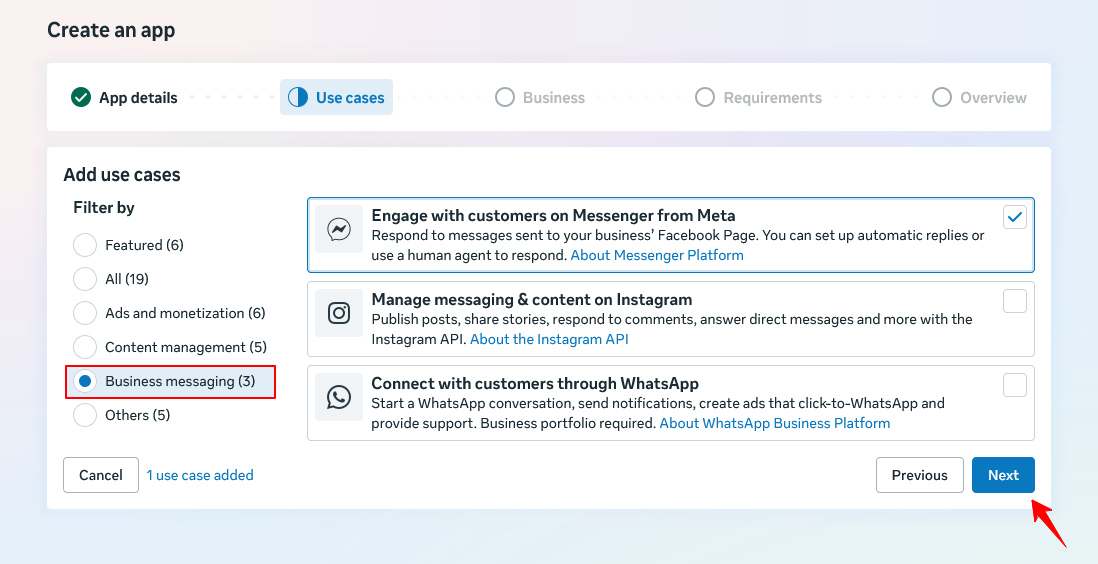
- Click Next to proceed
- Give your app a name (e.g.,
Store Bot,EasyCommerce Assistant, or your store name) in the App name field
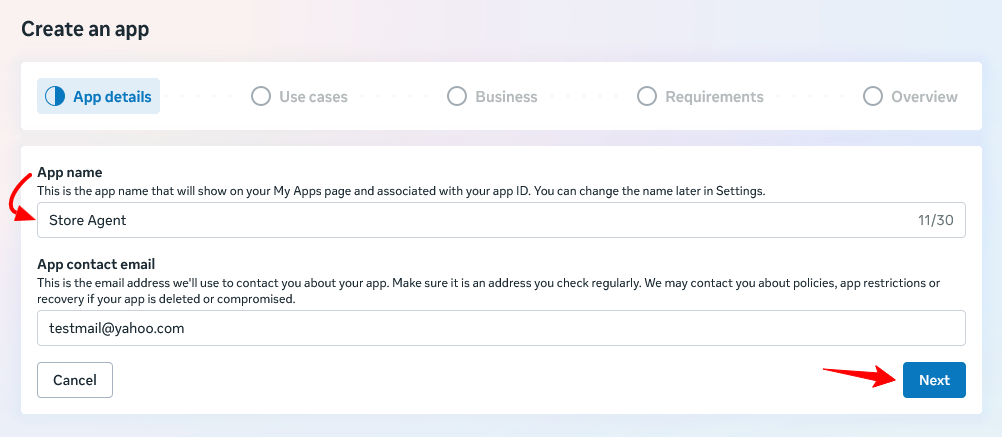
- Click Create App at the bottom
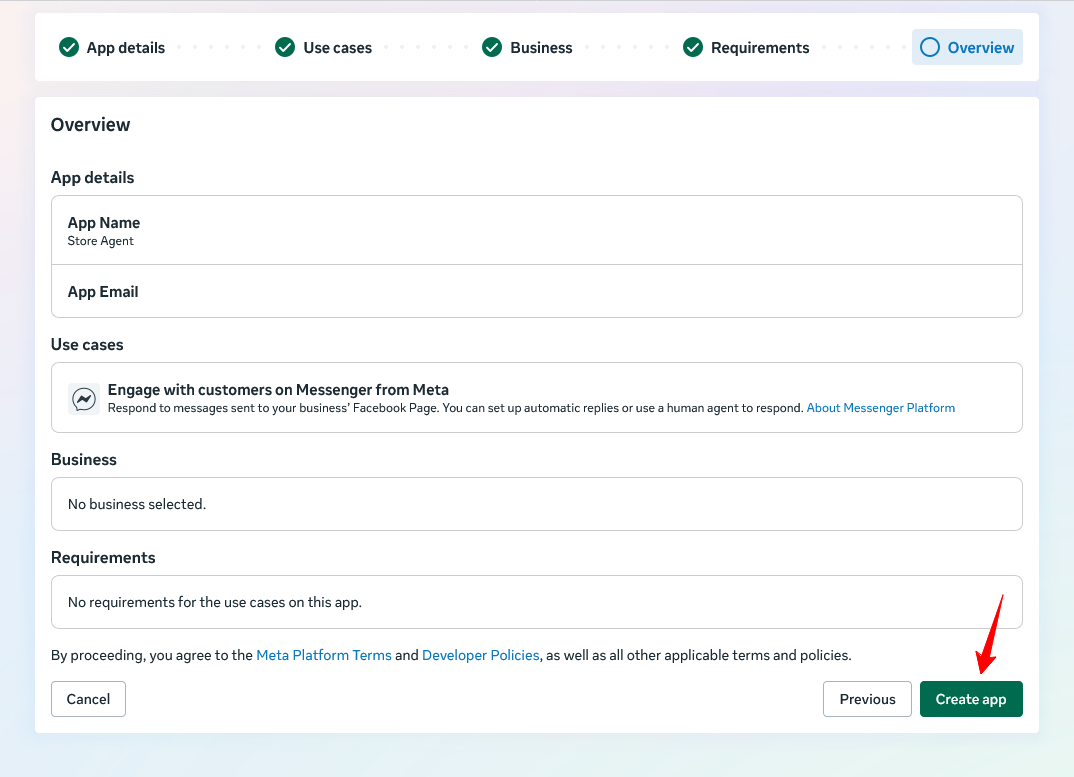
The app dashboard will now load. You’ll see the app ID and other tools. Keep this page open, you’ll need it throughout setup.
Step 2: Configure the Webhook in Facebook
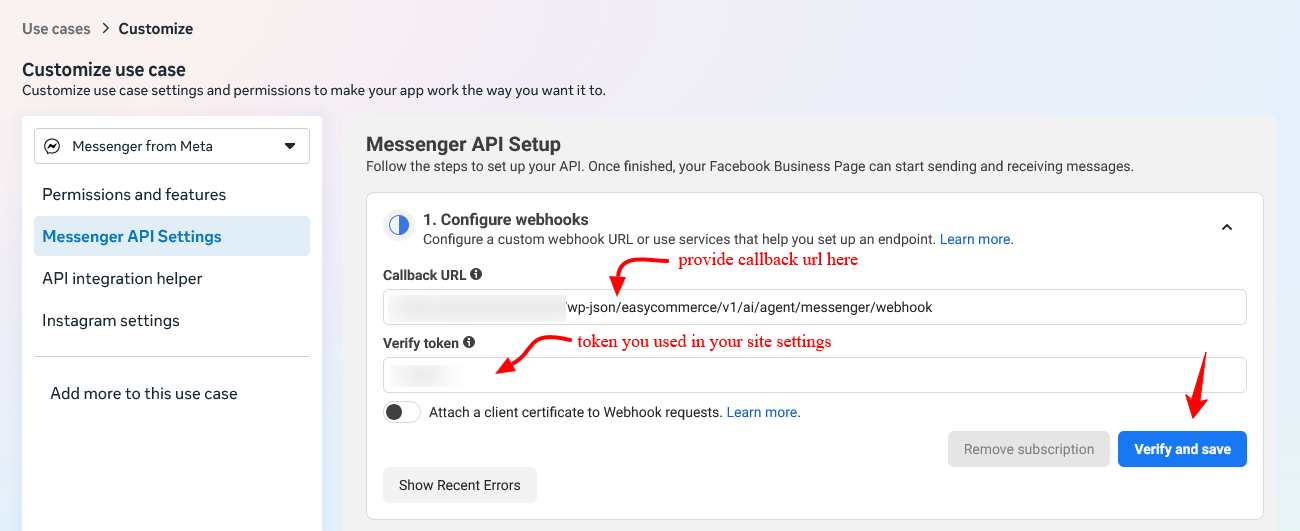
The webhook is how Facebook will send customer messages to your store. You need to tell Facebook where to send these messages.
- In your app dashboard, look for Add Product in the left sidebar and click it
- Click the setup beside Messenger
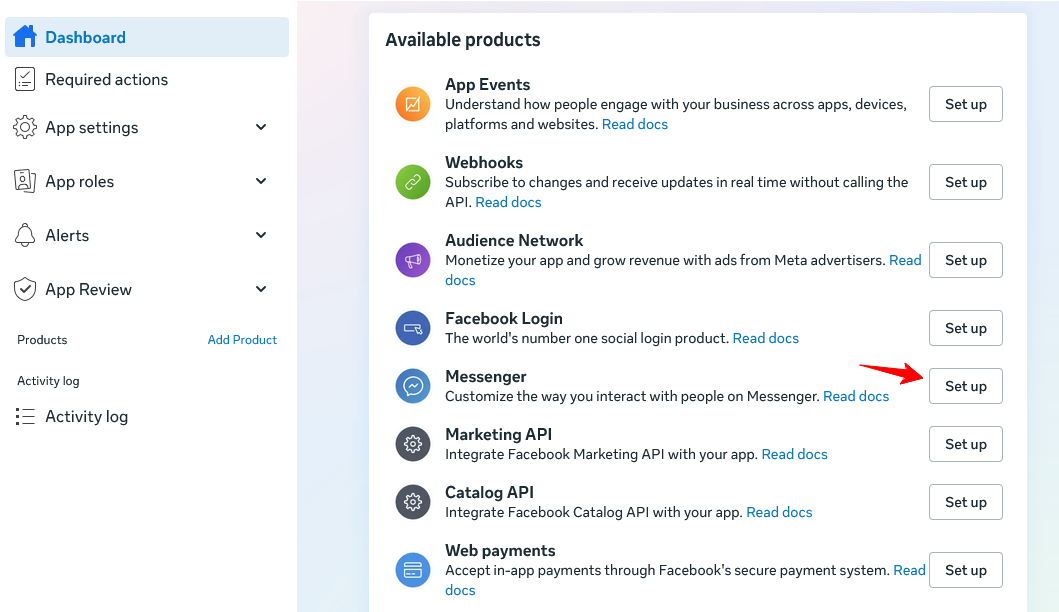
- Scroll down to find “Webhooks” section and click Add Callback URL
- Two fields will appear:
- Callback URL: This is where Facebook will send messages. Enter:
https://yoursite.com/wp-json/easycommerce/v1/messenger/webhook(replaceyoursite.comwith your actual domain) - Verify Token: Create any random secret string here. This proves to Facebook that you own the webhook URL. Example:
sdfynfuxre7r6ysdzjwezmw8eyw78(you can use any combination of letters and numbers)
- IMPORTANT: Before clicking “Verify and Save”, go to Step 3 first and save the tokens in EasyCommerce. Otherwise, Facebook’s verification will fail.
Write down both values somewhere temporary:
- Callback URL:
https://yoursite.com/wp-json/easycommerce/v1/messenger/webhook - Verify Token: (your random string)
Step 3: Save Credentials in EasyCommerce
Now you’ll enter the Facebook credentials into your EasyCommerce store settings.
- Log into your WordPress admin and go to EasyCommerce → Settings
- Click on the AI menu on the left sidebar
- Click the Agentic AI submenu
- Scroll down to the Facebook Messenger section
- Fill in the fields:
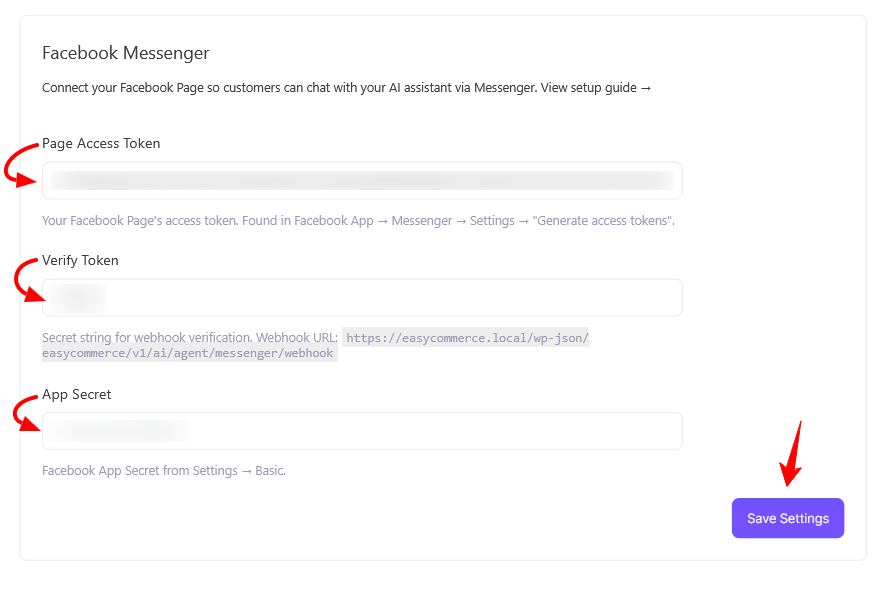
- Verify Token: Enter the same secret string you created in Step 2
- Page Access Token: Leave this blank for now – you’ll generate this in Step 4
- App Secret: Leave this blank for now – you’ll get this in Step 5
- Click Save Settings at the top right
You’ve now registered the webhook with EasyCommerce. Now you can go back to Facebook and complete the verification.
Step 4: Generate the Page Access Token
The Page Access Token allows EasyCommerce to send messages back to your customers through Messenger.
- Go back to your Facebook App dashboard (keep it open from Step 2)
- In the left sidebar, find Messenger → API→ Settings
- Scroll to the “Generate access tokens” section and click Connect
- You’ll see a dropdown labeled “Select a Page”. Click it and choose your Facebook Business Page from the list
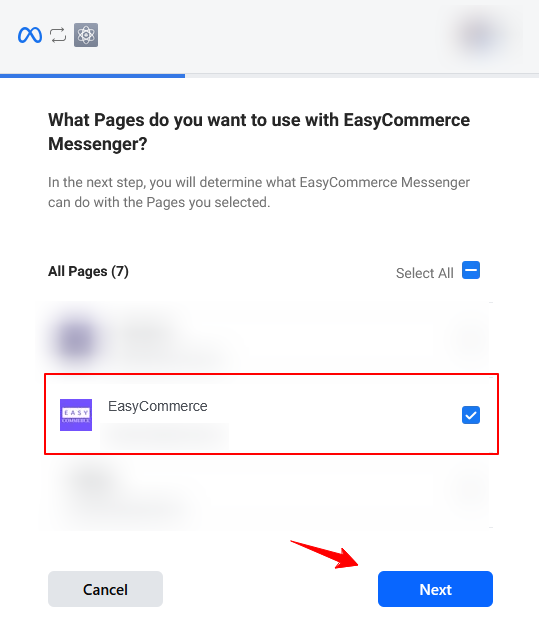
- After selecting your page, a button labeled Generate Token will appear. Click the button
- A long token string will appear. This is your Page Access Token. Click the Copy button next to it
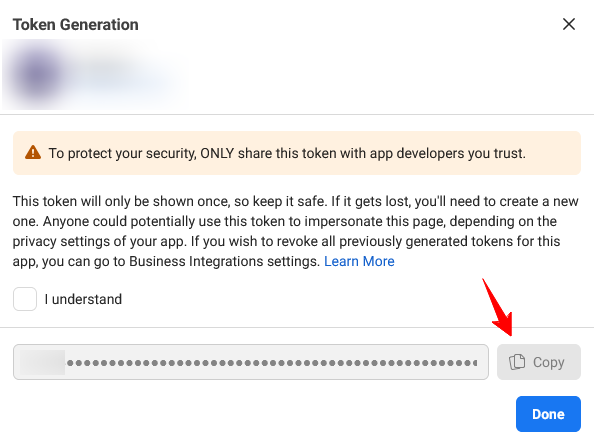
- Go back to EasyCommerce → Settings → AI → Agentic AI → Facebook Messenger section
- Paste the token into the Page Access Token field
- Click Save Settings
Step 5: Get Your App Secret
The App Secret is a security code that verifies incoming webhook messages are genuinely from Facebook.
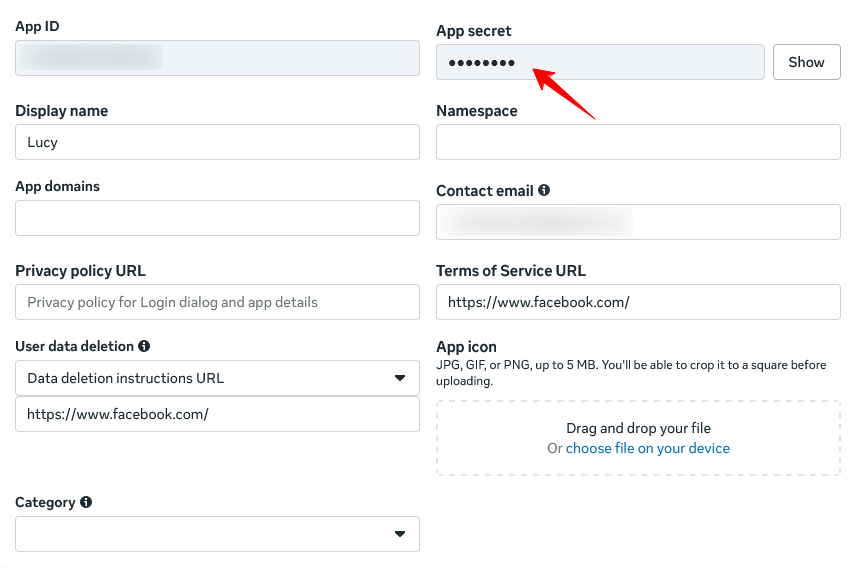
- In your Facebook App dashboard, click Settings → Basic in the left sidebar
- You’ll see a App Secret field with a hidden value. Click Show to reveal it
- Click Copy to copy the App Secret
- Go back to EasyCommerce → Settings → AI → Agentic AI → Facebook Messenger
- Paste the App Secret into the App Secret field
- Click Save Settings
Step 6: Subscribe Your Page to Messenger Events
This tells Facebook to send messages from your Page to the webhook you configured.
- Go back to your Facebook App dashboard
- Click Messenger → Settings in the sidebar
- Scroll to “Generate access tokens” section again
- You should see your Page listed with a blue Add Subscription button next to it. Click it
- A popup will appear with checkboxes for different event types. Make sure messages is checked (it should be by default)
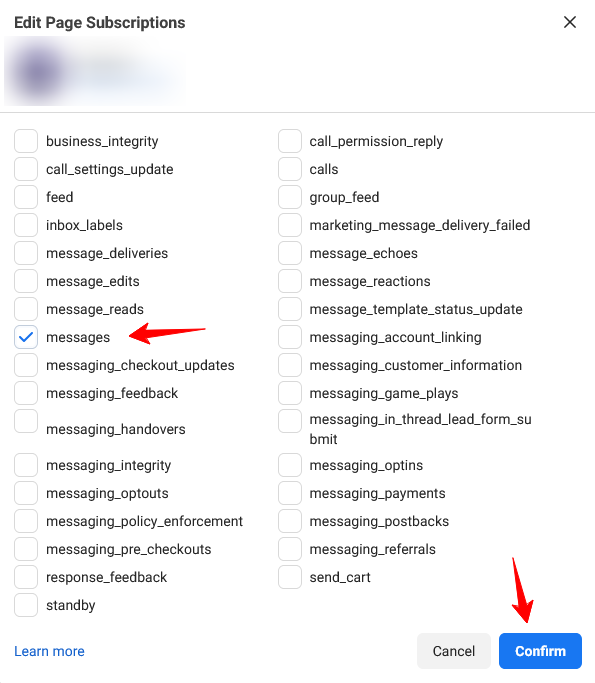
- Click Confirm to save
Step 7: Complete the Webhook Verification in Facebook
Now that EasyCommerce has your Verify Token saved, you can complete the final handshake with Facebook.
- Go back to your Facebook App dashboard and navigate to Messenger → Settings
- Scroll to Webhooks section
- You should see a Verify and Save button. Click it
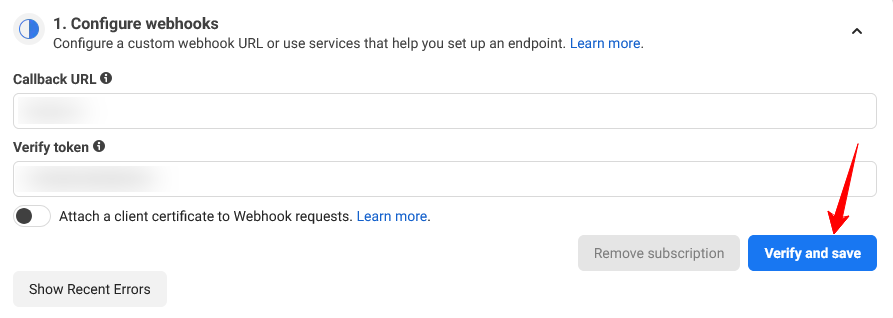
Facebook will send a verification request to your webhook URL. EasyCommerce will check the Verify Token you provided, and if it matches, the webhook will be confirmed.
If successful, you’ll see a green checkmark next to your Callback URL.
If verification fails: Go back to EasyCommerce Settings → AI → Agentic AI and double-check that the Verify Token matches exactly what you entered in Facebook (case-sensitive).
Step 8: Test the Integration
Now it’s time to test that everything works!
Important: Your app is in Development Mode. This means only accounts with Admin, Developer, or Tester roles on the Facebook App can chat with the bot. Public users cannot interact with it yet.
To test:
- Make sure you have Developer or Admin role on the Facebook App
- Go to your Facebook Page and send a private message to it
- Your AI shopping assistant should reply within a few seconds with a greeting or response
If you don’t get a reply:
- Check your EasyCommerce AI credit balance (Messenger uses 2 credits per message)
- Verify all three tokens are saved correctly in EasyCommerce Settings
- Make sure the webhook verification shows a green checkmark in Facebook
How It Works Behind the Scenes
When a customer sends a message:
- Facebook receives the message on your Page
- Facebook sends a webhook POST request to
https://yoursite.com/wp-json/easycommerce/v1/messenger/webhook - EasyCommerce verifies the request using the App Secret (HMAC signature check)
- The AI agent processes the customer’s message with full conversation history
- EasyCommerce replies via Facebook’s Graph API using your Page Access Token
- Customer receives the response in Messenger within seconds
Each customer gets their own session ID (messenger_ + their Messenger ID), so the AI remembers their conversation history across multiple messages.
Costs: Each message costs 2 AI credits. Monitor your credit balance in EasyCommerce → Settings → AI to ensure you don’t run out.
Going Public (App Review)
Right now, only your team can test the bot. To let all your customers chat with the bot on Messenger, you need to submit your app for Facebook review:
- In your Facebook App dashboard, go to App roles → Test users/permissions
- Review the pages_messaging permission — this is what lets you message users
- Submit the pages_messaging permission for App Review
- Facebook will review your app (usually takes a few hours to a few days)
- Once approved, all your followers can chat with the bot
Troubleshooting
“Verification failed” when clicking Verify and Save
- The Verify Token in Facebook doesn’t match the one in EasyCommerce Settings
- Make sure it’s exactly the same (case-sensitive)
- Clear your browser cache and try again
Bot doesn’t reply
- Check EasyCommerce → Settings → AI balance. You need at least 2 credits per message
- Confirm all three tokens are filled in: Verify Token, Page Access Token, and App Secret
- Make sure the webhook shows a green checkmark in Facebook dashboard
- Check that you have Developer/Admin role on the Facebook App
“Page Access Token” error
- The token may have expired. Go back to Step 4 and generate a new one
- Paste it into EasyCommerce and Save Settings again
Messages not being received
- Confirm your site is HTTPS and publicly accessible (not localhost)
- Check that your callback URL in Facebook exactly matches:
https://yoursite.com/wp-json/easycommerce/v1/messenger/webhook
Next Steps
- Enable Smart Search in Settings → AI → Agentic AI to help customers find products with AI-powered search
- Customize the Agent — change the name, avatar, and color to match your brand
- Monitor usage — check your AI credits regularly to ensure the bot can reply
- Read replies — customers’ messages are logged in your Messenger inbox. Respond personally when needed for support
Was this doc helpful?